
Your own load tables
Enter manufacturers' load tables with their source and date, so your parts are rated from them (Team).
A load table is a manufacturer's printed capacities for its beams (by span) or frames (by level spacing). On the Team plan and up, you can type yours into Baylogik, with the source document's title and revision, its date and where in it the figures are. The designers and your proposals then rate your parts from the row you entered, and say which row it was.
Baylogik never works a capacity out from dimensions and never interpolates between rows. Where your table doesn't cover a part, it reads Not certified and says why.
Add a table
Step 1: Open Load tables
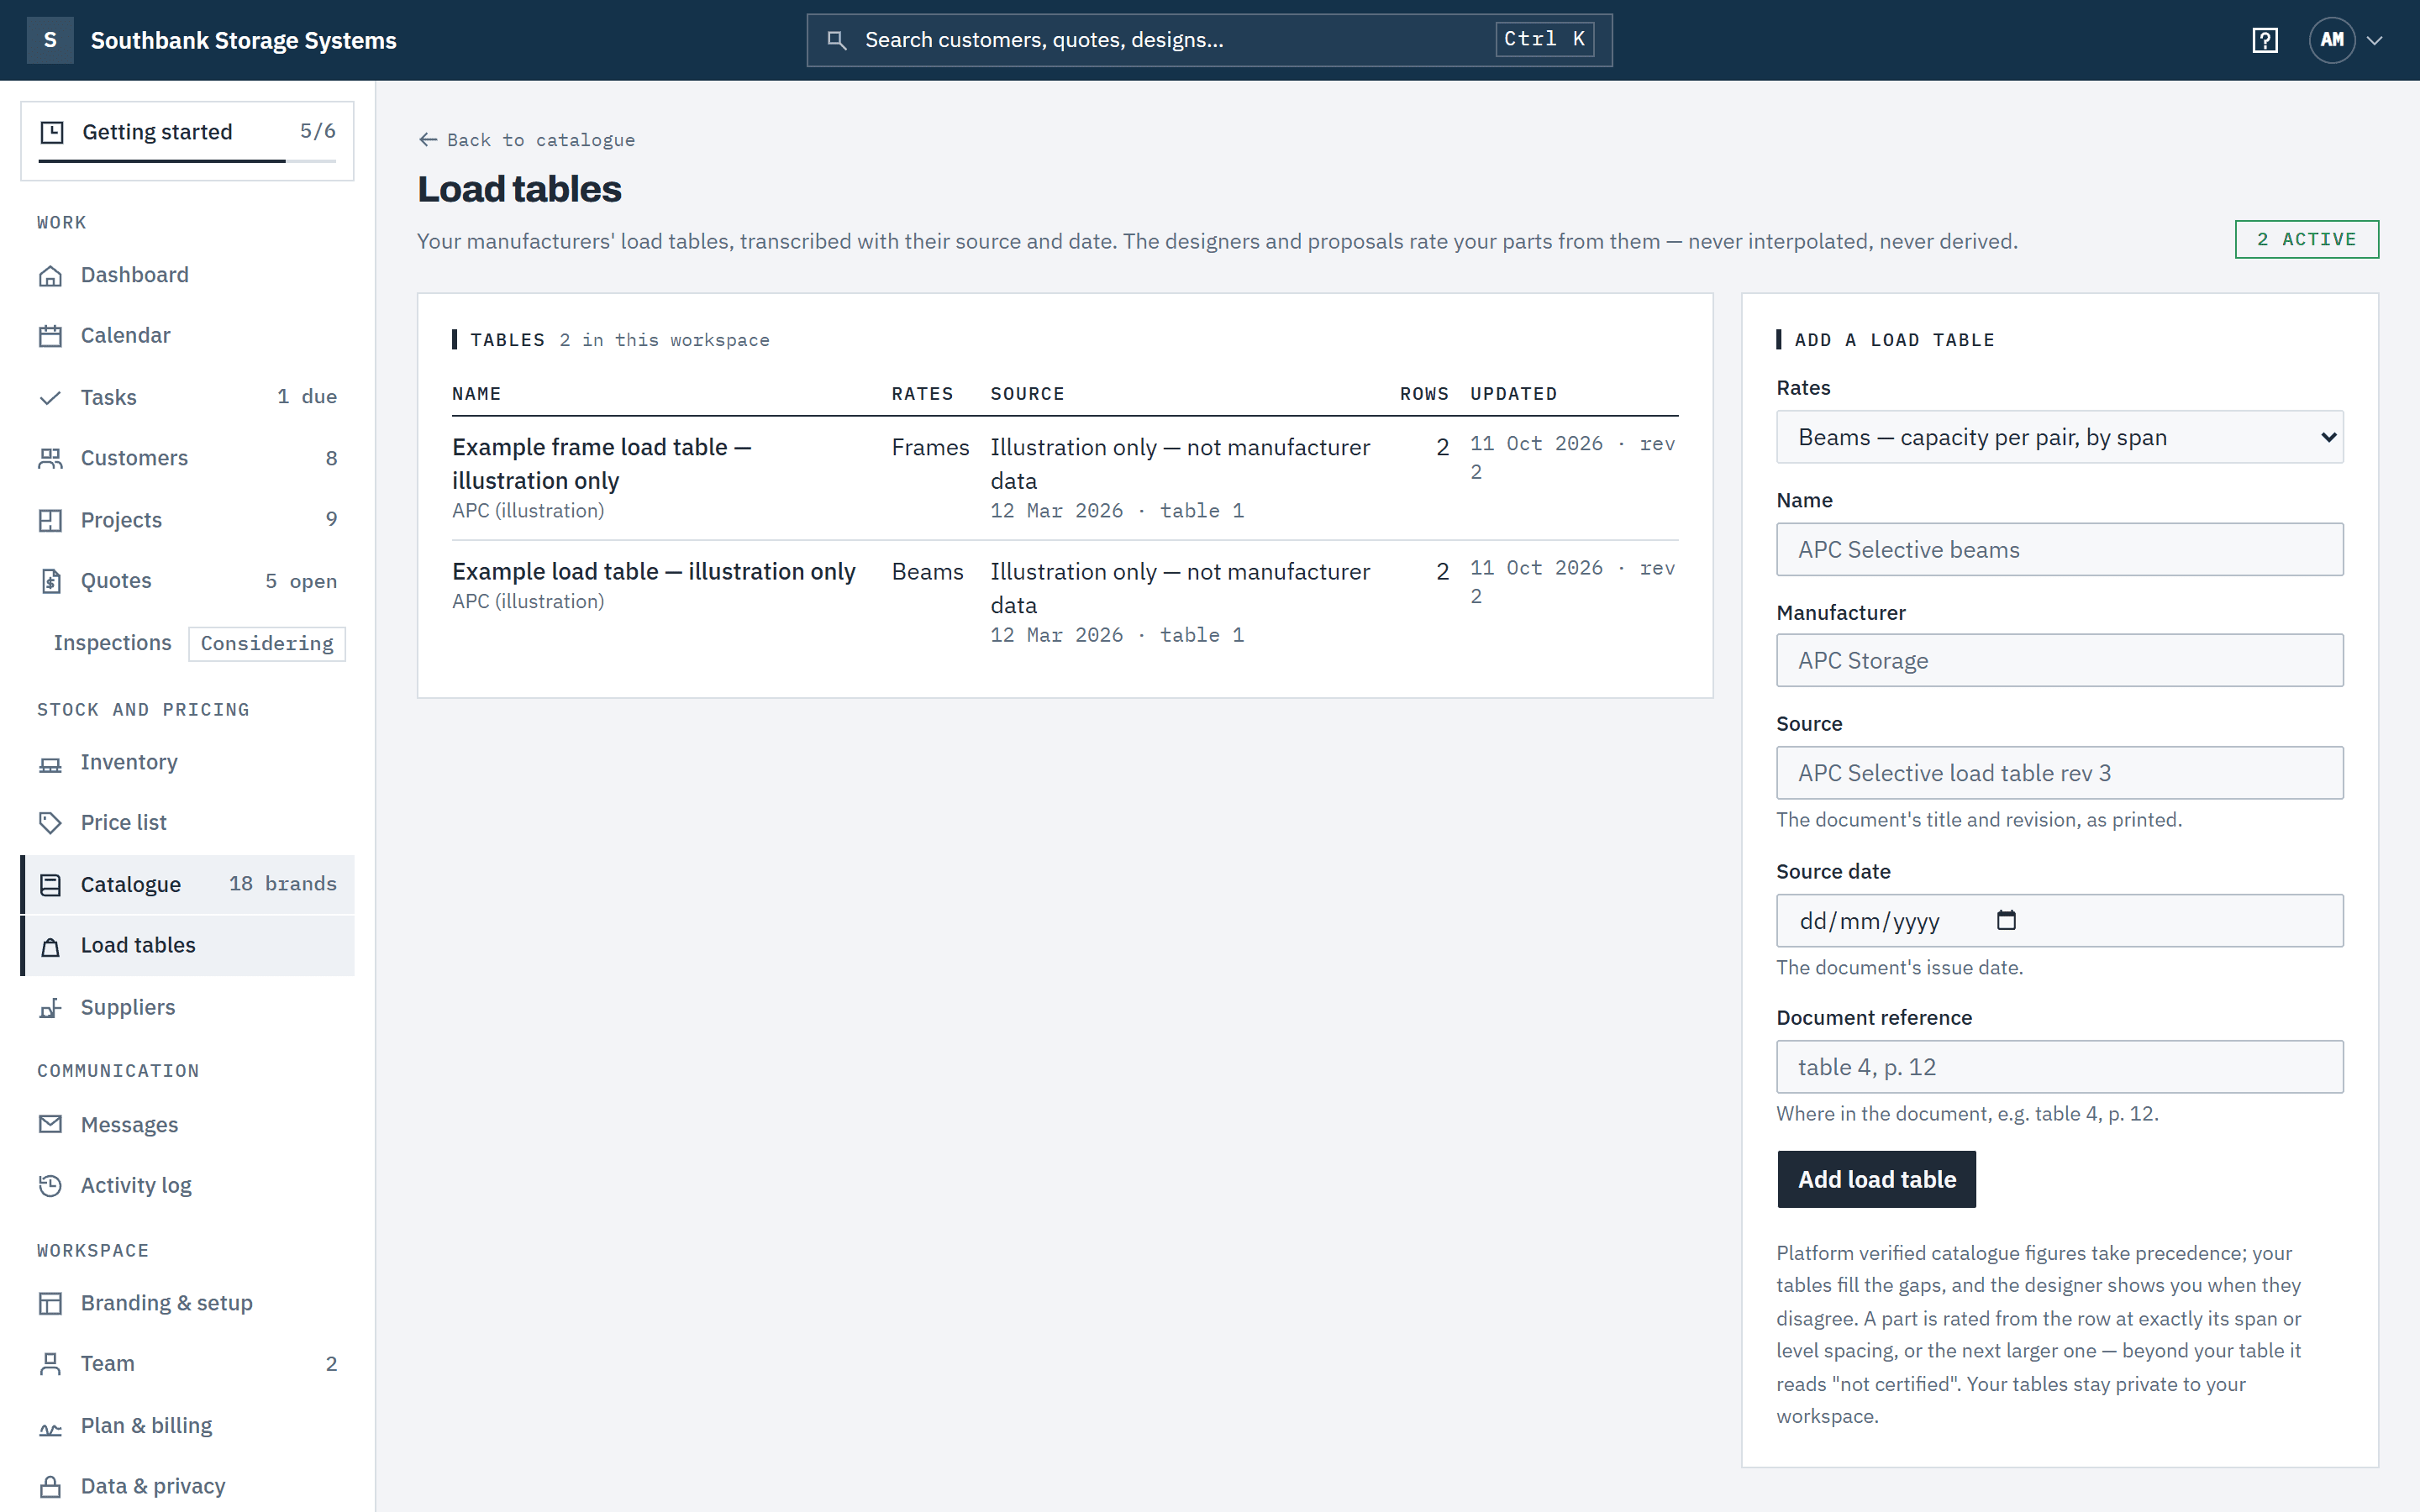
In the navigation, under Stock and pricing, choose Load tables. The list shows each table's name and manufacturer, whether it rates Beams or Frames, its source with date and reference, how many rows it holds and its revision. The pill counts the tables in use, for example 2 active.
 (opens full size in a new tab)
Load tables lists your tables with where their figures come from. (The examples are illustrations, not manufacturer data.) Step 2: Enter where the figures come from
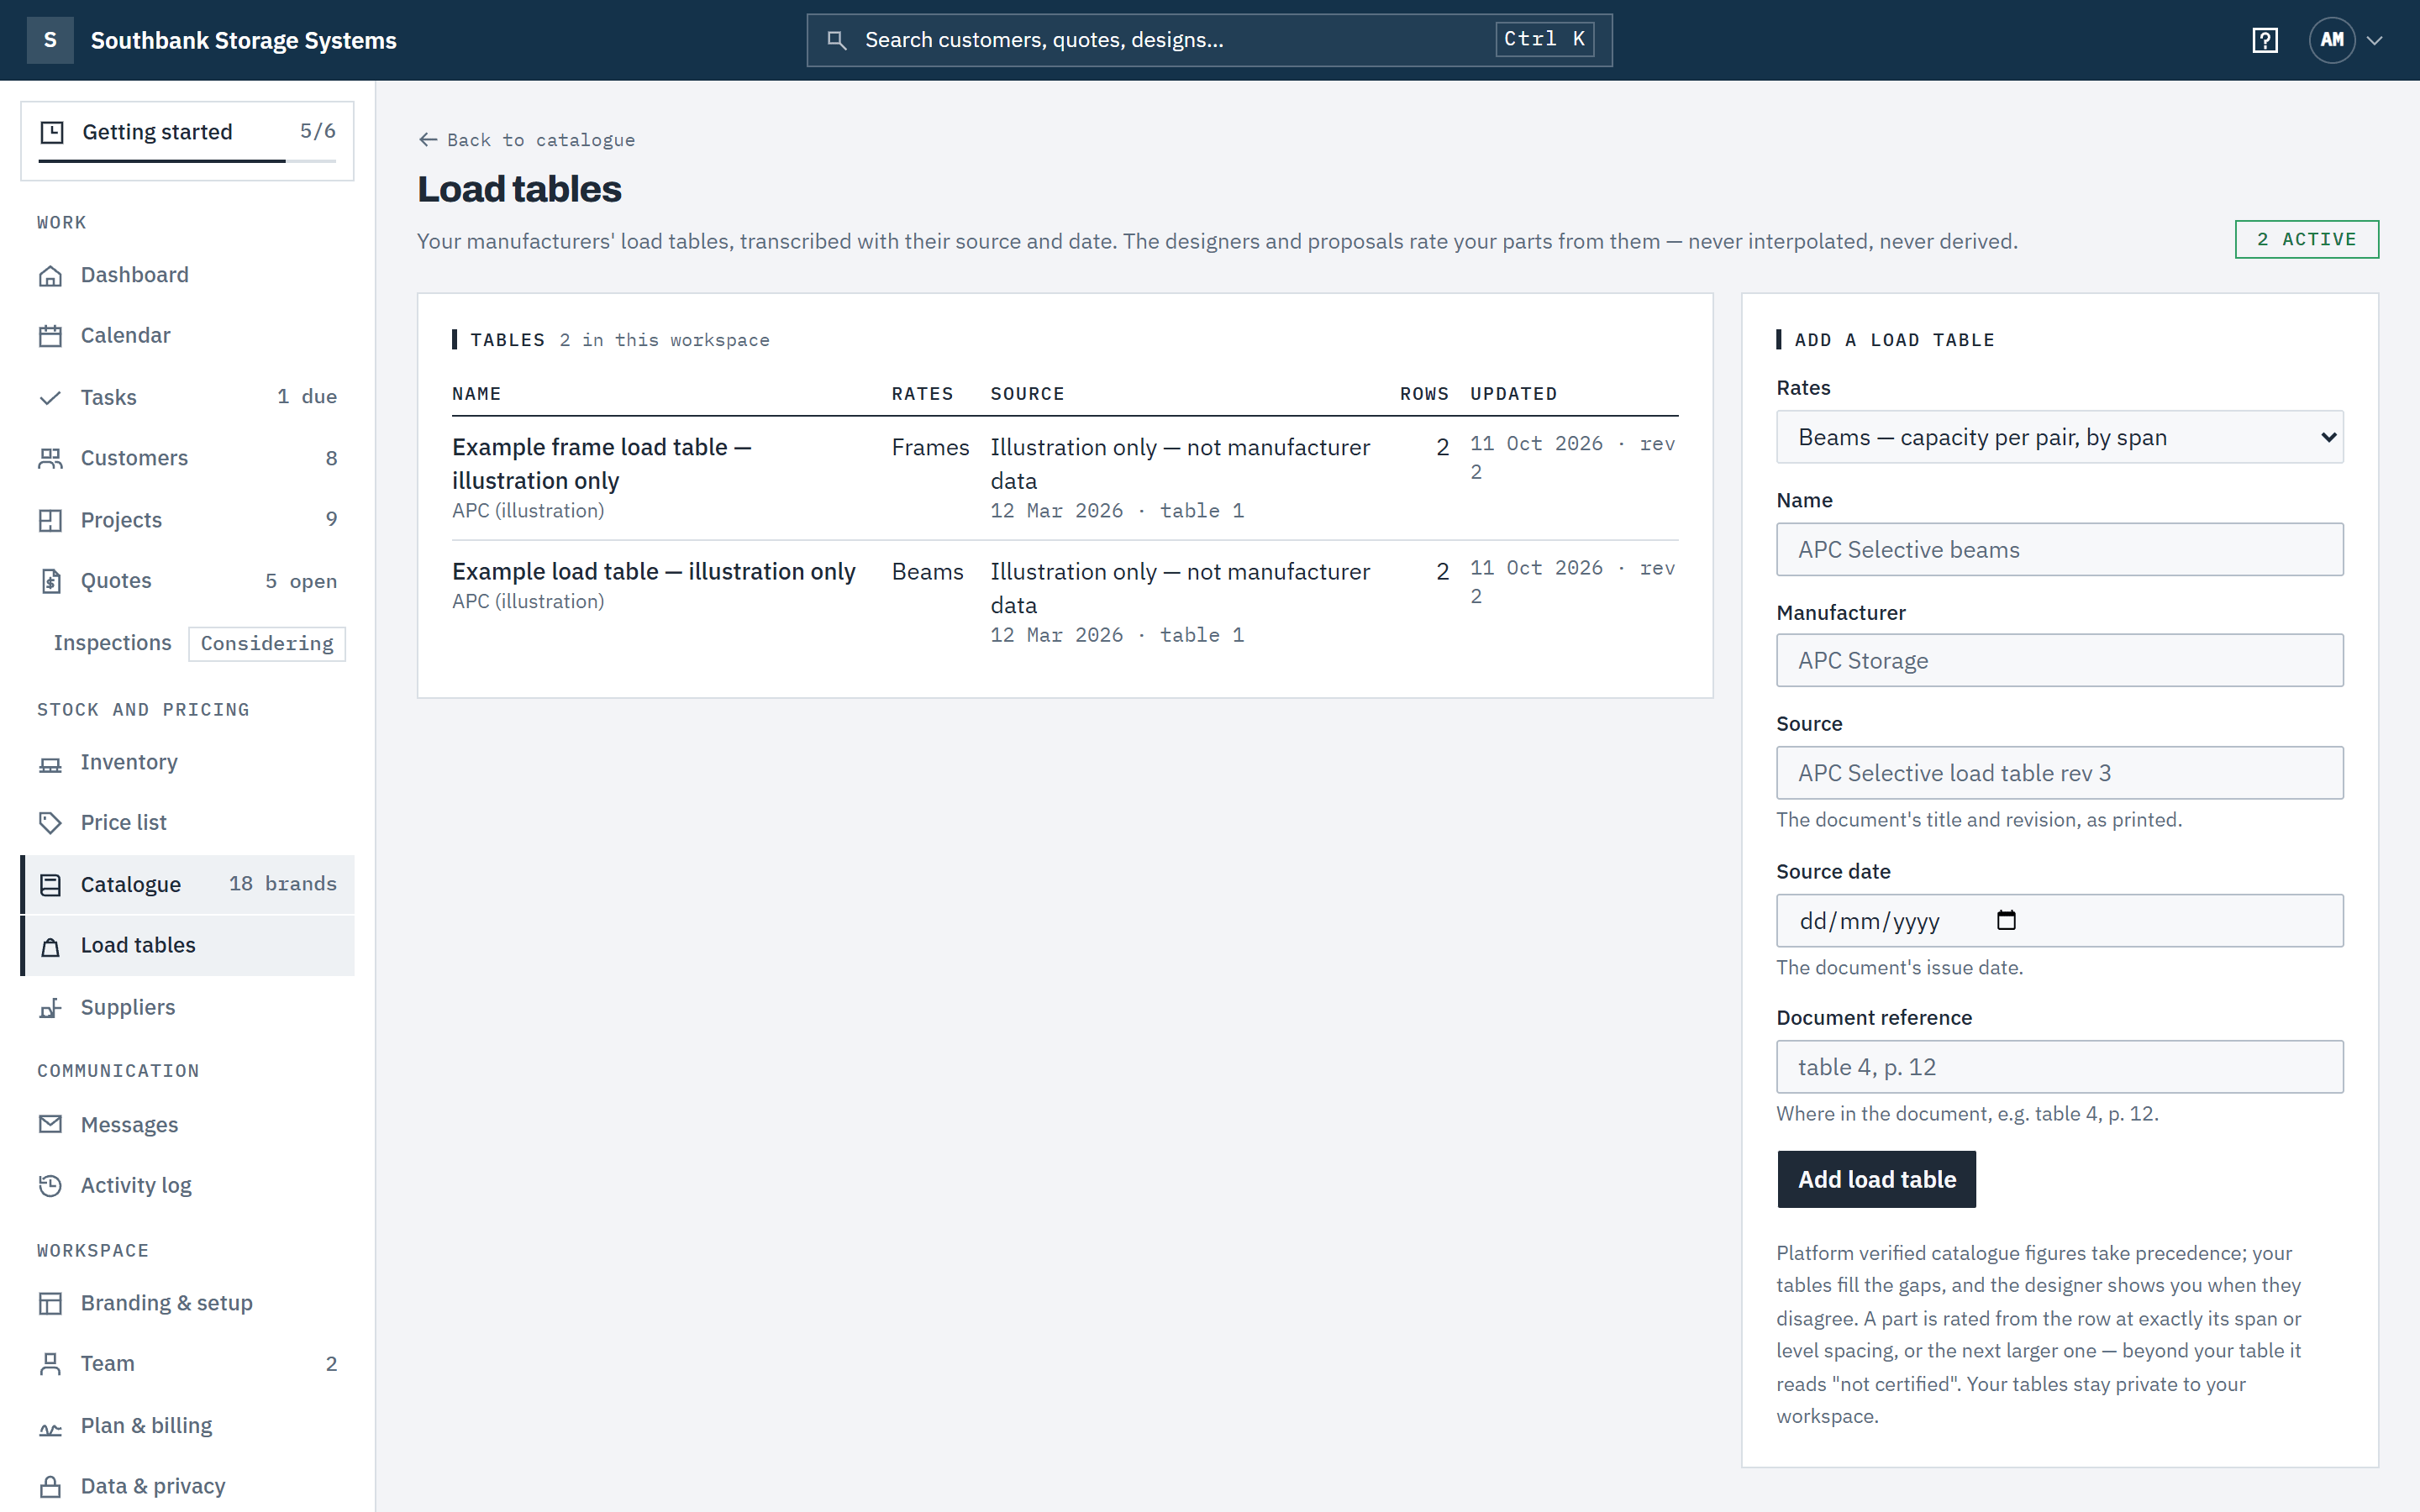
Under Add a load table, choose what it Rates: Beams — capacity per pair, by span or Frames — capacity by maximum level spacing. Then fill in all five details:
- Name and Manufacturer, for example APC Selective beams.
- Source: the document's title and revision exactly as printed, such as APC Selective load table rev 3.
- Source date: the document's issue date.
- Document reference: where in the document, such as table 4, p. 12.
Choose Add load table to open it. None of the five can be left blank: they are what every rating from this table cites.
Step 3: Attach the document, if you like
Under Document, upload the PDF, or an image of the table, up to 4 MB. It's stored encrypted, private to your workspace, and only ever downloads as a file: it never opens in the browser and your customers never see it. Replace the document swaps it for a newer one.
Enter the rows
Step 4: Type the rows, or load a CSV
Under Rows, choose Add row and pick the Product: your enabled catalogue frames or beams, and your own under {brand} · your products. Enter the Span (mm) for a beam or the Max level spacing (mm) for a frame, the Capacity (kg), the Basis (Beam pair, UDL per level, Per bay or Per frame) and an optional Note. Enter every figure exactly as printed.
For a long table, download the CSV template, fill it in and use Load a CSV. A CSV replaces the rows on screen; products match by catalogue id, or by your part number or name.
Step 5: Review and confirm as shown
Choose Review rows. Baylogik checks every row and points at anything to fix:
- spans and spacings outside 100–20 000 mm, and capacities outside 50–20 000 kg for a beam pair or 500–100 000 kg per bay or per frame (a dropped or extra zero, usually);
- a capacity that rises as the span or spacing grows. Real tables only go down, so this is almost always a typo, and the save is refused until it's fixed;
- a frame given both per-bay and per-frame figures in one table, and duplicate rows.
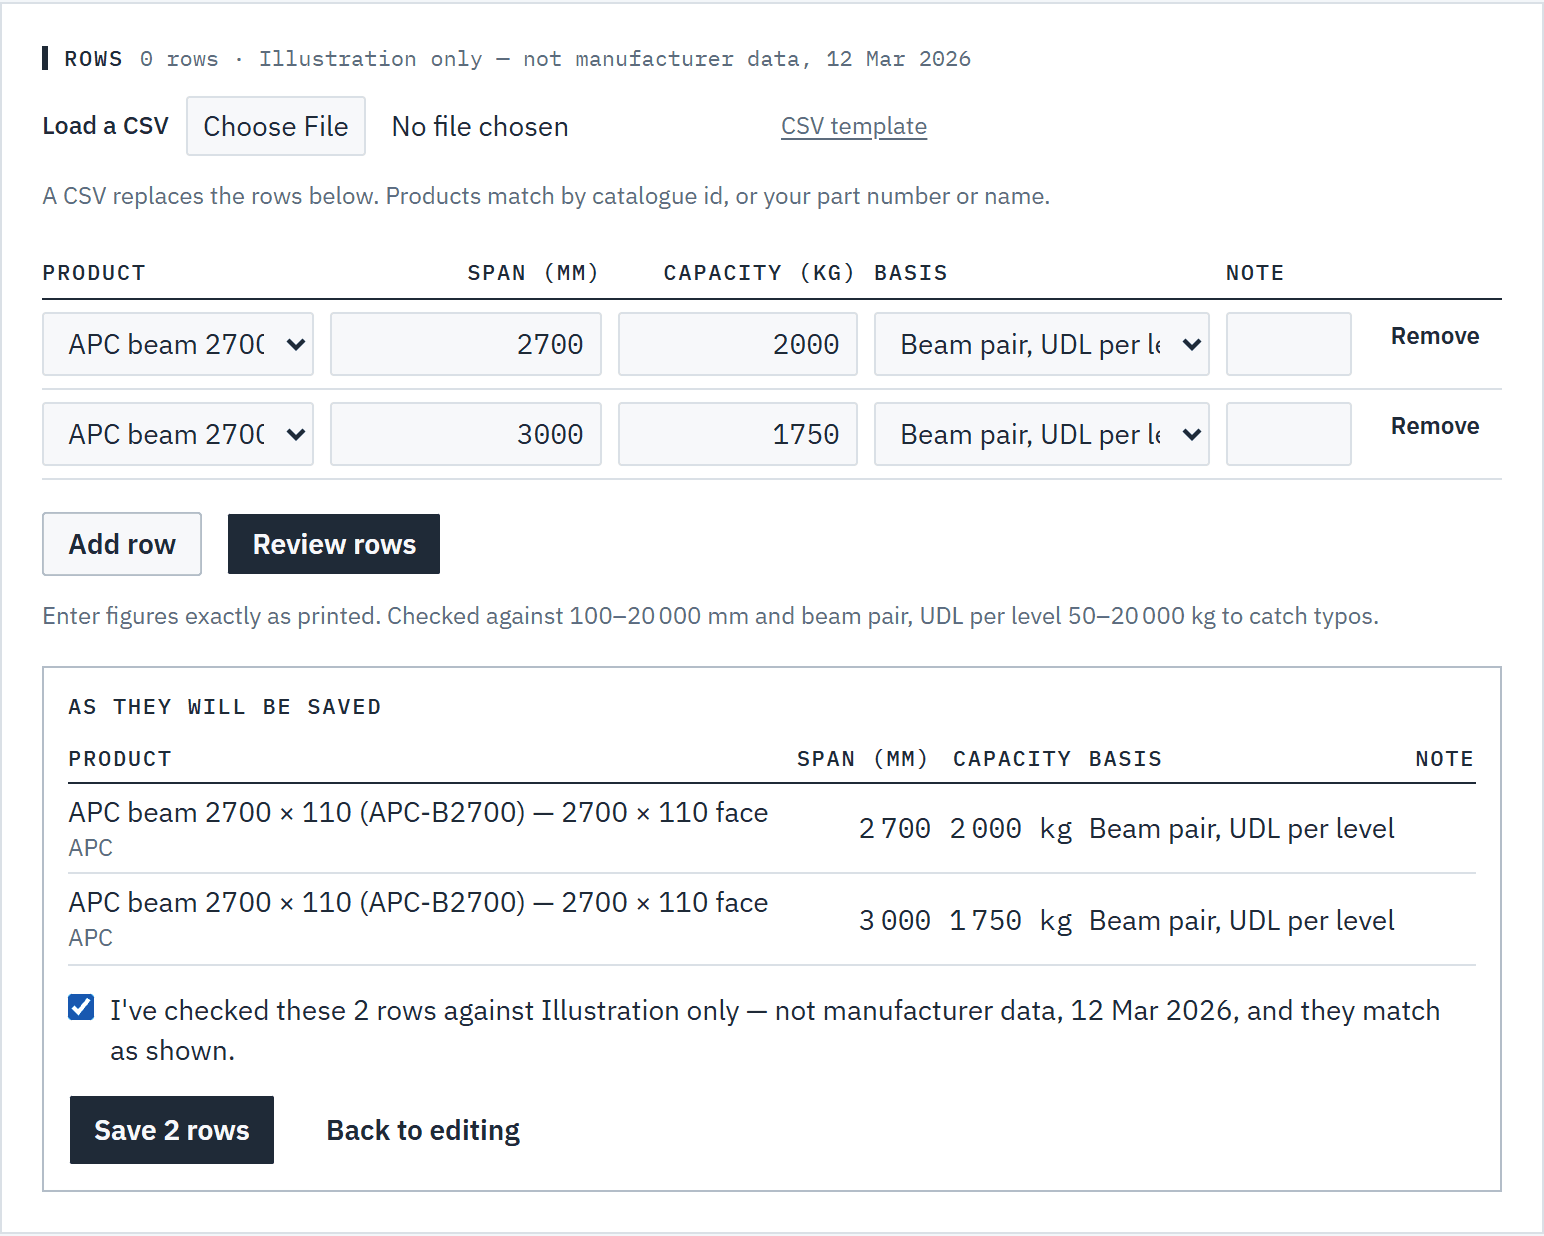
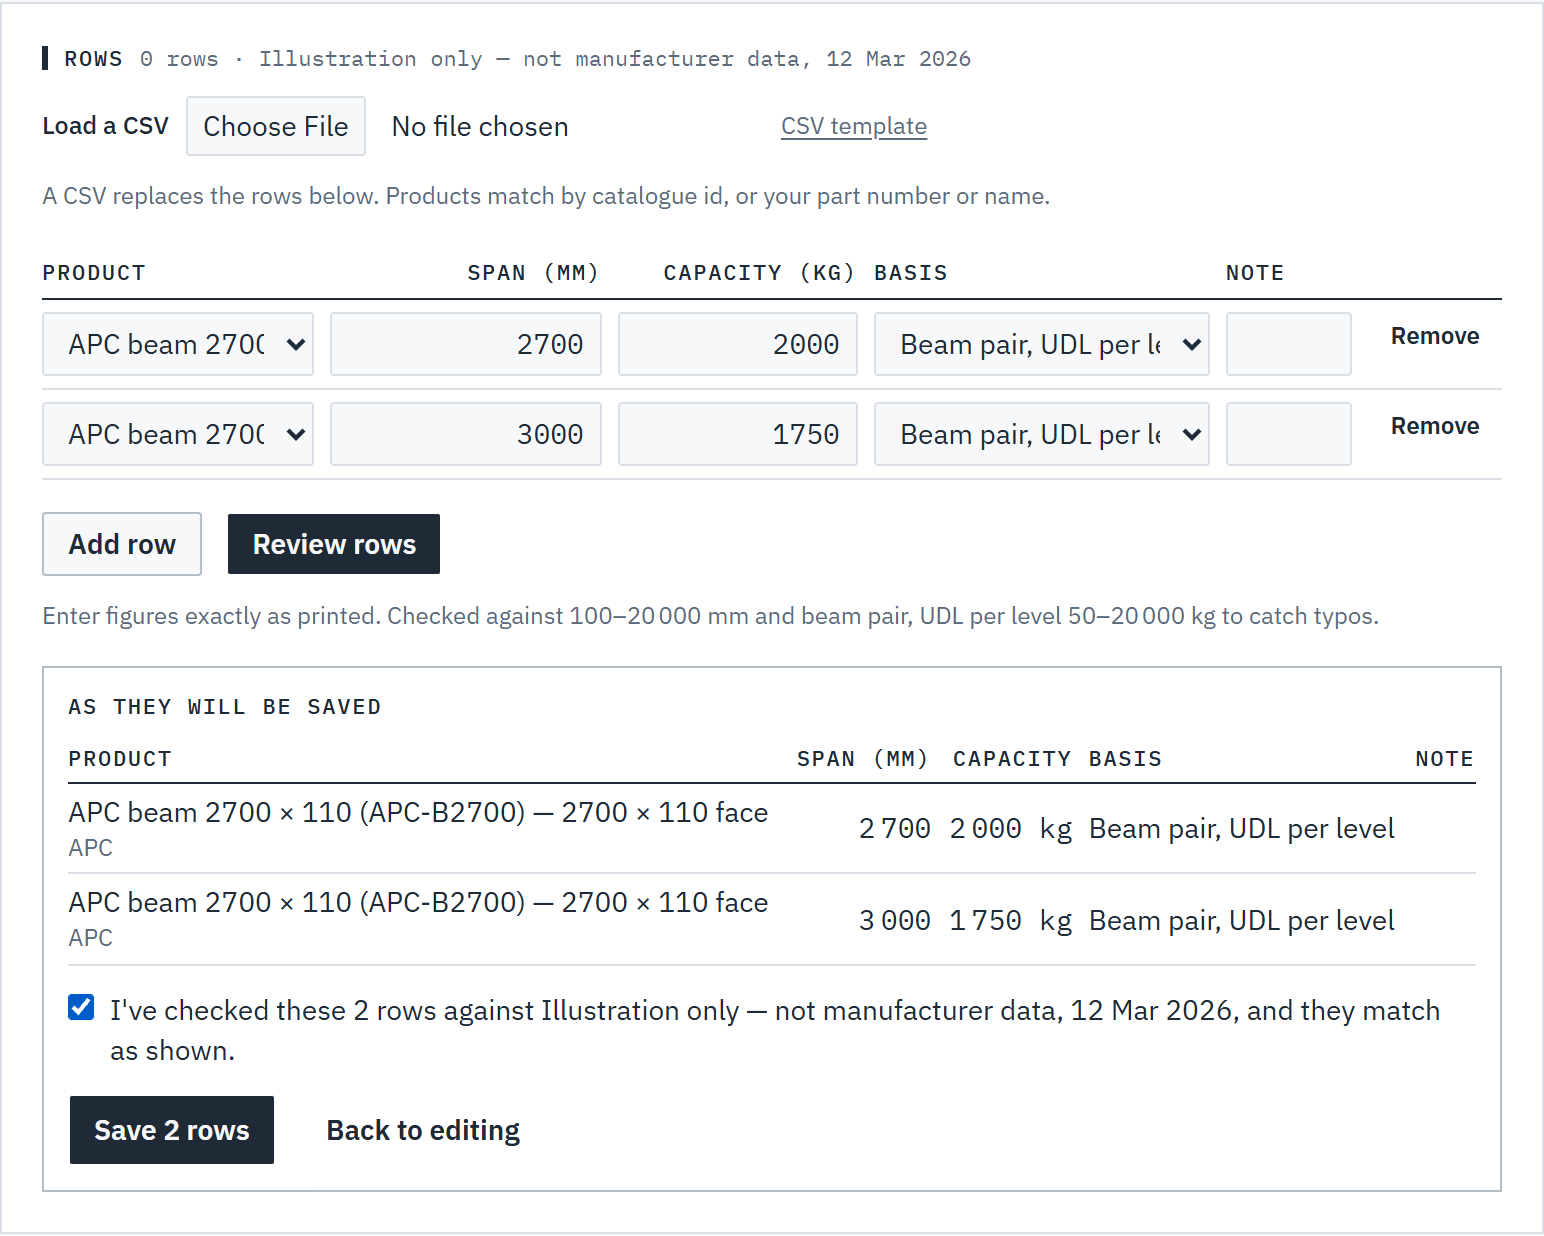
The rows then show As they will be saved. Check them against the document, tick I've checked these rows against …, and they match as shown, and choose Save. Changing anything after the review sends you back to review it again.
 (opens full size in a new tab)
Review the rows exactly as they'll be saved, confirm they match the document, then save. (The figures shown are an illustration, not manufacturer data.)
How a part is rated
Step 6: Know the lookup rule
A beam is looked up at its own clear entry. A frame is looked up at the layout's governing level spacing: the largest of the distance from the floor to the first beam and every gap between beam levels, worked out for each bay profile.
Baylogik uses the row at exactly that span or spacing. If there isn't one, it uses the next larger tabulated value, which is the conservative side. It never interpolates between rows. Beyond the largest value in your table, the part reads Not certified — outside your load table. If two tables give the same value, the lower capacity is used.
Step 7: See the rating in the designer
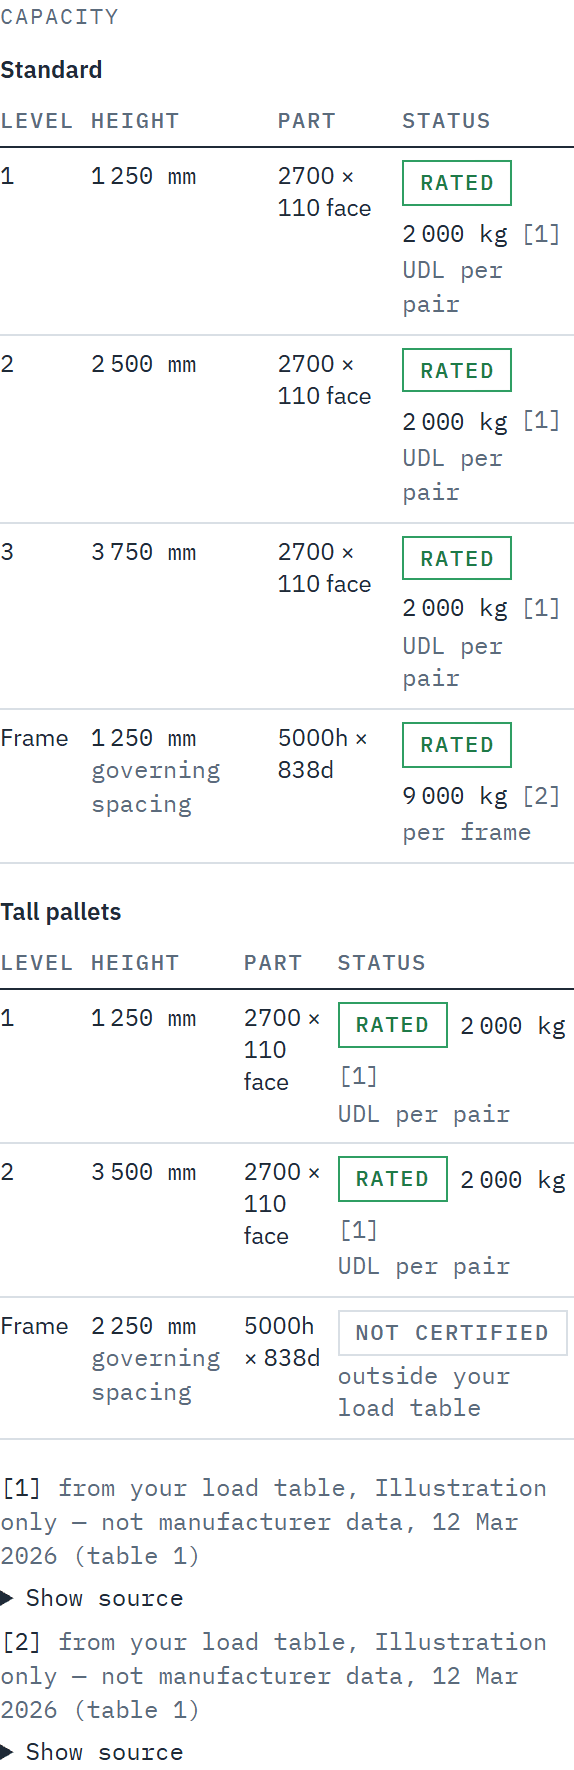
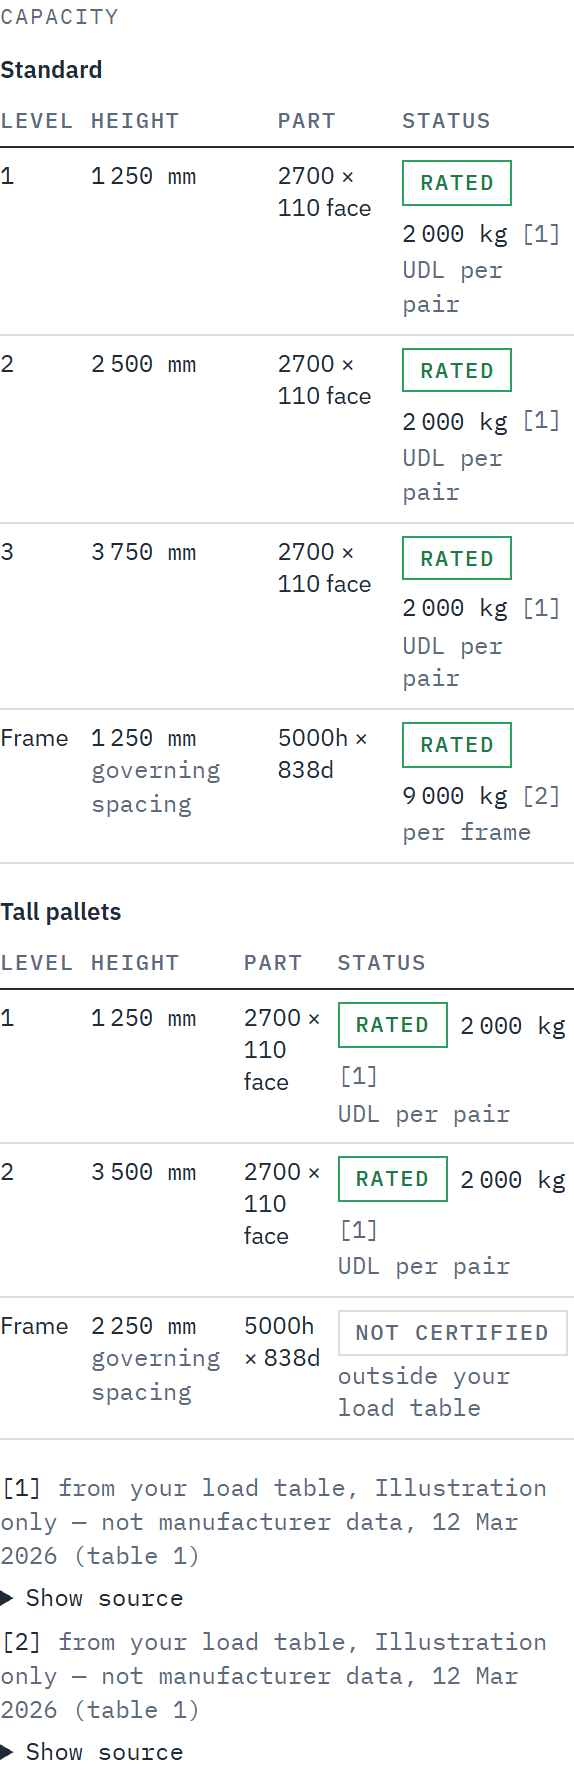
The rating names its source, for example Rated 2 000 kg UDL per pair · from your load table, APC Selective load table rev 3, 12 Mar 2026 (p. 4), and the row used, such as Row: 2 700 mm span, APC Selective beams — the next tabulated value above …. In the warehouse designer, Summary → Capacity lists each beam level and the frame at its governing spacing, profile by profile. See Design a layout.
 (opens full size in a new tab)
The designer names the table, source, date and row behind each rating. (Illustration, not manufacturer data.) Step 8: Know what your customer sees
The proposal, the online proposal and the PDF carry a Load data block with one line per rated part: the rating, the tabulated row used, the source, date and reference, and Load data supplied by {your business}, so your customer knows the figures are yours.
Parts that aren't rated keep the asterisk and the not-certified footnote. A sent quote keeps the load data it was sent with: editing or retiring a table later doesn't change it. See What your customer sees.
Good to know
- Load tables come with the Team plan and up, including the 30-day trial. On Starter the page explains what they are. Tables entered before a downgrade, or while a workspace is read-only, are kept and can be read, but aren't applied: parts read Not certified — your plan doesn't include load tables until the plan includes them again.
- Owners and admins add and change tables. Everyone who can see the catalogue can read them and download the document.
- The platform's verified catalogue figures take precedence; your tables fill the gaps. Where your table disagrees with a verified figure, the designer shows both and says which is used, so you can check which is current. Your customer only ever sees the figure used.
- Changing a table's source, date or reference re-cites every row in it, so only do that when the rows come from that document. Retire table keeps it for the record but stops it rating anything.
- A frame whose rows across your active tables mix per-bay and per-frame figures reads not certified until one table is corrected or retired: the two can't be compared.
- Your tables and documents stay in your workspace. They are never shown to other workspaces or added to Baylogik's catalogue.
- Baylogik reads your figures as you entered them; it doesn't check them against the document. Engineering sign-off, capacities and load signs stay with the manufacturer or your engineer.
- Further reading: the SafeWork NSW pallet racking fact sheet, and WorkSafe Victoria's pallet racking operation and maintenance guidance. They're written for the businesses that run racking, and are worth passing on to your customers.
Related articles
- Choose your catalogueEnable the brands you sell, and add your own frames, beams and services.
- Design a layoutRooms, racking choices, walkways and the 3D view.
- Create and send a quoteGenerate, review and send a priced, branded proposal.
- Plans, trial and billingThe 30-day trial, Starter, Team and Enterprise, seats, applying a code, and what happens when a trial ends.