
Design a layout
Rooms, racking choices, walkways and the 3D view.
The designer turns a room's dimensions into a fitted layout. You enter the room, pick a frame and beam from your catalogue, and say what has to move through the walkway. Baylogik works out the runs, bays and islands, draws the floor plan, cross-section and 3D model, and keeps a running estimate.
It flags what doesn't fit. In the container designer a frame taller than the room or a beam longer than the run is hidden, with a count; the warehouse designer lists a frame taller than the clear height, marked, and warns.
Step 1: Open the designer
From Projects, choose Open in designer on the job, or open the project and choose Start designing. To start a new job from a customer, choose + New design, name it, pick the Site and the Container / room designer (rooms up to 12 × 20 m) or Warehouse (forklift aisles and multi-row pallet racking, in beta), then Create and open. See Projects.
Step 2: Enter the room on Setup
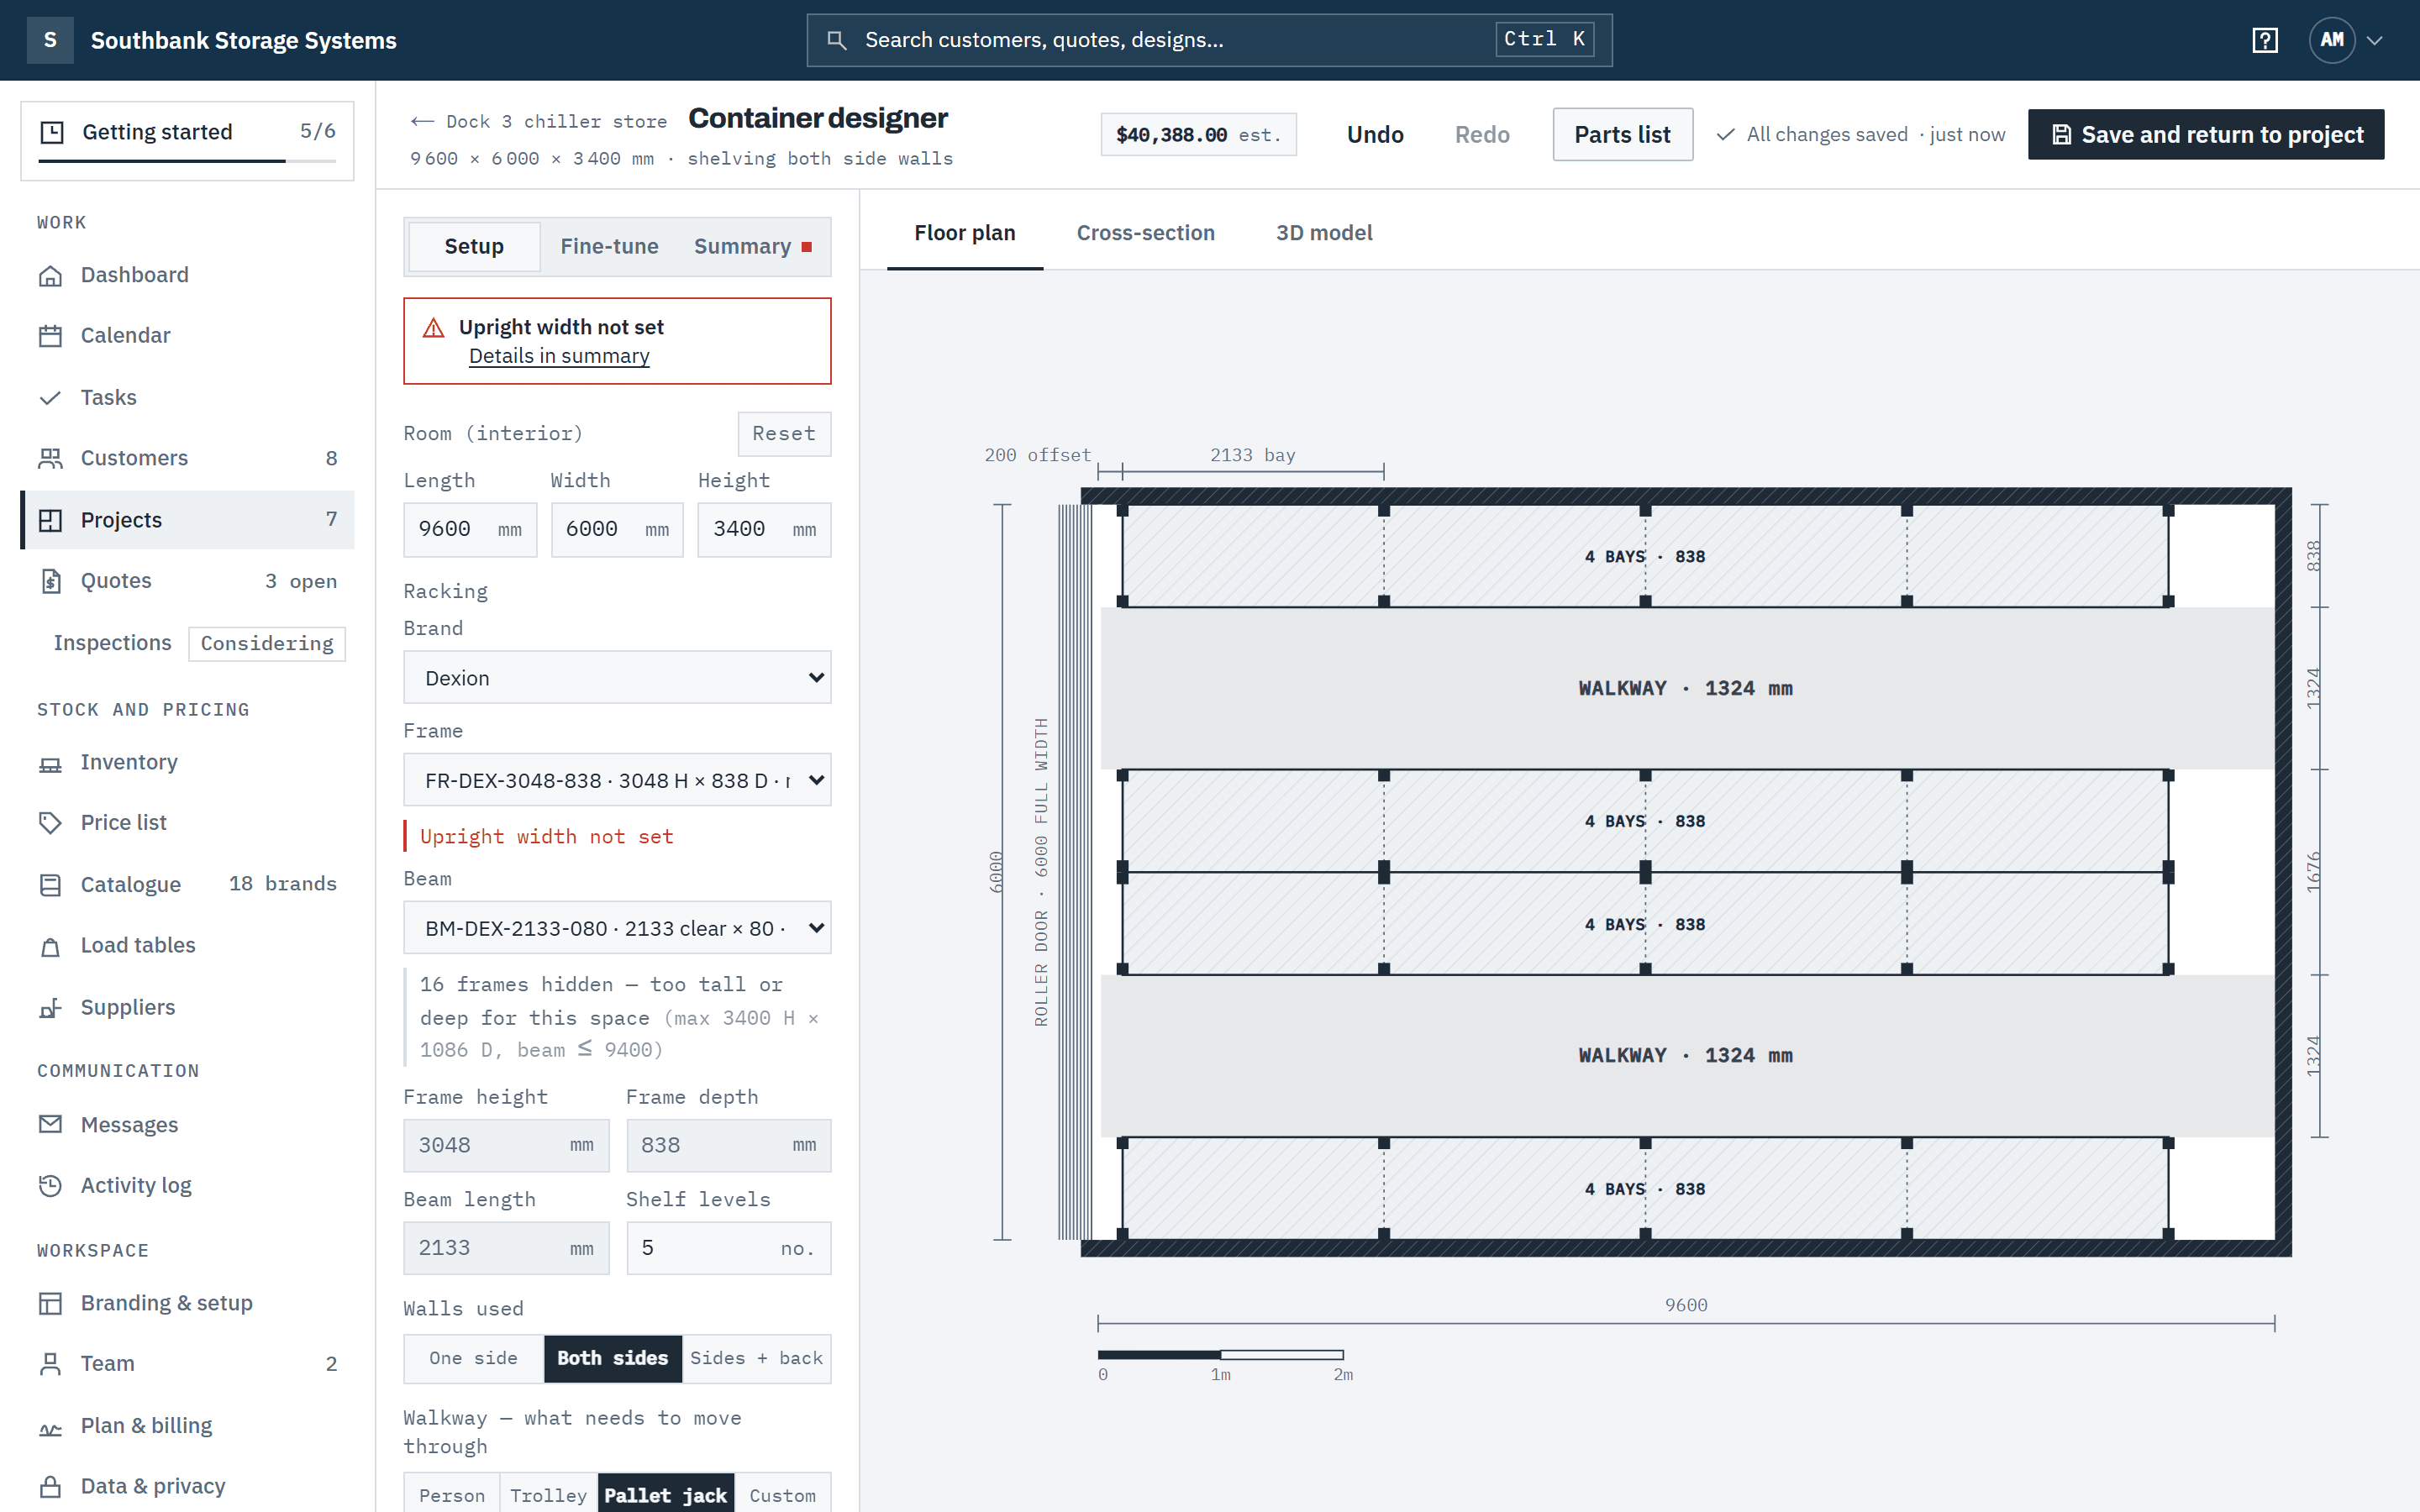
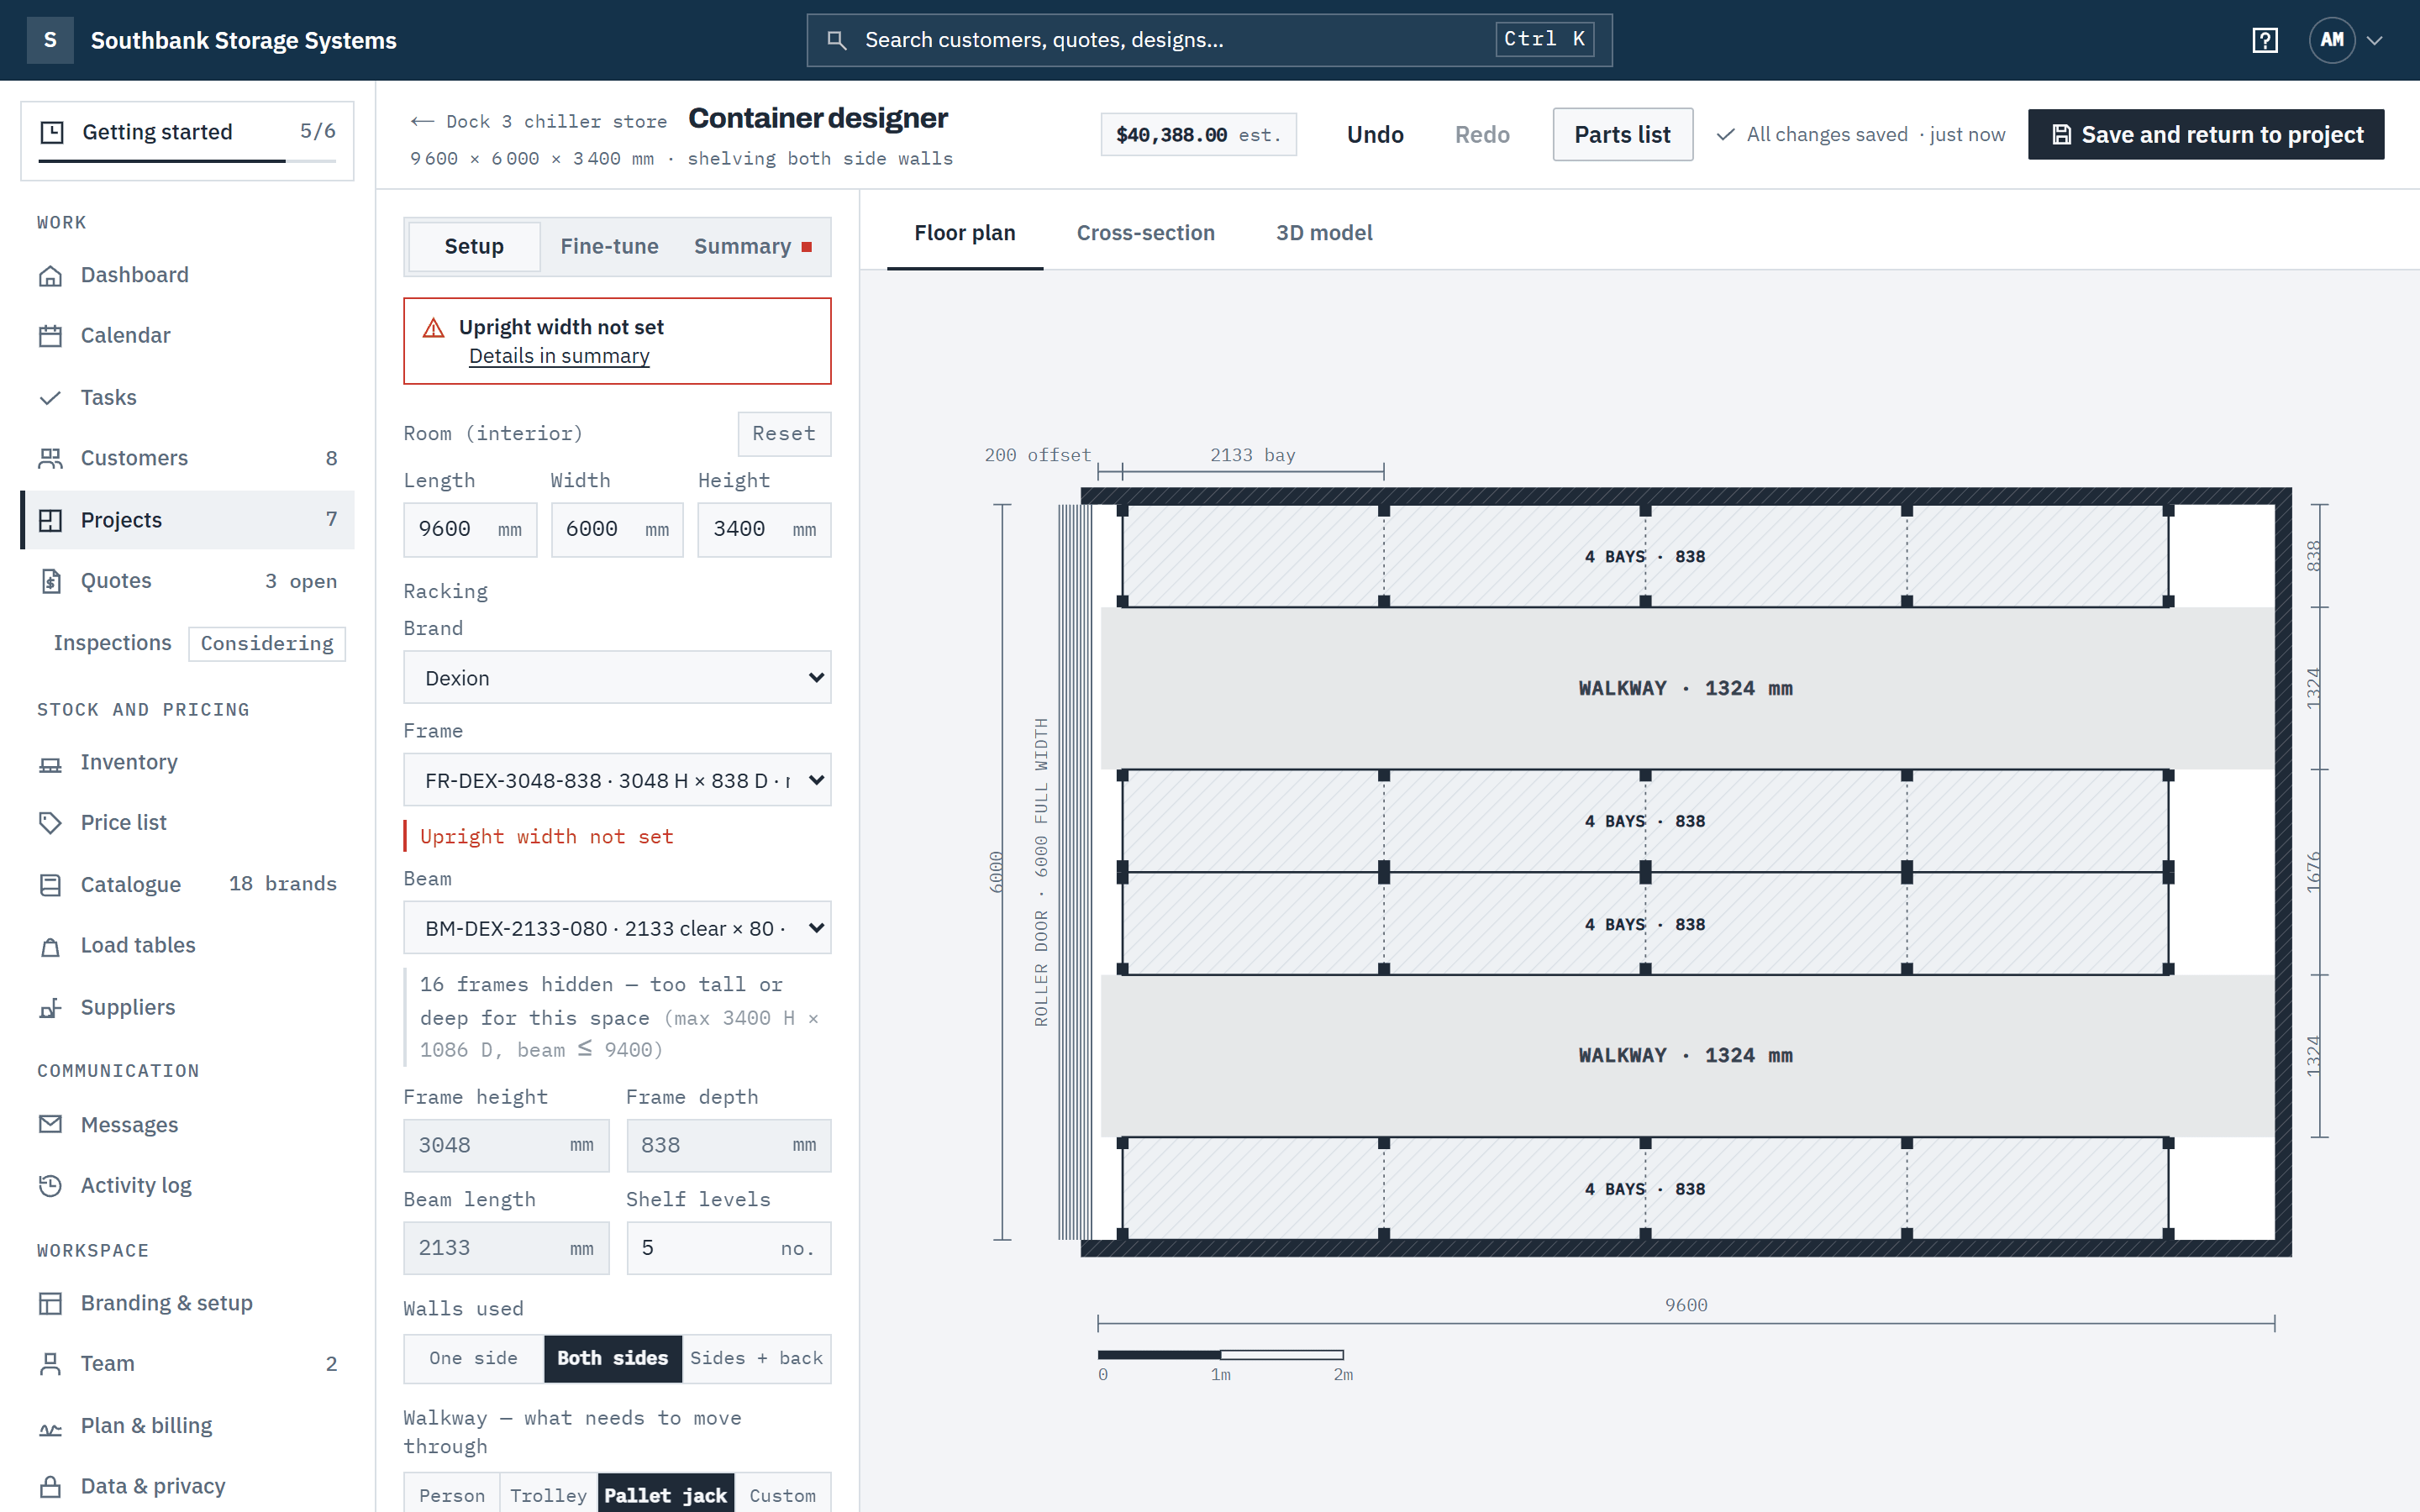
The settings down the left have three tabs: Setup, Fine-tune and Summary. On Setup, under Room (interior), enter the Length, Width and Height in millimetres, and choose the Walls used: One side, Both sides or Sides + back.
The floor plan and the estimate in the header redraw as you type. Reset puts the room back to the defaults.
 (opens full size in a new tab)
Set the room on Setup and pick catalogue frames and beams; the floor plan and estimate update as you type. Step 3: Pick the racking
Under Racking, choose the Brand, Frame and Beam. Each frame shows its part number, height, depth, rating and price, for example FR-DEX-3048-838 · 3048 H × 838 D · not certified — $344. Parts that don't fit are hidden with a note such as 16 frames hidden — too tall or deep for this space. A catalogue part listed but greyed out has no dimensions in the catalogue yet, so it can't be used.
Your own frames and beams are grouped under {brand} · your product, on every plan. See Choose your catalogue.
Set Shelf levels (1–12). Frame height, Frame depth and Beam length lock to the parts you picked.
Step 4: Choose the walkway and islands
Under Walkway — what needs to move through, choose Person (600 mm), Trolley (900 mm), Pallet jack (1 200 mm) or Custom and enter a Minimum clear walkway. Add up to three Middle rows (islands) with +; an island that would squeeze the walkway below target is dropped, and the Summary says so.
Step 5: Check it in 3D
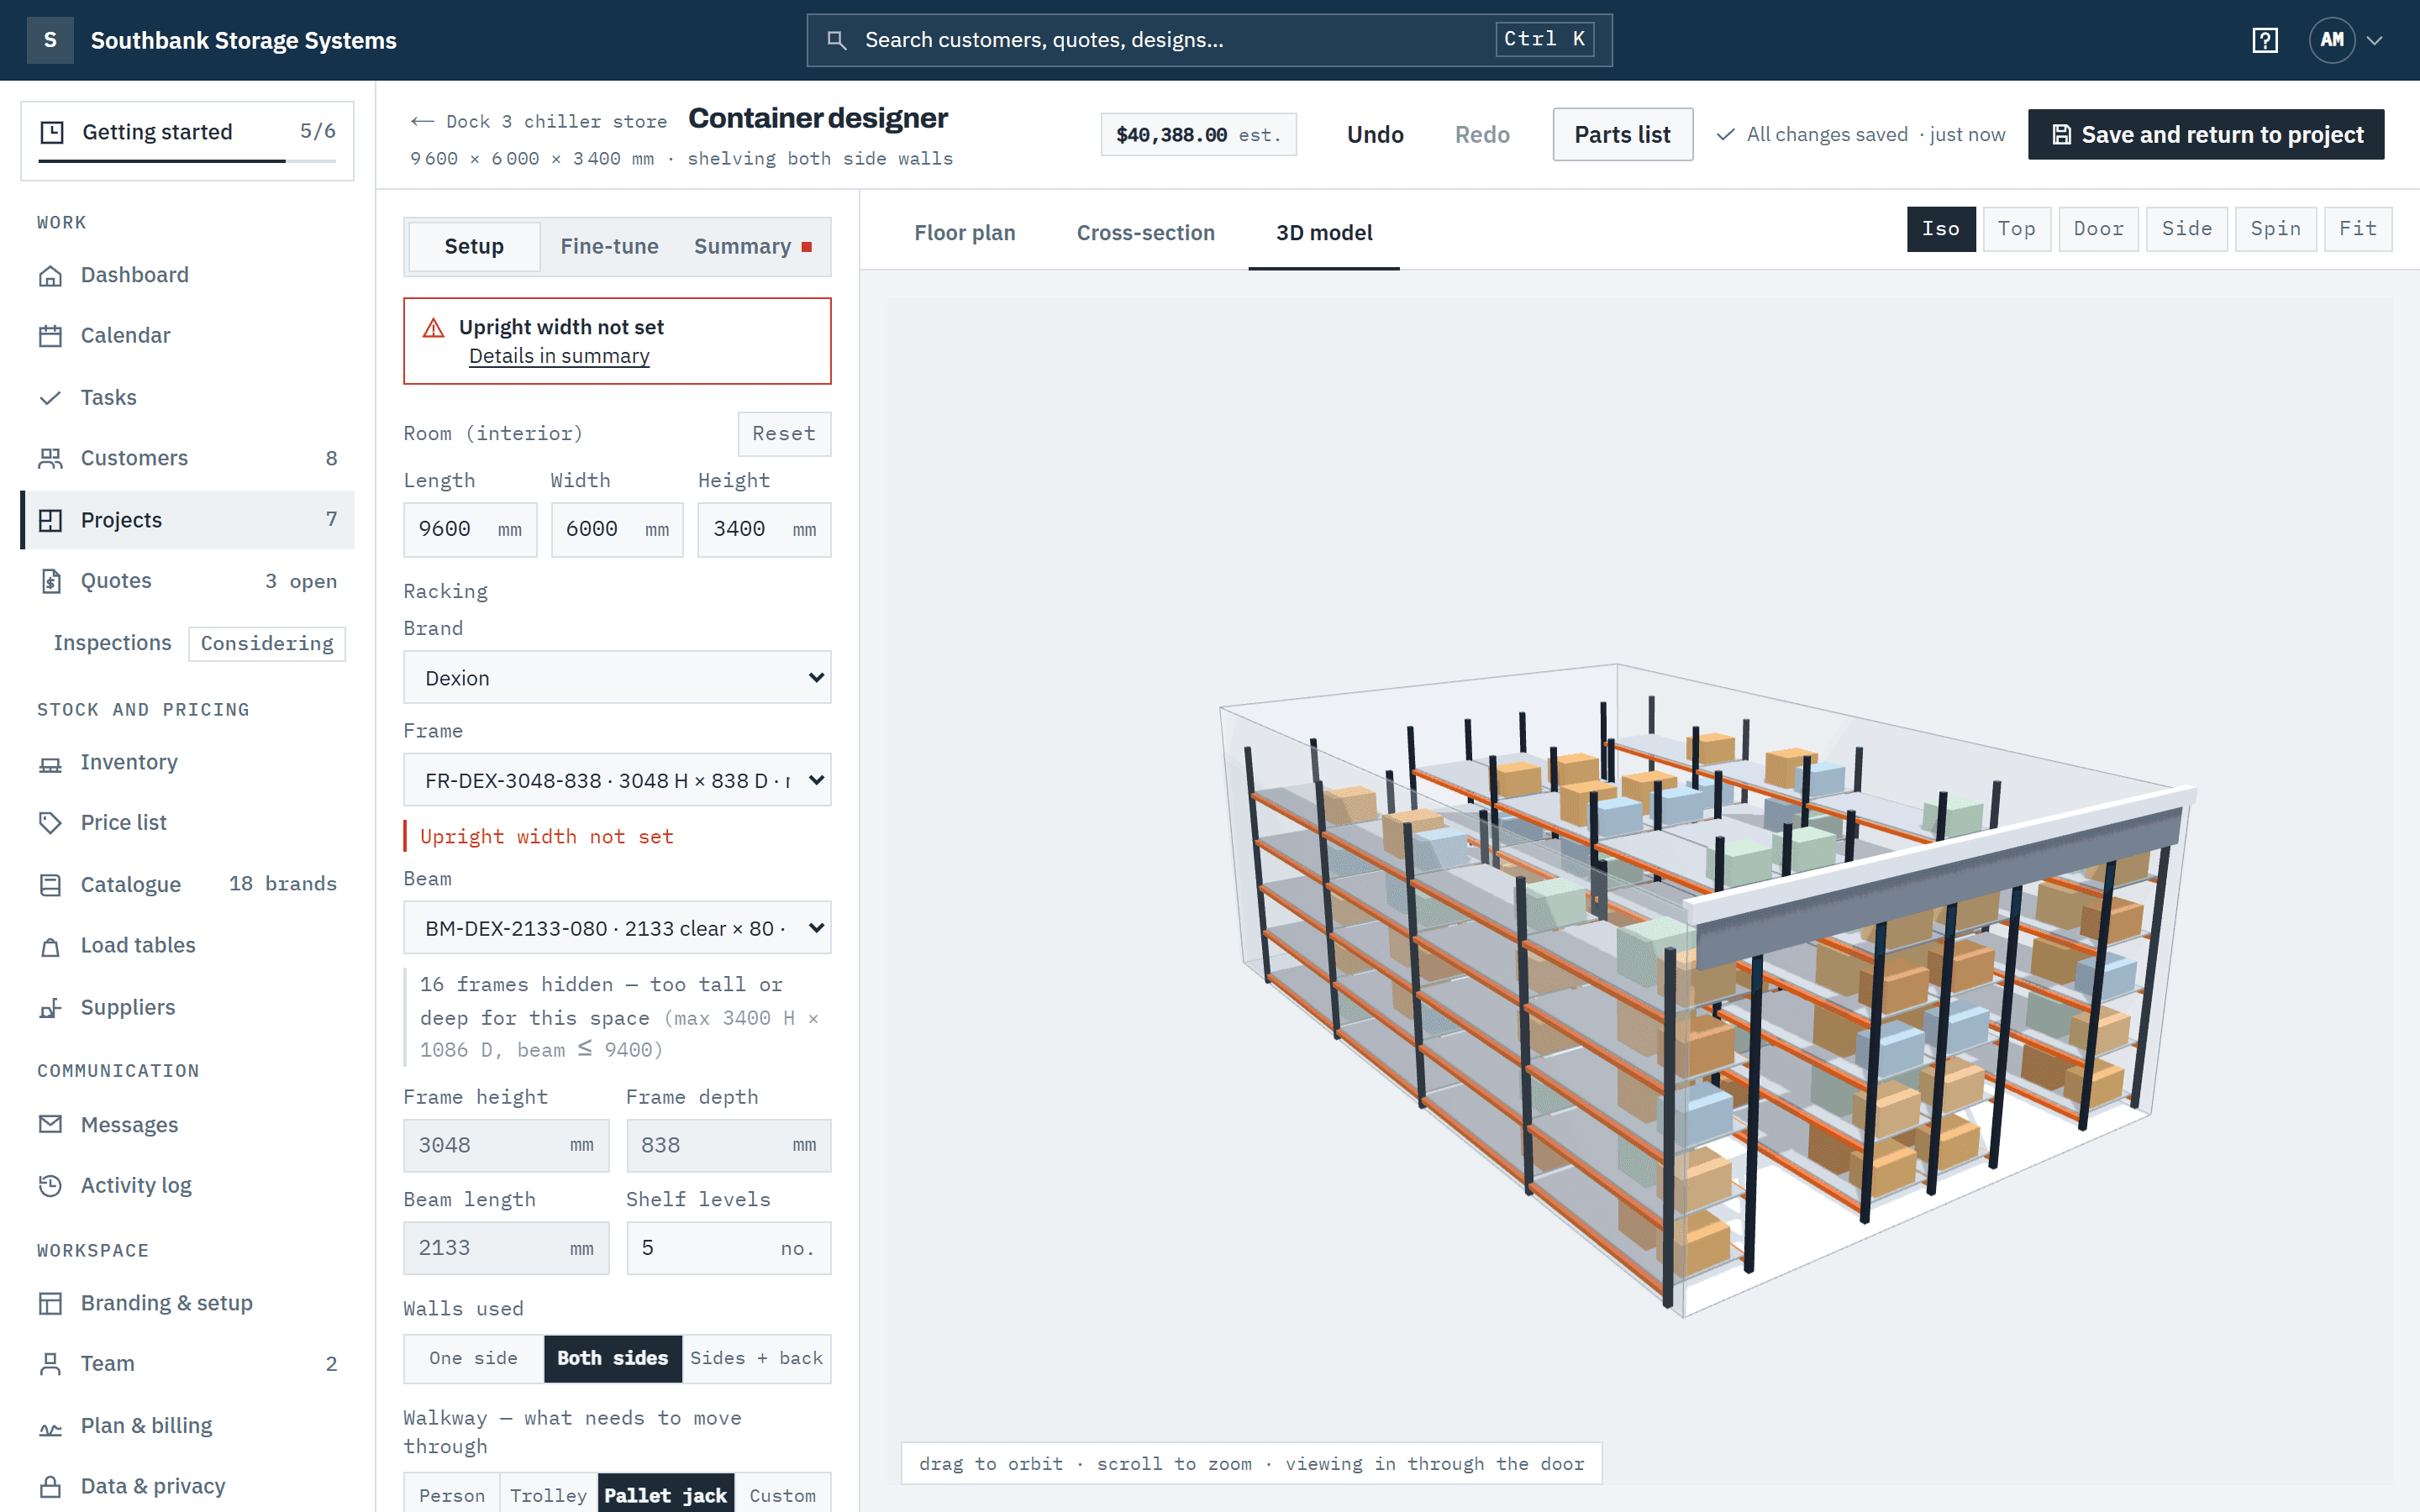
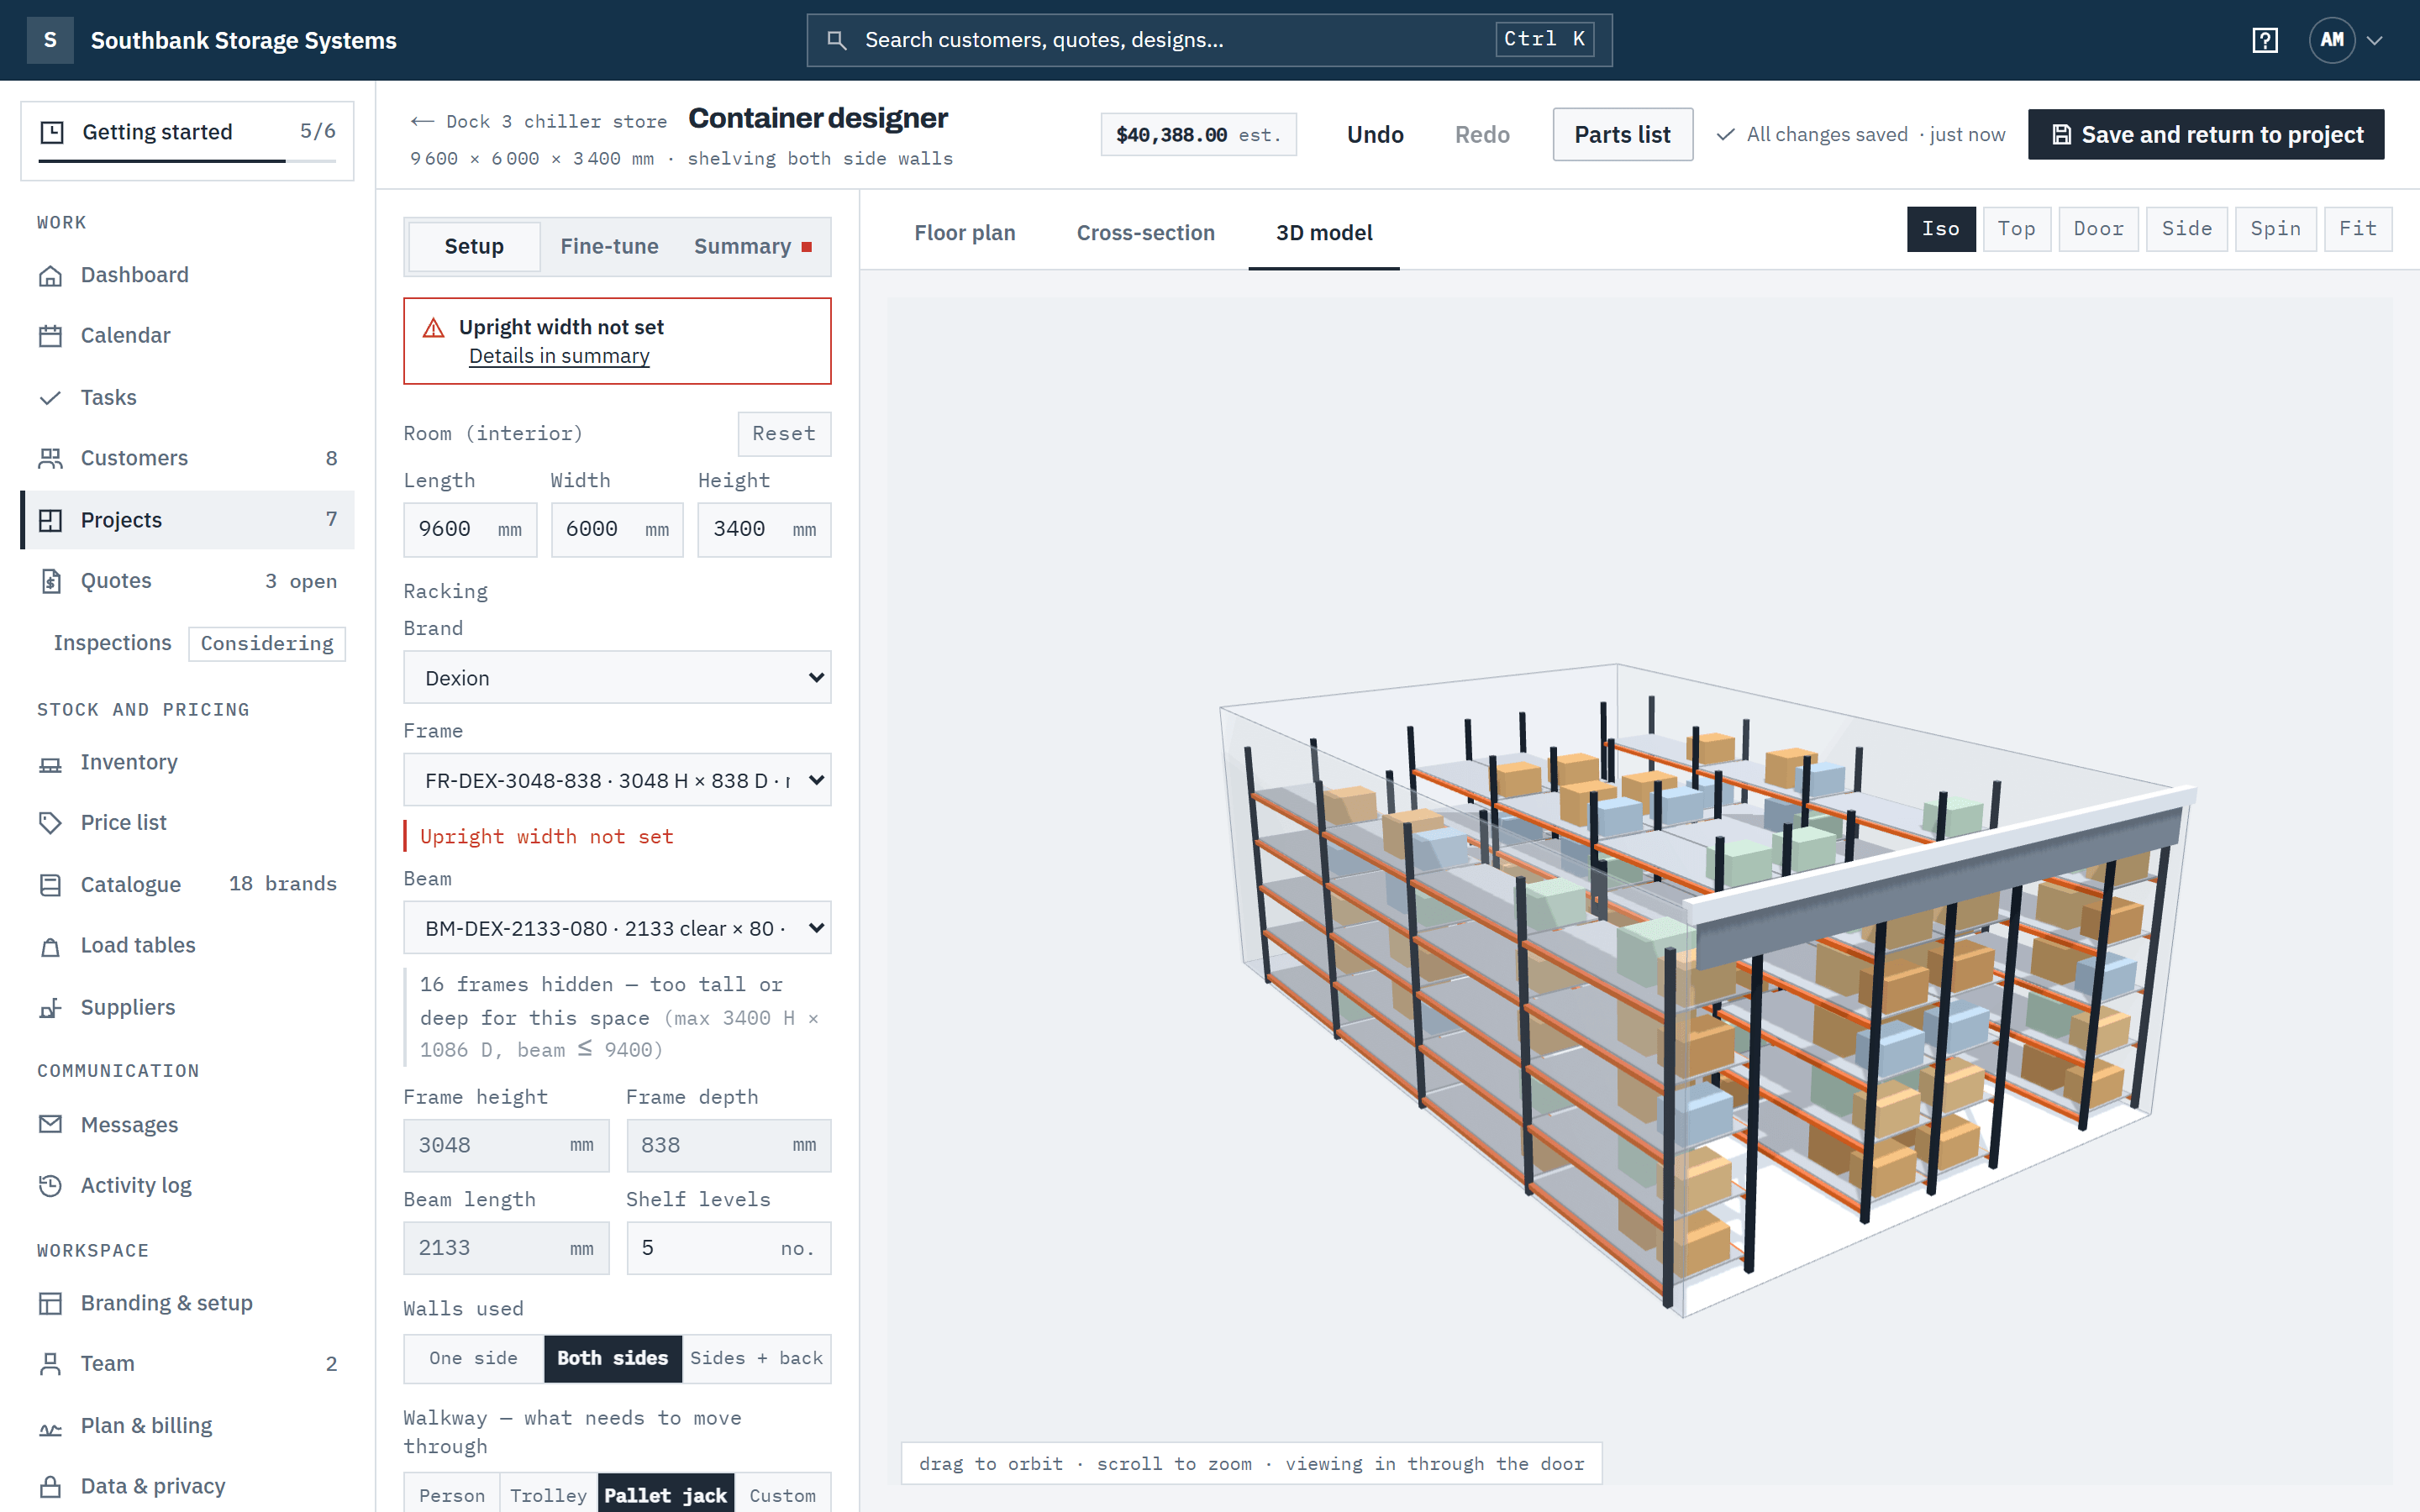
Switch between Floor plan, Cross-section and 3D model. In 3D, use Iso, Top, Door and Side for set views, Spin to turn it, or drag to orbit, right-drag to pan and scroll to zoom. The model always opens with the whole layout in view. Zooming out stops at a little over twice that view and panning stays on the layout, so it can't get lost off screen; Fit (or choosing the selected view again) brings the whole layout back. The cross-section shows ceiling clearance.
 (opens full size in a new tab)
The 3D model shows exactly what will be installed; drag to orbit and scroll to zoom. Step 6: Fine-tune walls, shelves and cost
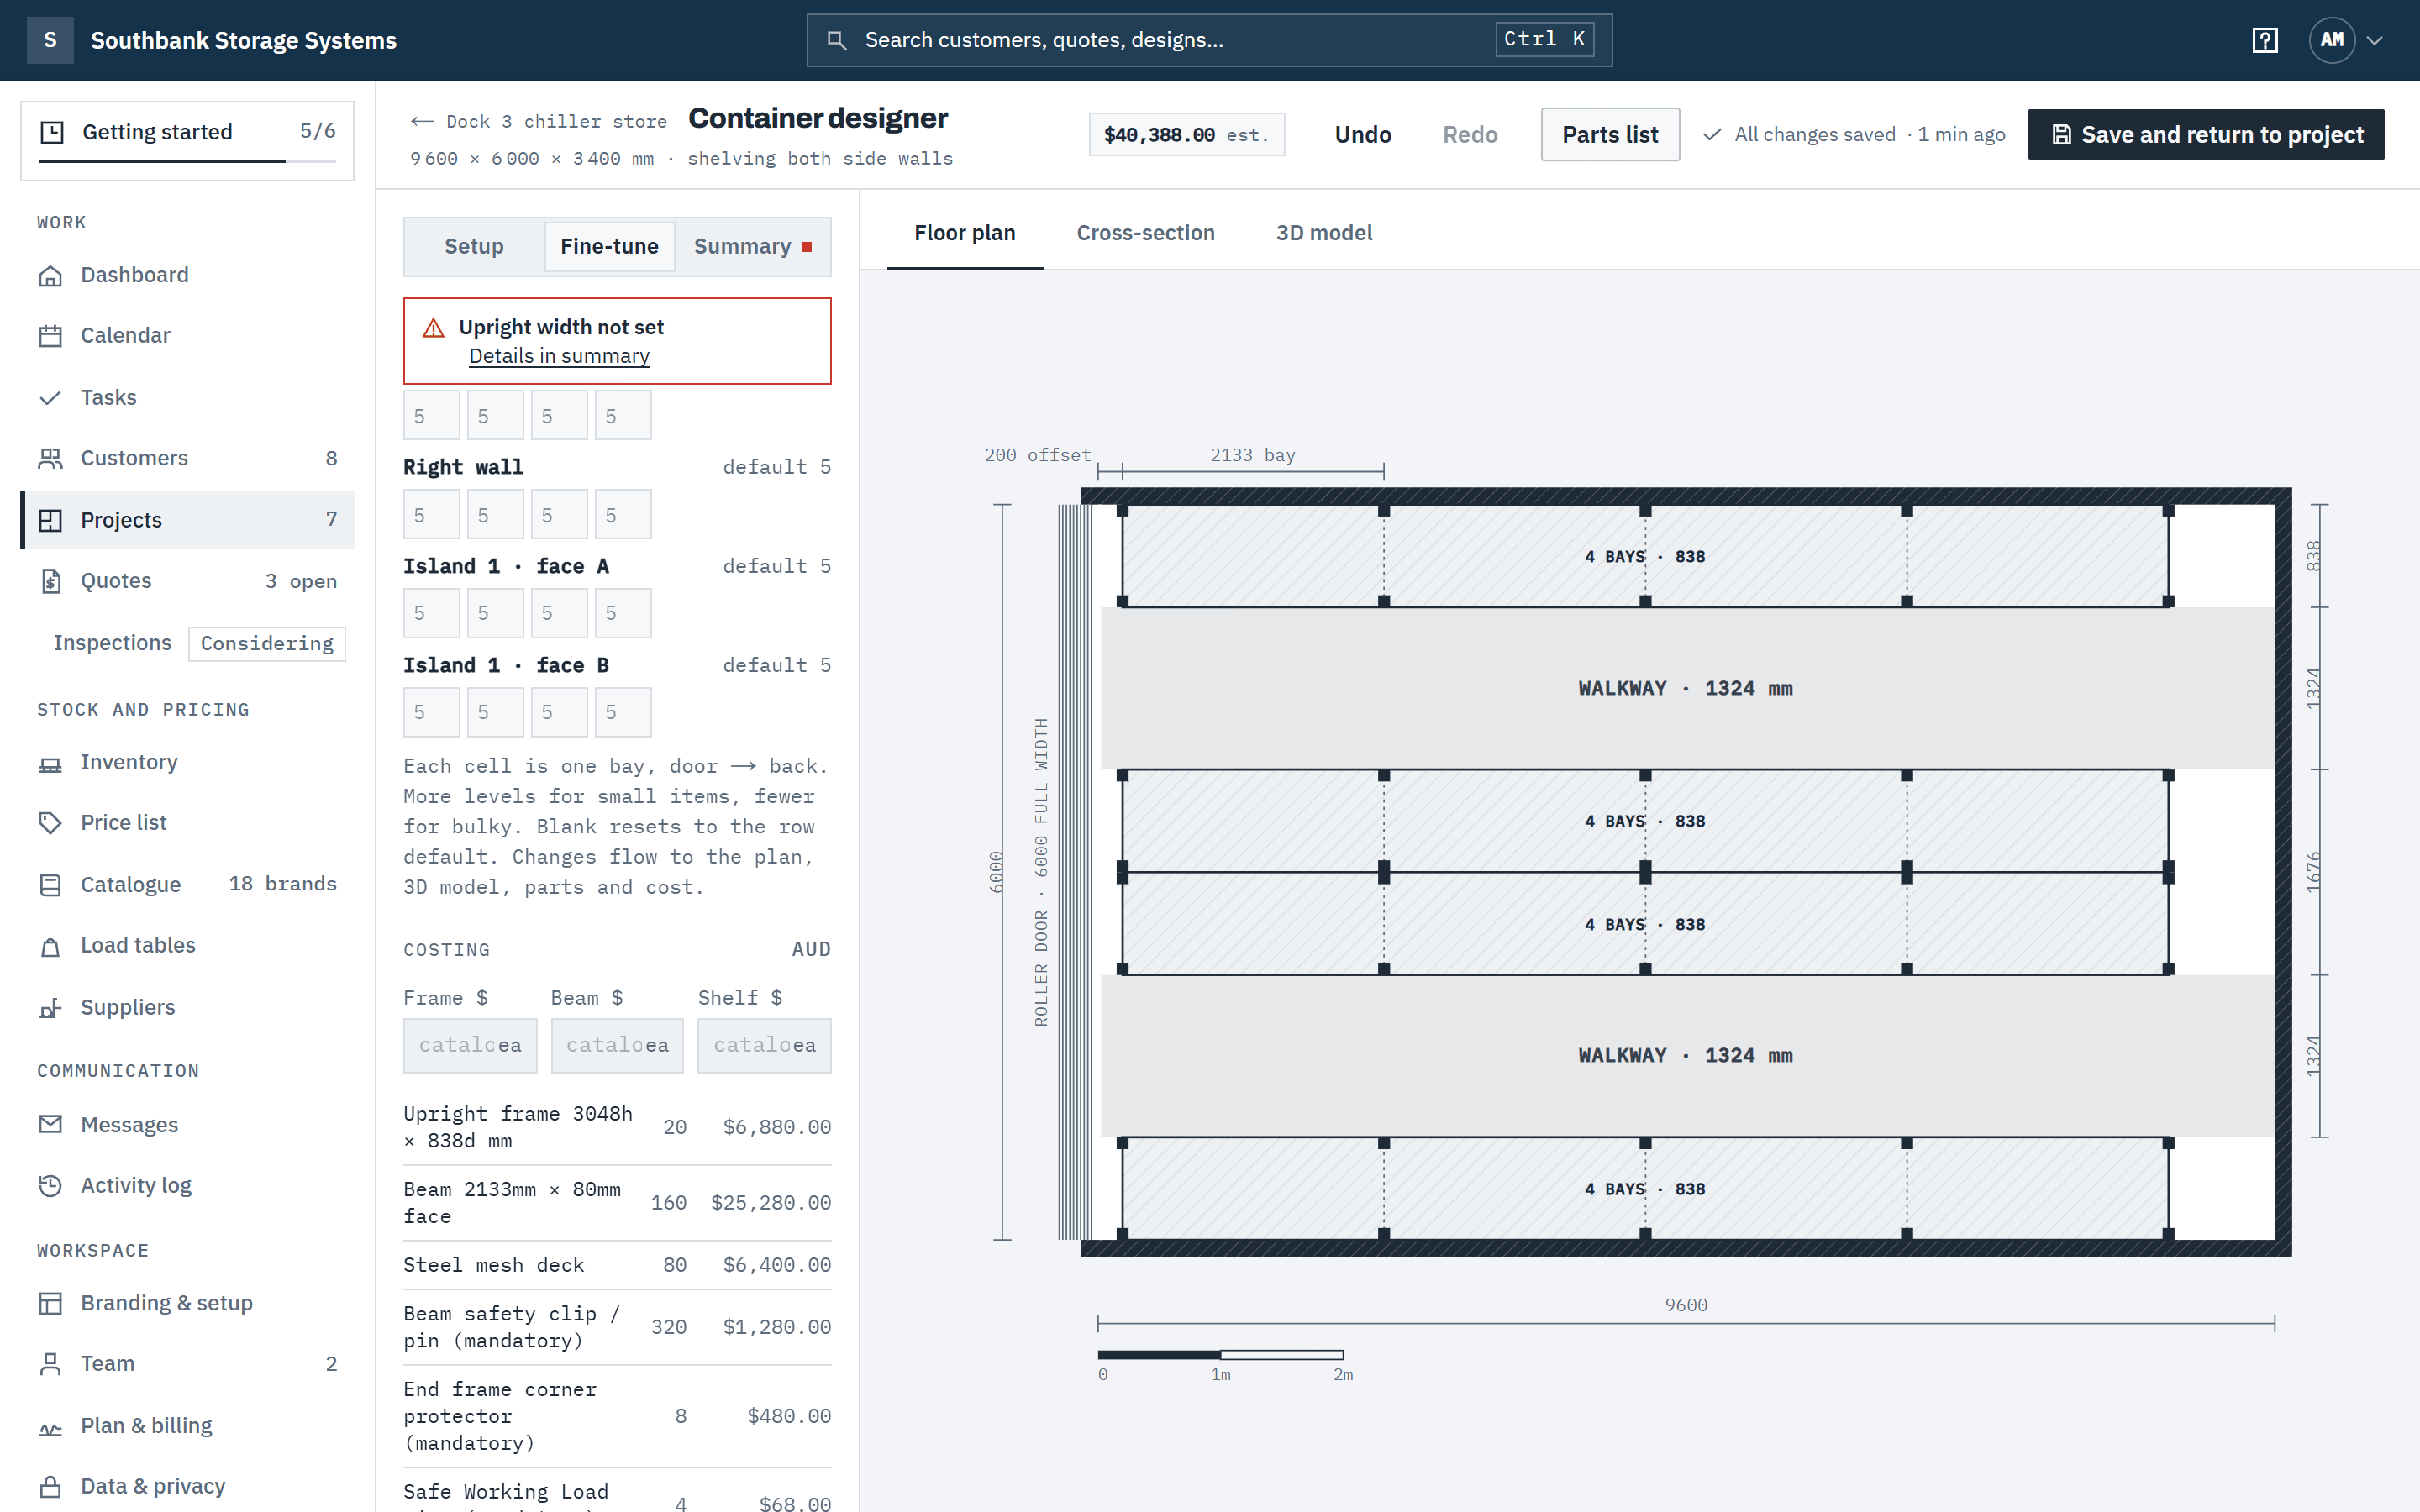
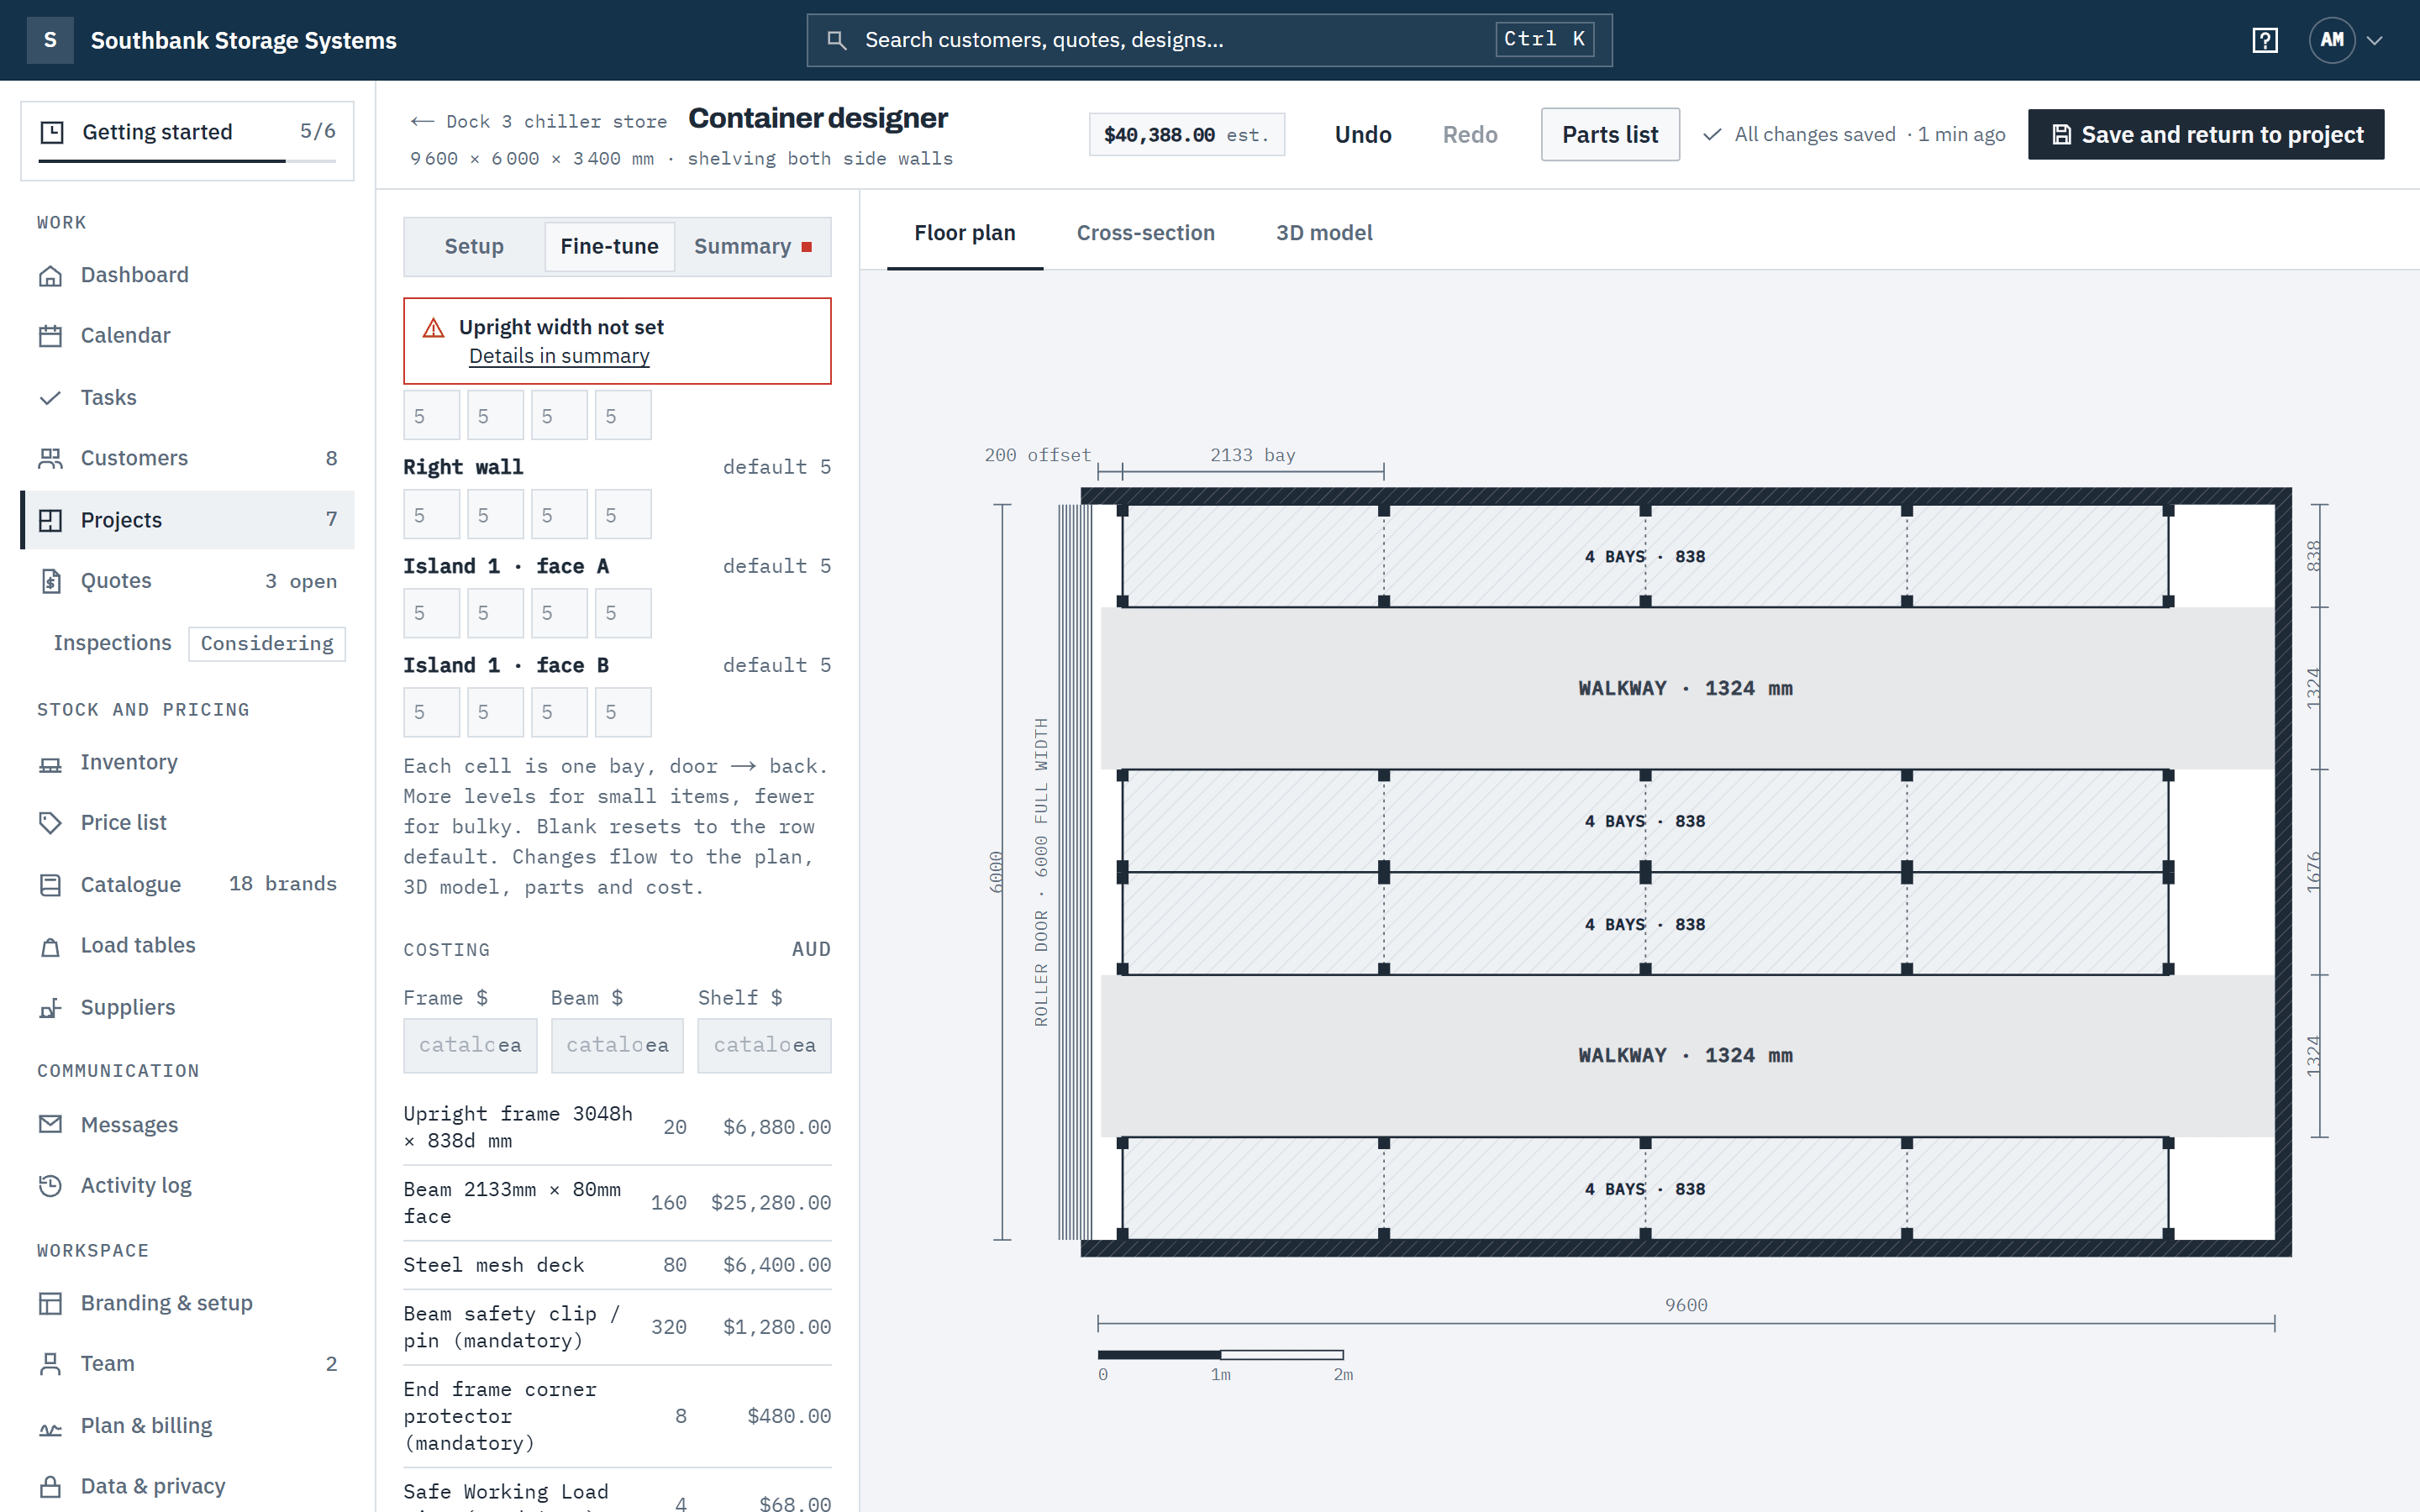
Fine-tune holds everything past the basics: the Offset from front door, Customise right wall, Customise islands and the back wall's size on Sides + back, and Shelves per bay to set the levels bay by bay. The tab is marked when anything on it differs from Setup.
Costing lists every part with its quantity and the running total. The Frame $, Beam $ and Shelf $ rates start blank: a part with no sell price on your price list reads Not priced until you enter a rate, and a line priced that way is tagged manual rate on the quote (never on the proposal). The rates lock to your price list when the part has a sell price. Revisions is here too: name a snapshot of the layout and restore it later.
 (opens full size in a new tab)
Fine-tune shows every part, its quantity and the running total the quote will start from. Step 7: Read the Summary
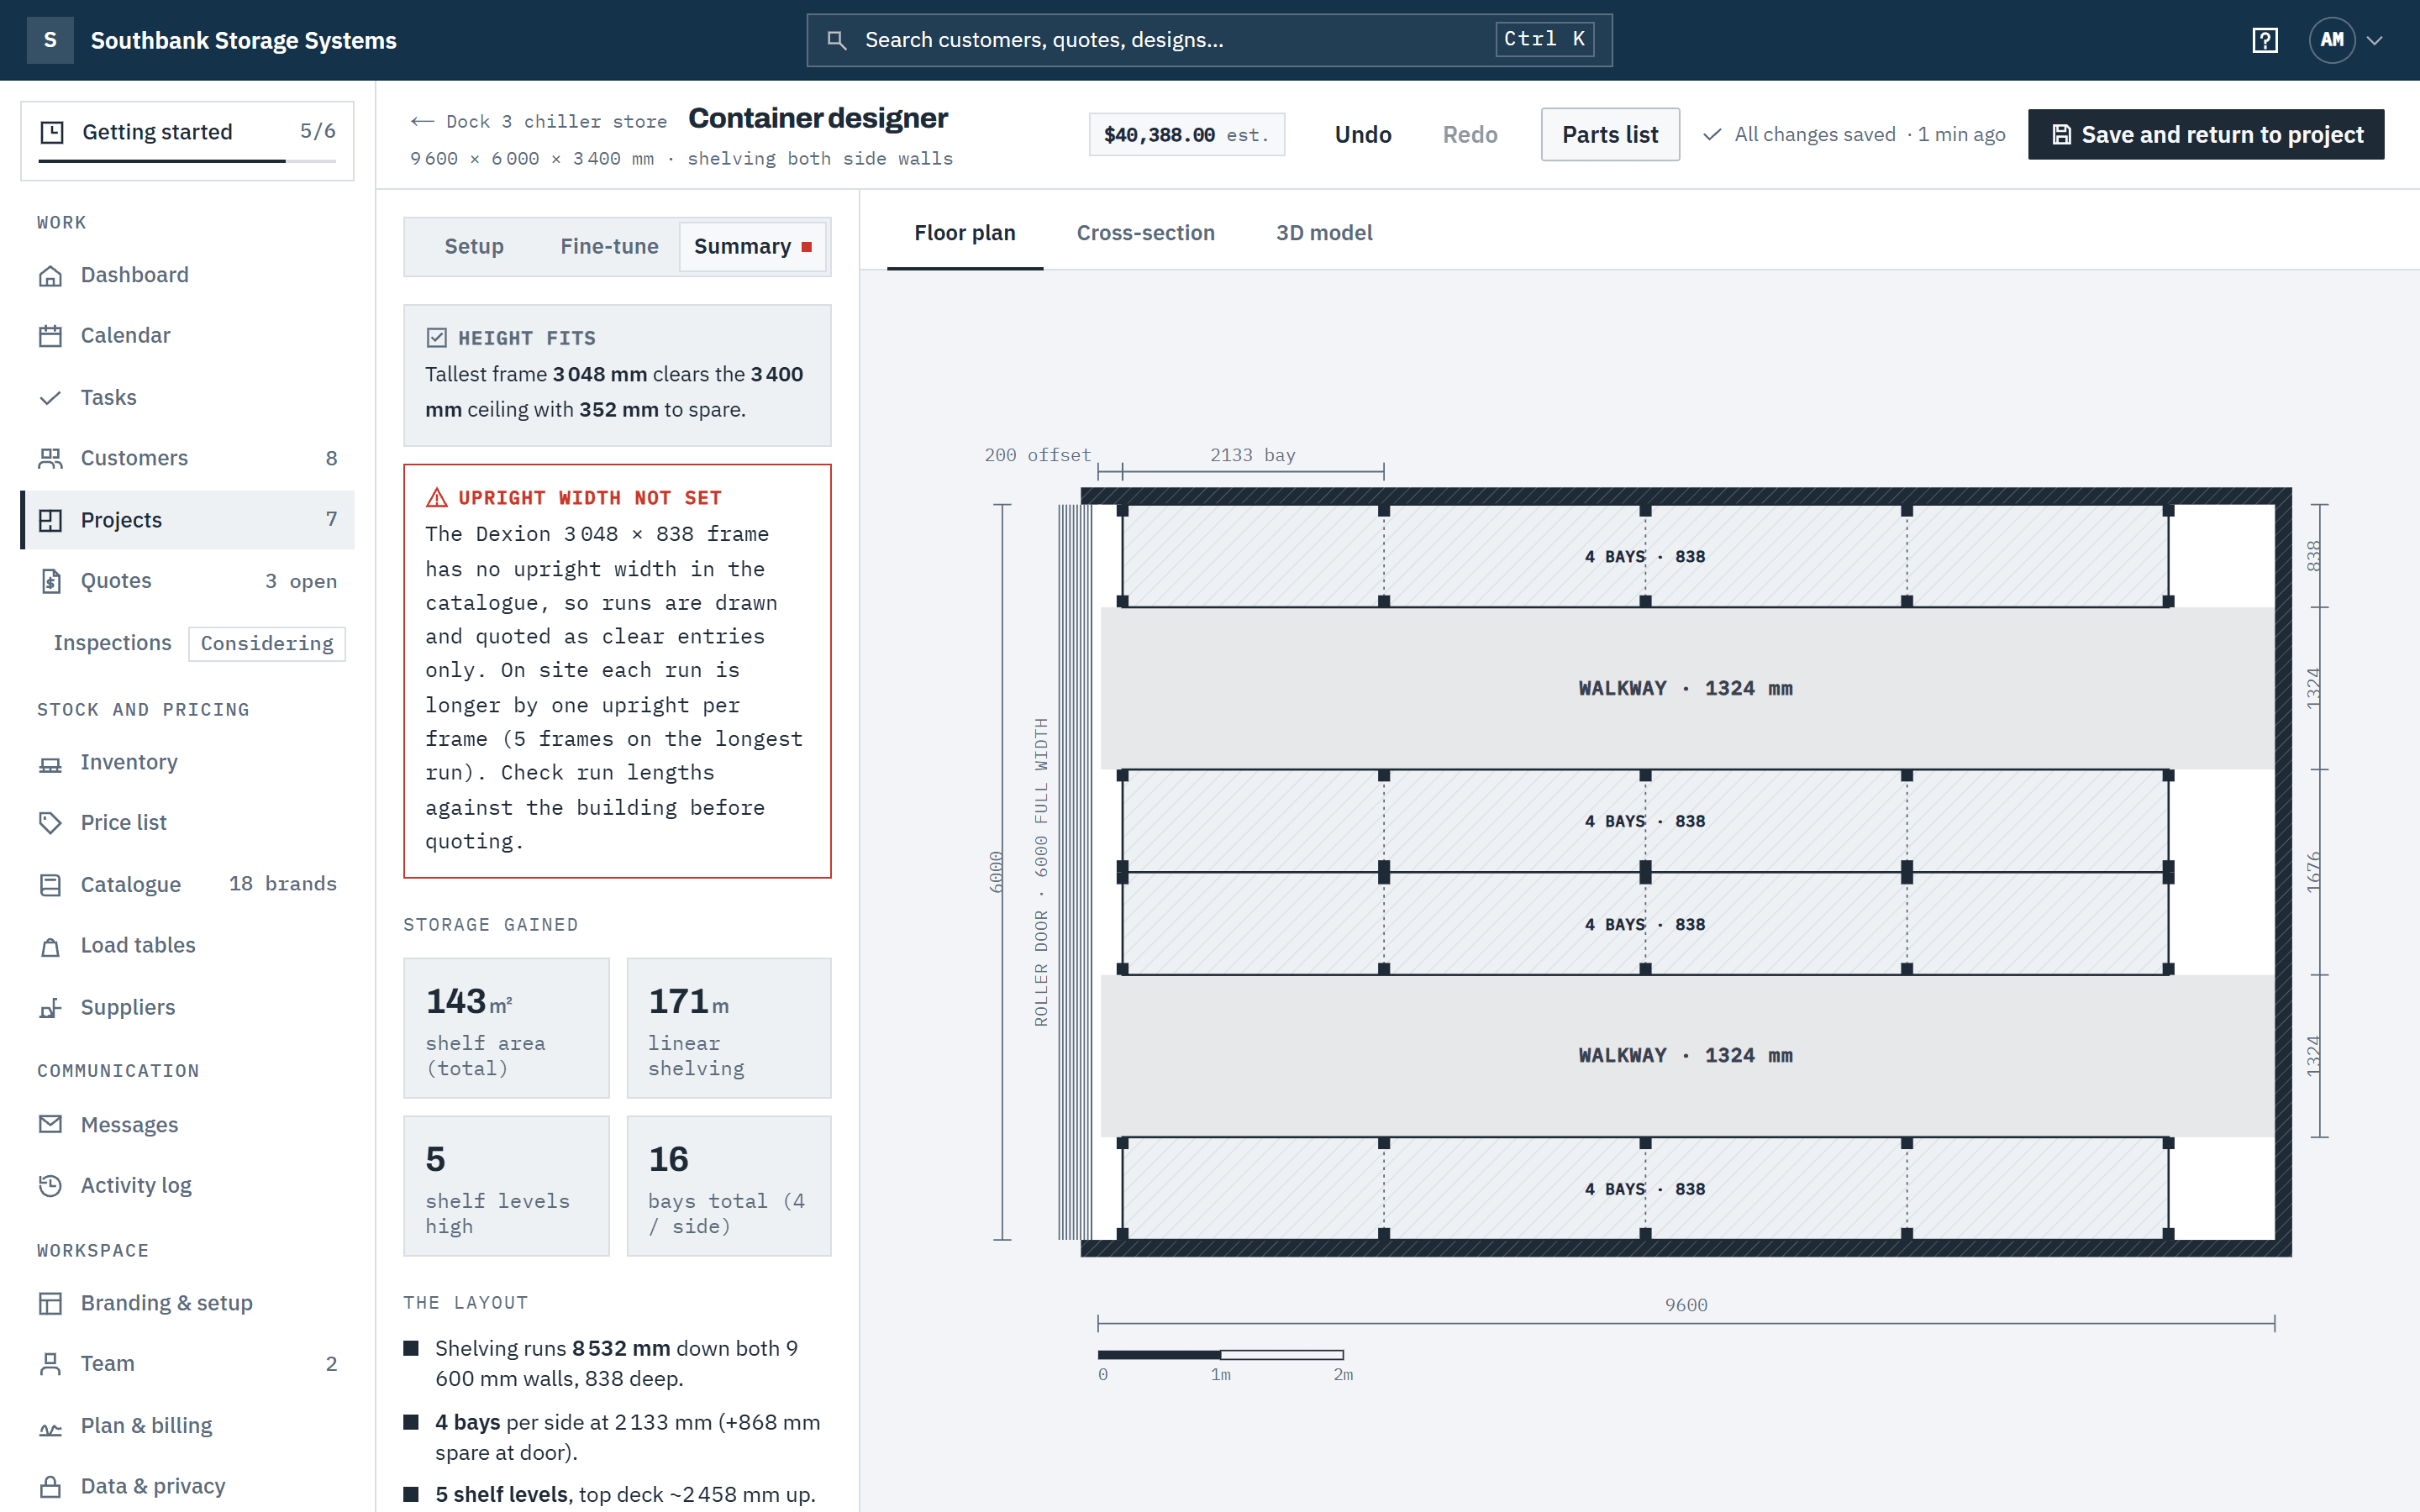
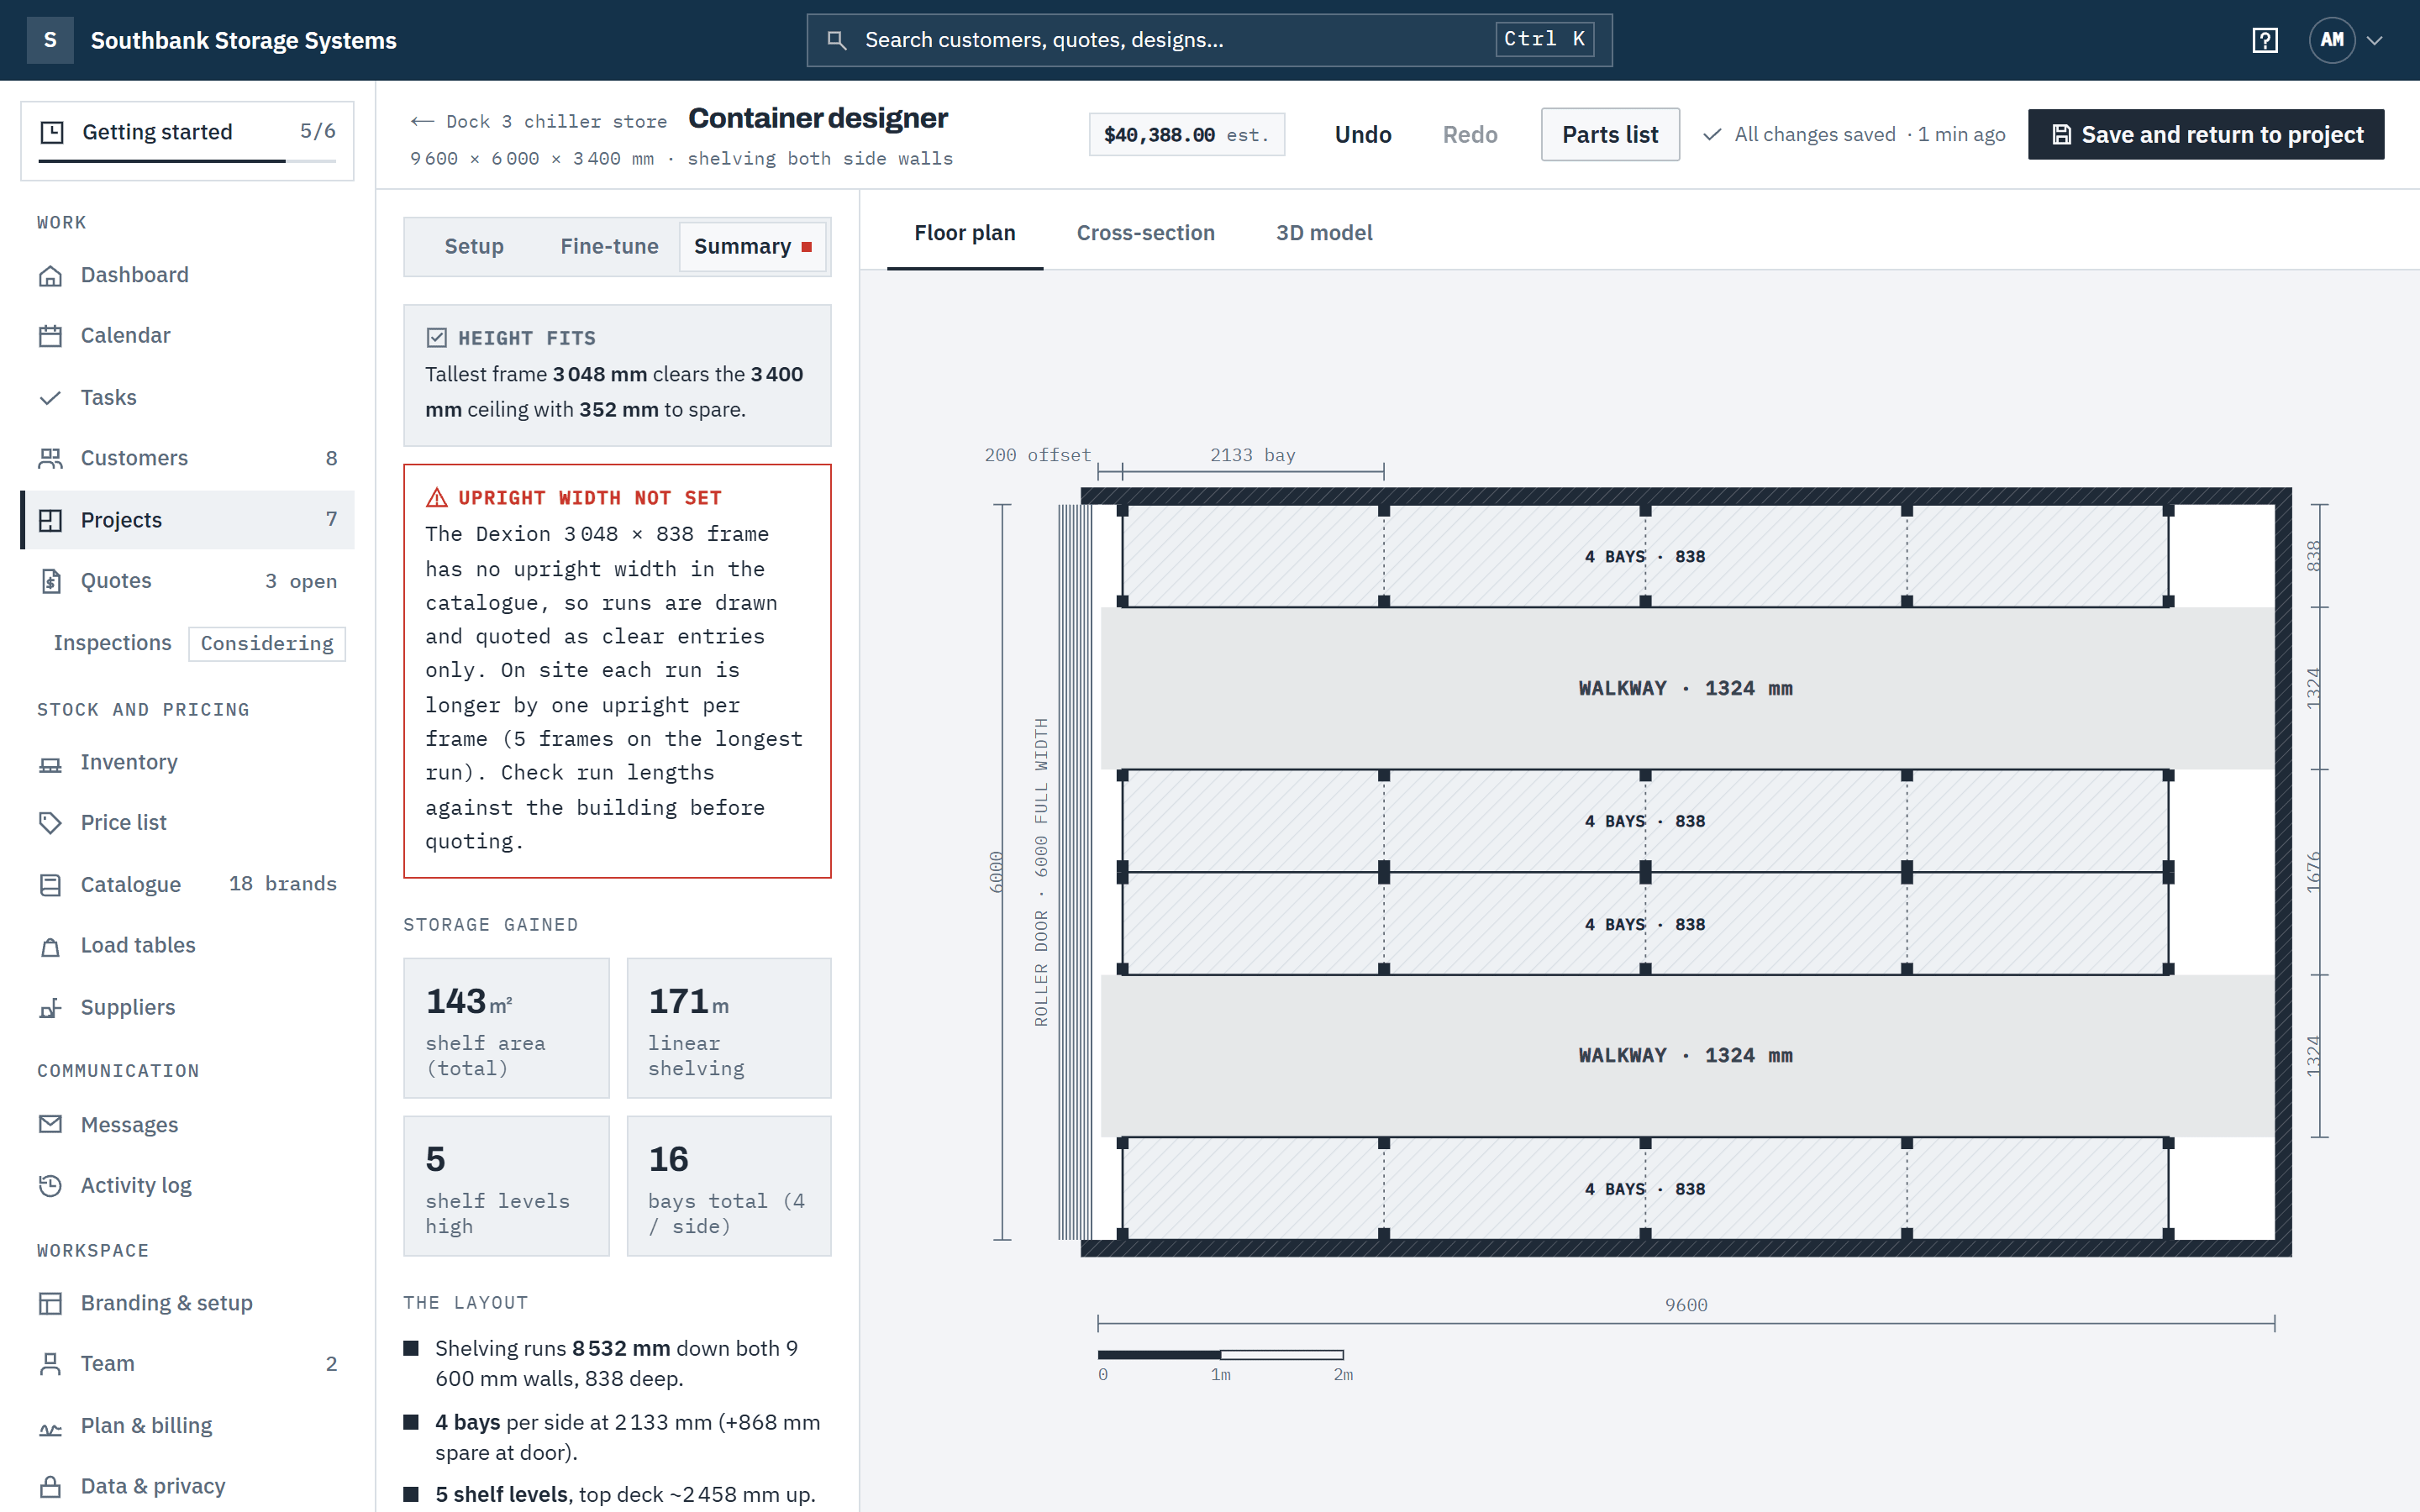
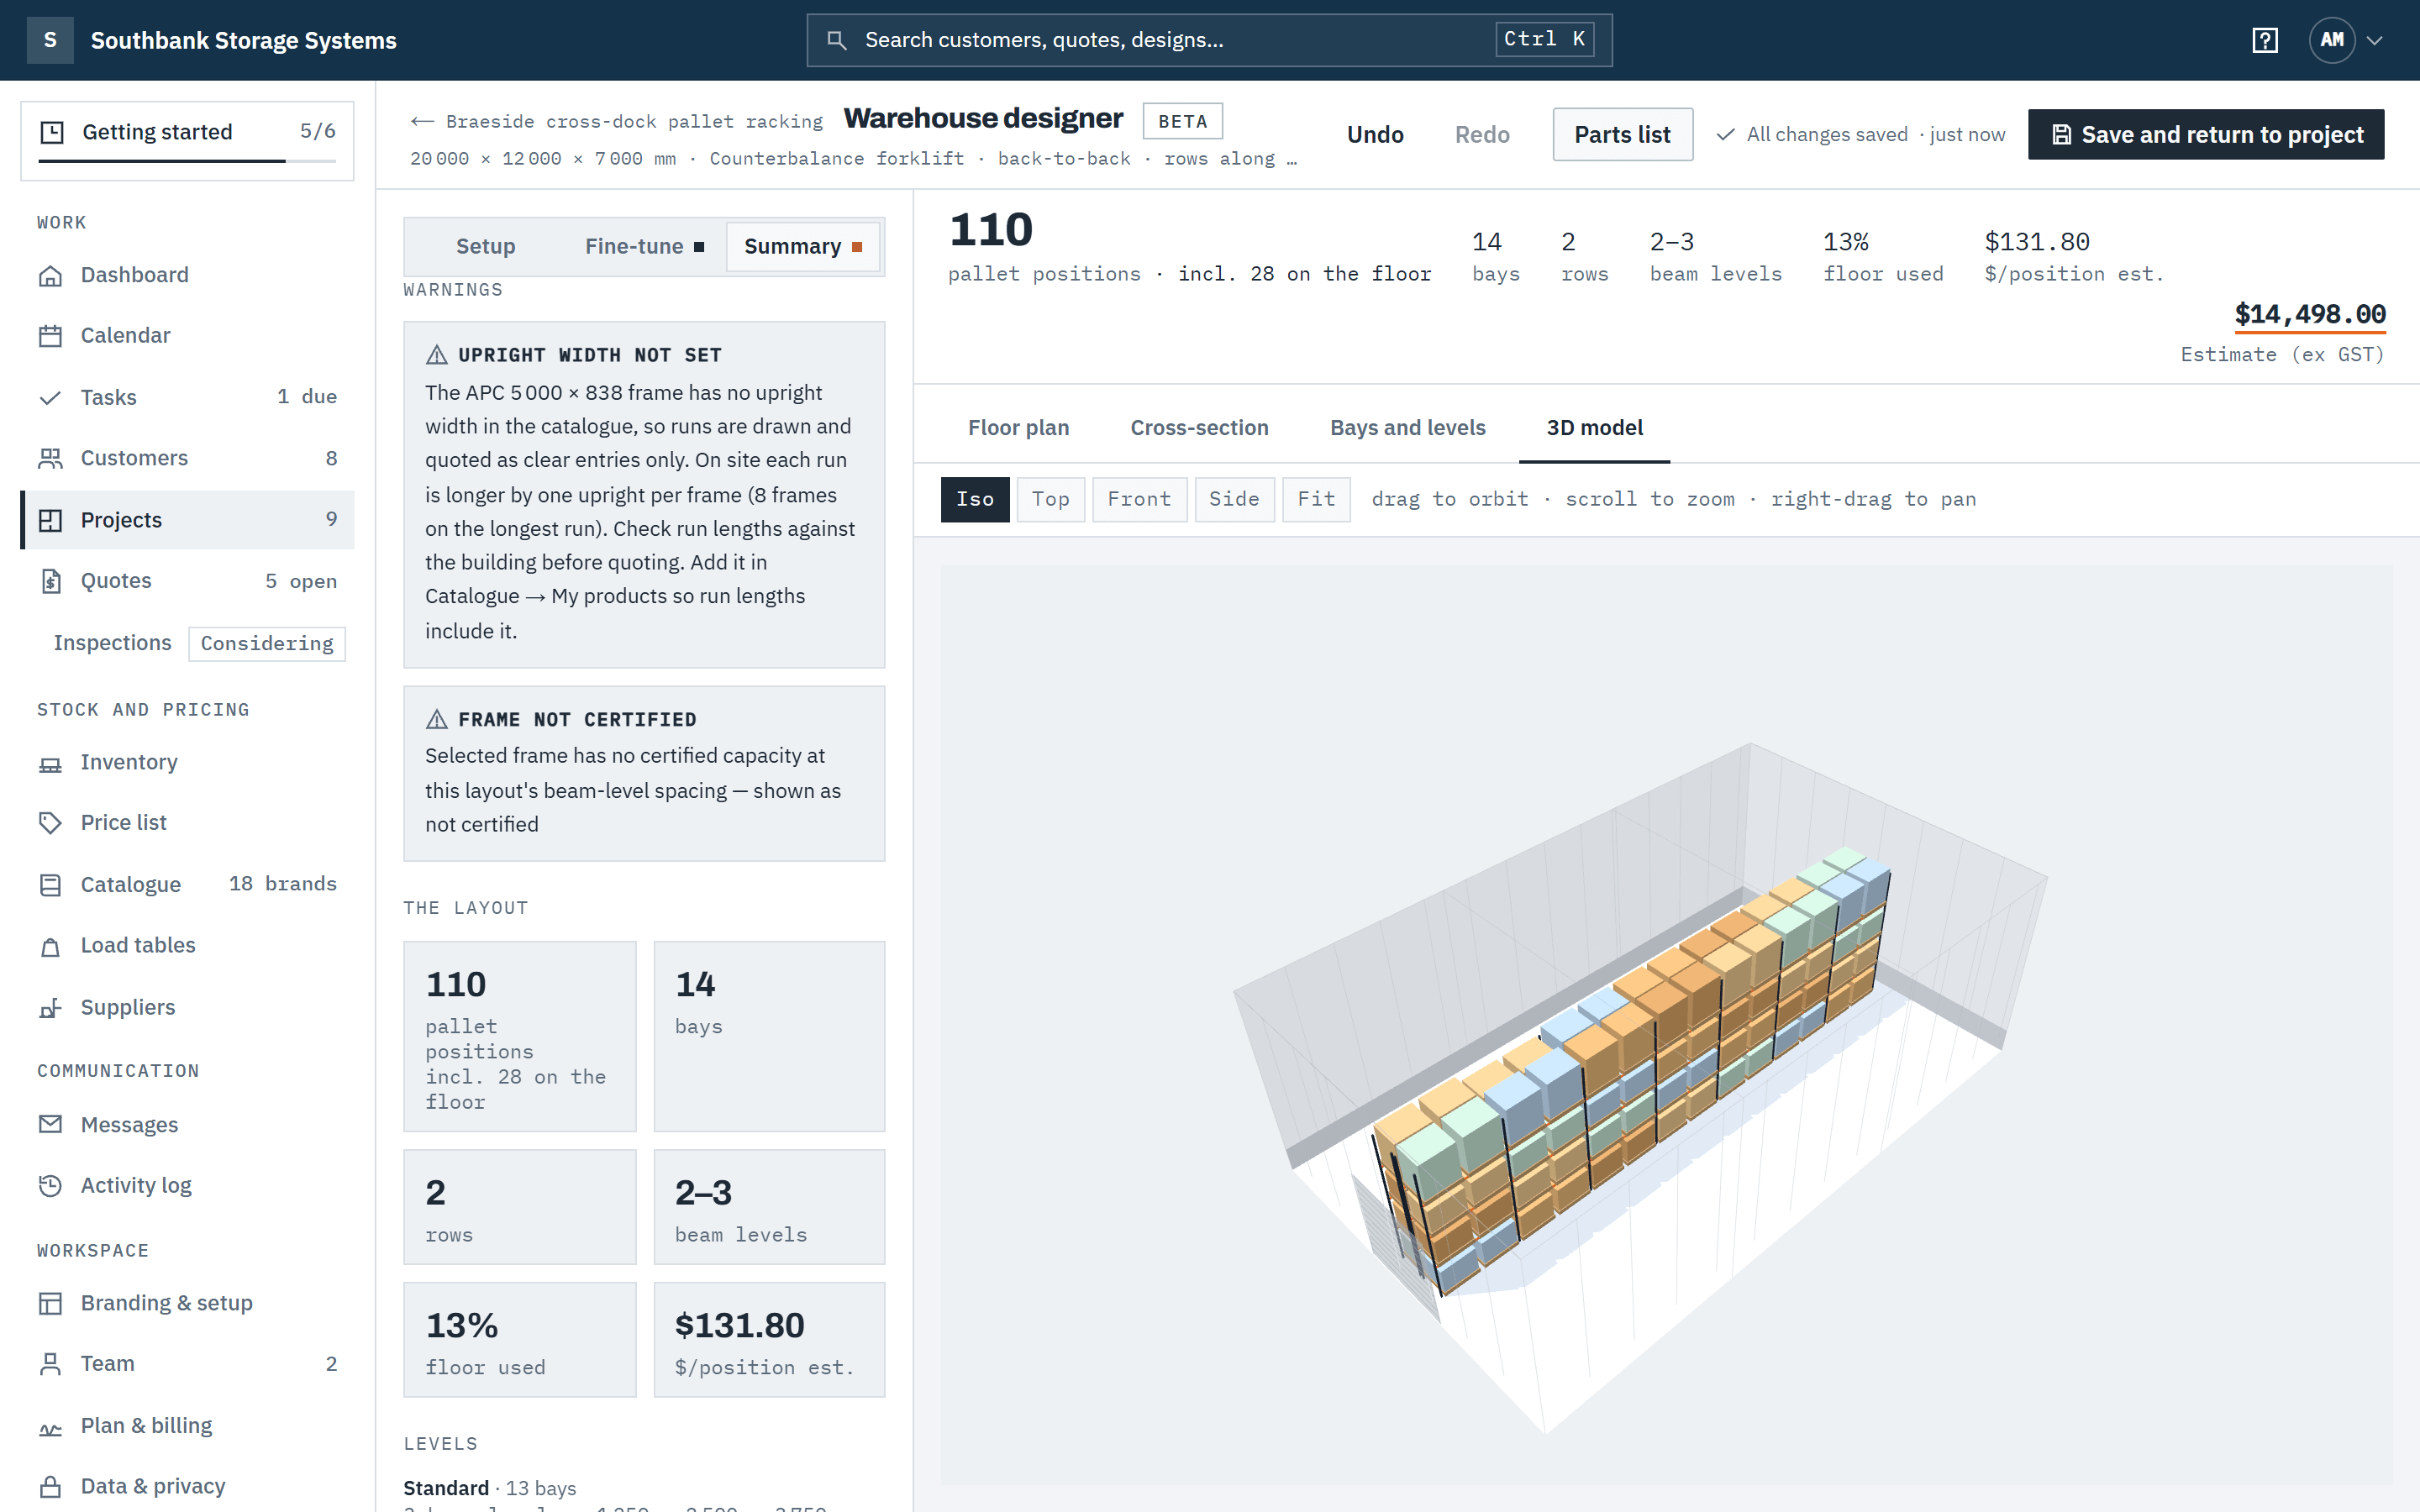
Summary is read-only: what your settings produce. It starts with any fit notes, such as Height fits, Walkway below target or Cross-brand mix, then Storage gained (shelf area, linear shelving, levels and bays), The layout line by line, and Racking parts with each part's capacity or not certified.
When there's a warning, the Summary tab is marked and Setup and Fine-tune show it in one line with Details in summary.
 (opens full size in a new tab)
Summary is read-only: what your settings produce, with any warnings first. Step 8: Check the parts list
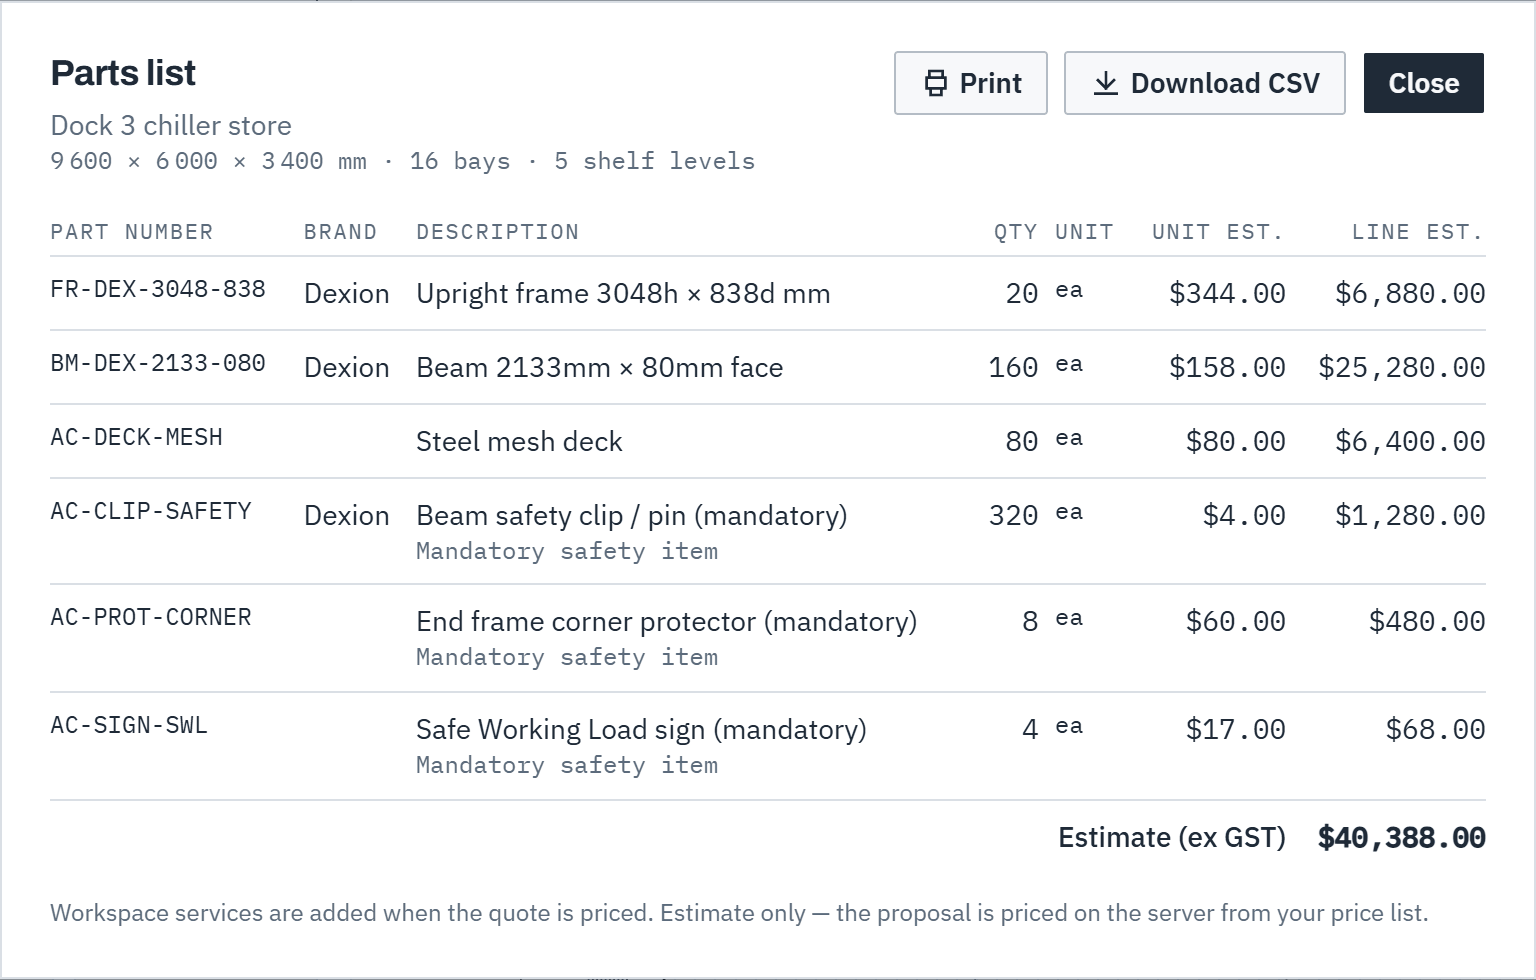
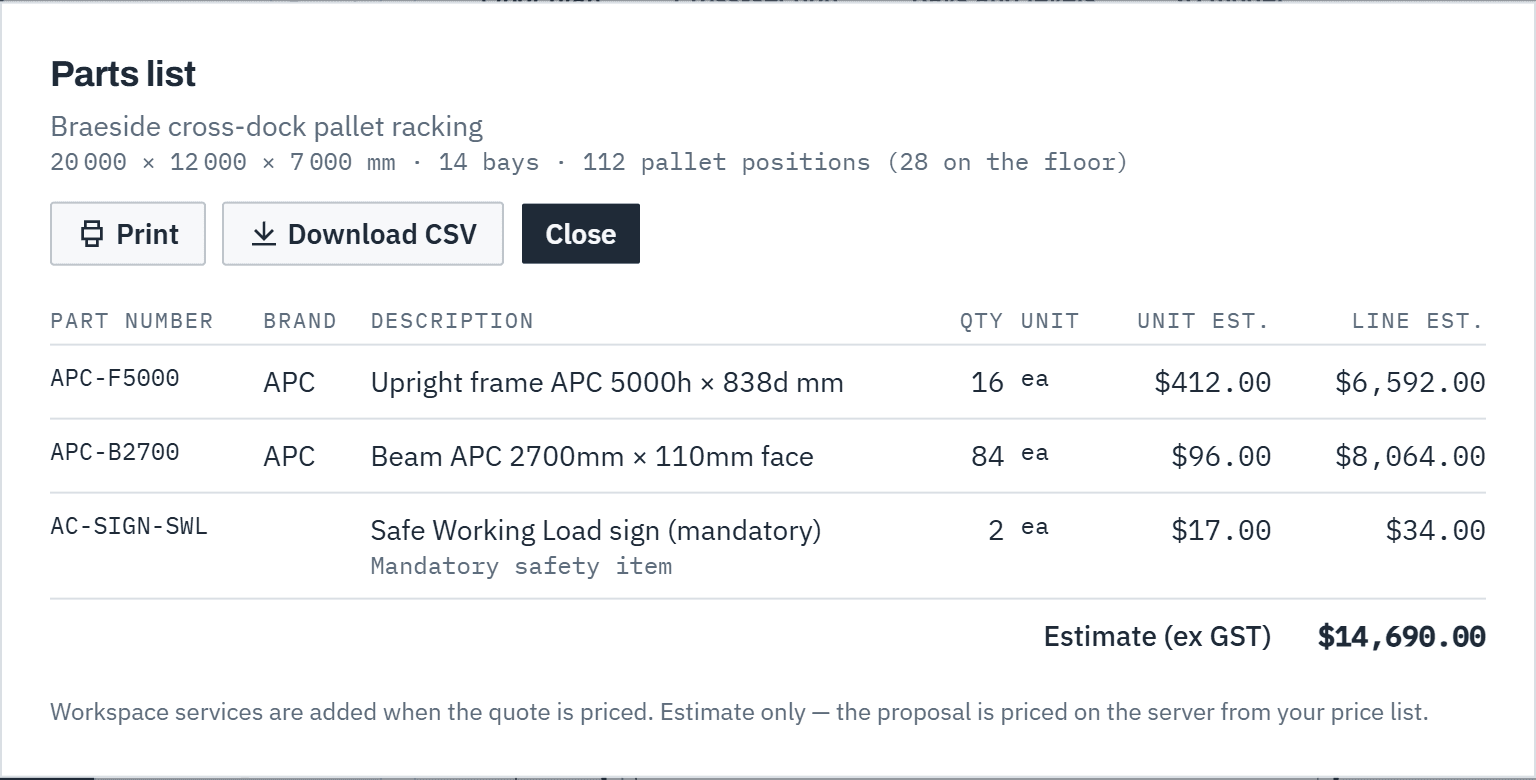
Choose Parts list for the bill of materials: the part number, brand, description, quantity and unit of every frame, beam, deck panel and mandatory safety item, with the estimate ex GST on screen. They are the same lines as the estimate in the header and the costing on Fine-tune. Use Print for a workshop copy, or Download CSV for a supplier: the CSV has no prices. A part with no price in your price list reads Not priced, as it does on the quote. Workspace items are added when the quote is priced.
Mandatory safety items are counted from the layout: one sign per rack run, and a corner protector at each free-standing run end, one per face. An end less than 600 mm from a wall, or from another run's frames, isn't free-standing. The doorway isn't a wall, so run ends facing the door always get a corner protector. A brand's own safety item, such as a beam clip, is only added when the frame or beam is that brand. A mandatory item you haven't priced is still listed, as Not priced, and the quote can't be sent until it has a price.
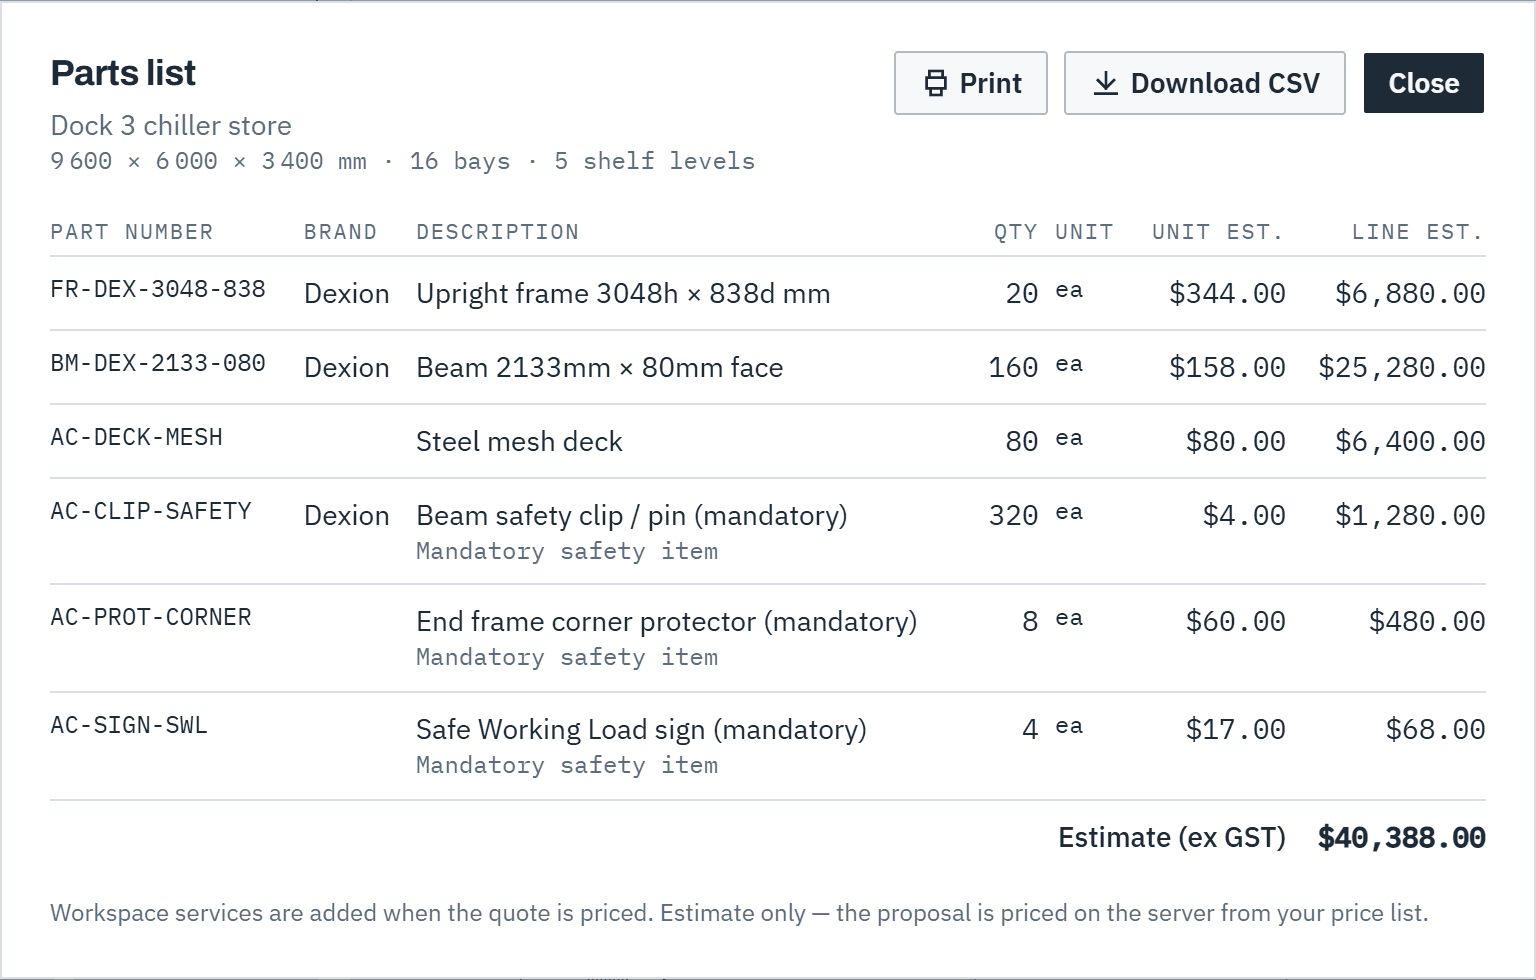 (opens full size in a new tab)
Open the parts list to check, print or download the bill of materials (the CSV never carries prices). Step 9: Save and go back
The designer saves about a second after each change. The header says where it's up to: Saving…, then All changes saved with how long ago, for example All changes saved · 2 min ago.
The main button takes you back to where you came from, saving first: Save and return to quote when you opened the layout from a quote, Save and return to projects from the projects list, or Save and return to project. It reads Saving…, then Returning…. When the layout is ready to price, generate the quote. See Create and send a quote.
 (opens full size in a new tab)
The header always shows the save status; Save and return saves first, then takes you back.

In the warehouse designer
The warehouse designer (in beta) lays out forklift aisles and rows of pallet racking. It has the same Setup, Fine-tune and Summary tabs, a labelled floor plan, and a Bays and levels view where you can change the levels of one bay or a whole row.
Step 10: Read the header and stat strip
The header names the project, the room and the handling equipment, with Undo, Redo, Parts list and the save status. Under it, the stat strip leads with pallet positions (and how many are on the floor), then bays, rows, beam levels, floor used, the estimated cost per position and the estimate ex GST. shelf area appears when deck panels are on.
 (opens full size in a new tab)
The stat strip leads with pallet positions, counted by pallets per beam from your Catalogue pallet standard. Step 11: Set up the room and racking
Setup keeps the basics: the room, Rows run along and Row type, the Material handling and Aisle width (leave it blank for your house standard), then the racking: Brand, then Frame, then Beam. A frame taller than the clear height is marked (over clear height); Custom size is last in each list.
Fine-tune holds the perimeter setback, flue gap, cross-aisles, row and bay overrides, bay profiles, the pallet side clearance for this design, and the rates. The tab is marked when anything on it differs from your defaults. Frame $ and Beam $ lock to your price list when the part has a sell price.
Step 12: Set the levels
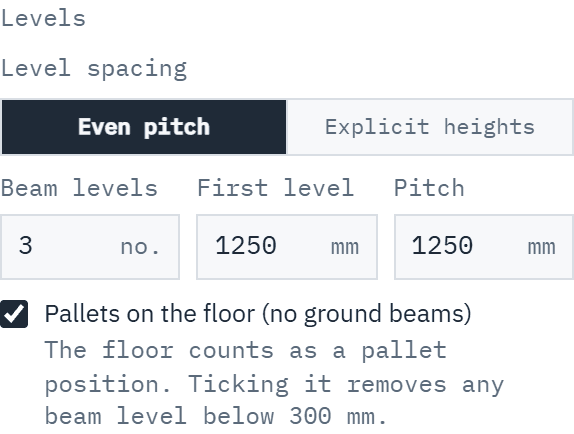
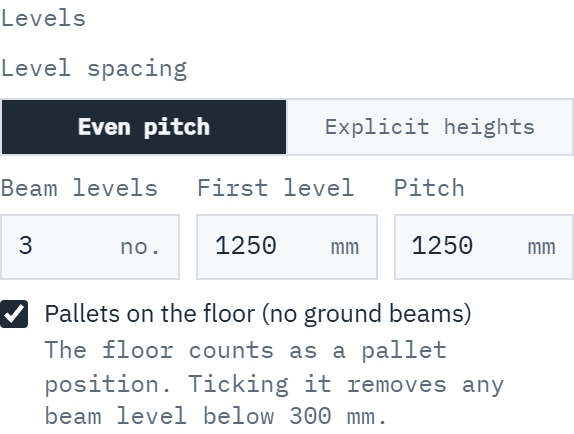
On Setup, under Levels, set the number of Beam levels. With Even pitch, enter the First level and the Pitch in millimetres; with Explicit heights, enter each level's height.
Tick Pallets on the floor (no ground beams) when the bottom pallet sits on the floor: the floor counts as a pallet position, and any beam level below 300 mm is removed. A new warehouse design starts this way, with three beam levels at 1 250, 2 500 and 3 750 mm.
 (opens full size in a new tab)
Levels sets the beam levels of the default profile; pallets on the floor count as a position. Step 13: Switch deck panels on or off
Under Racking, Deck panels is off for pallet racking: the quote then has no deck-panel lines. Switch it on for shelving that needs decks. A new warehouse design starts with it off; designs made before it existed keep their deck panels.
Step 14: Select a row on the plan
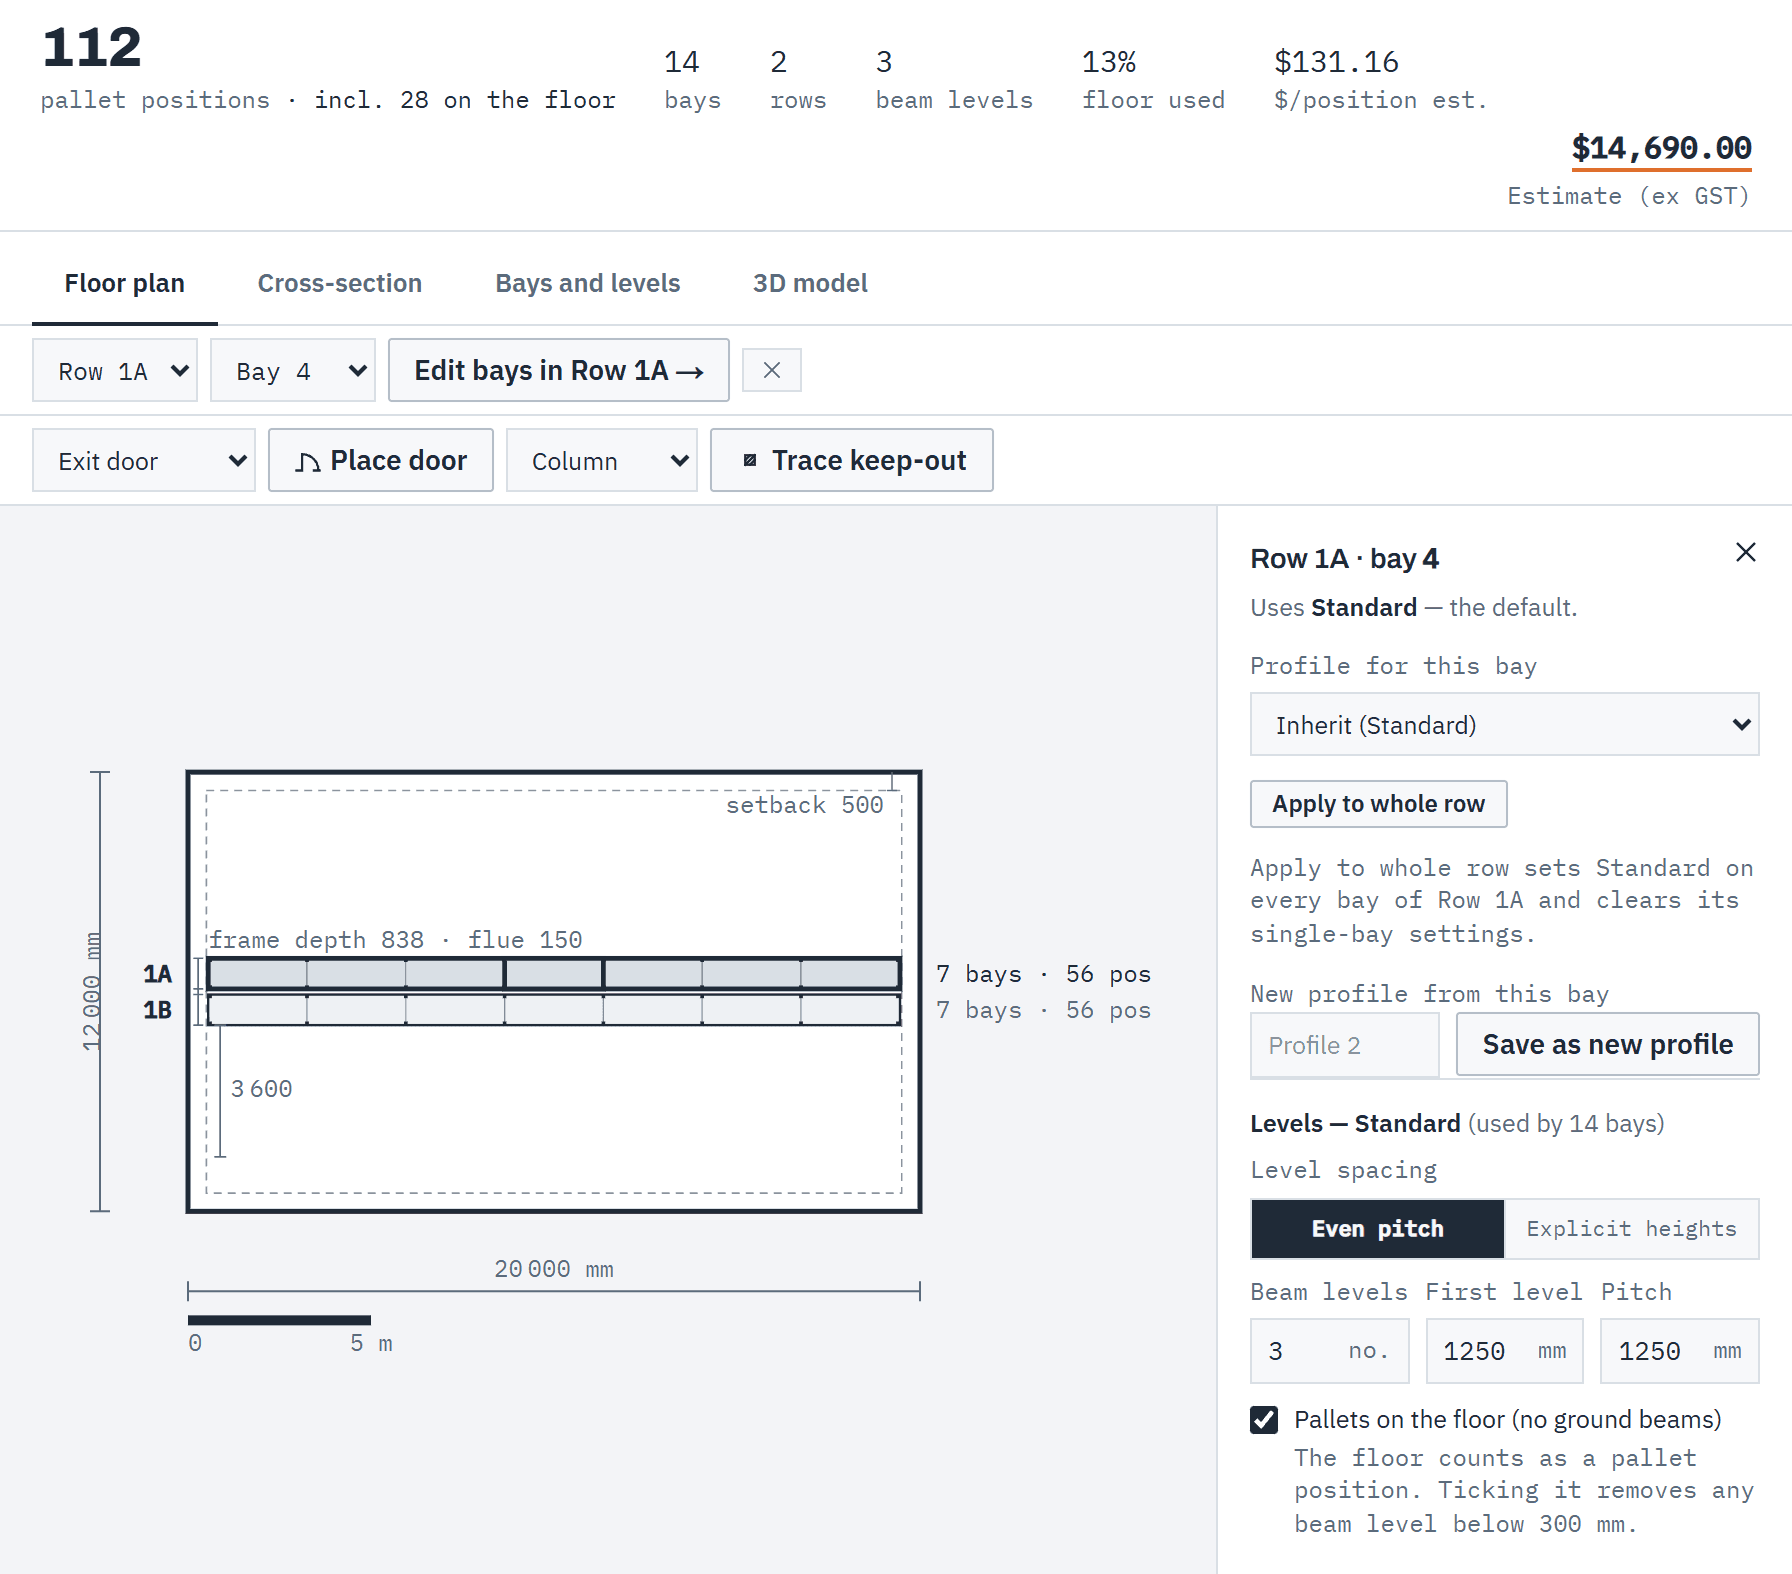
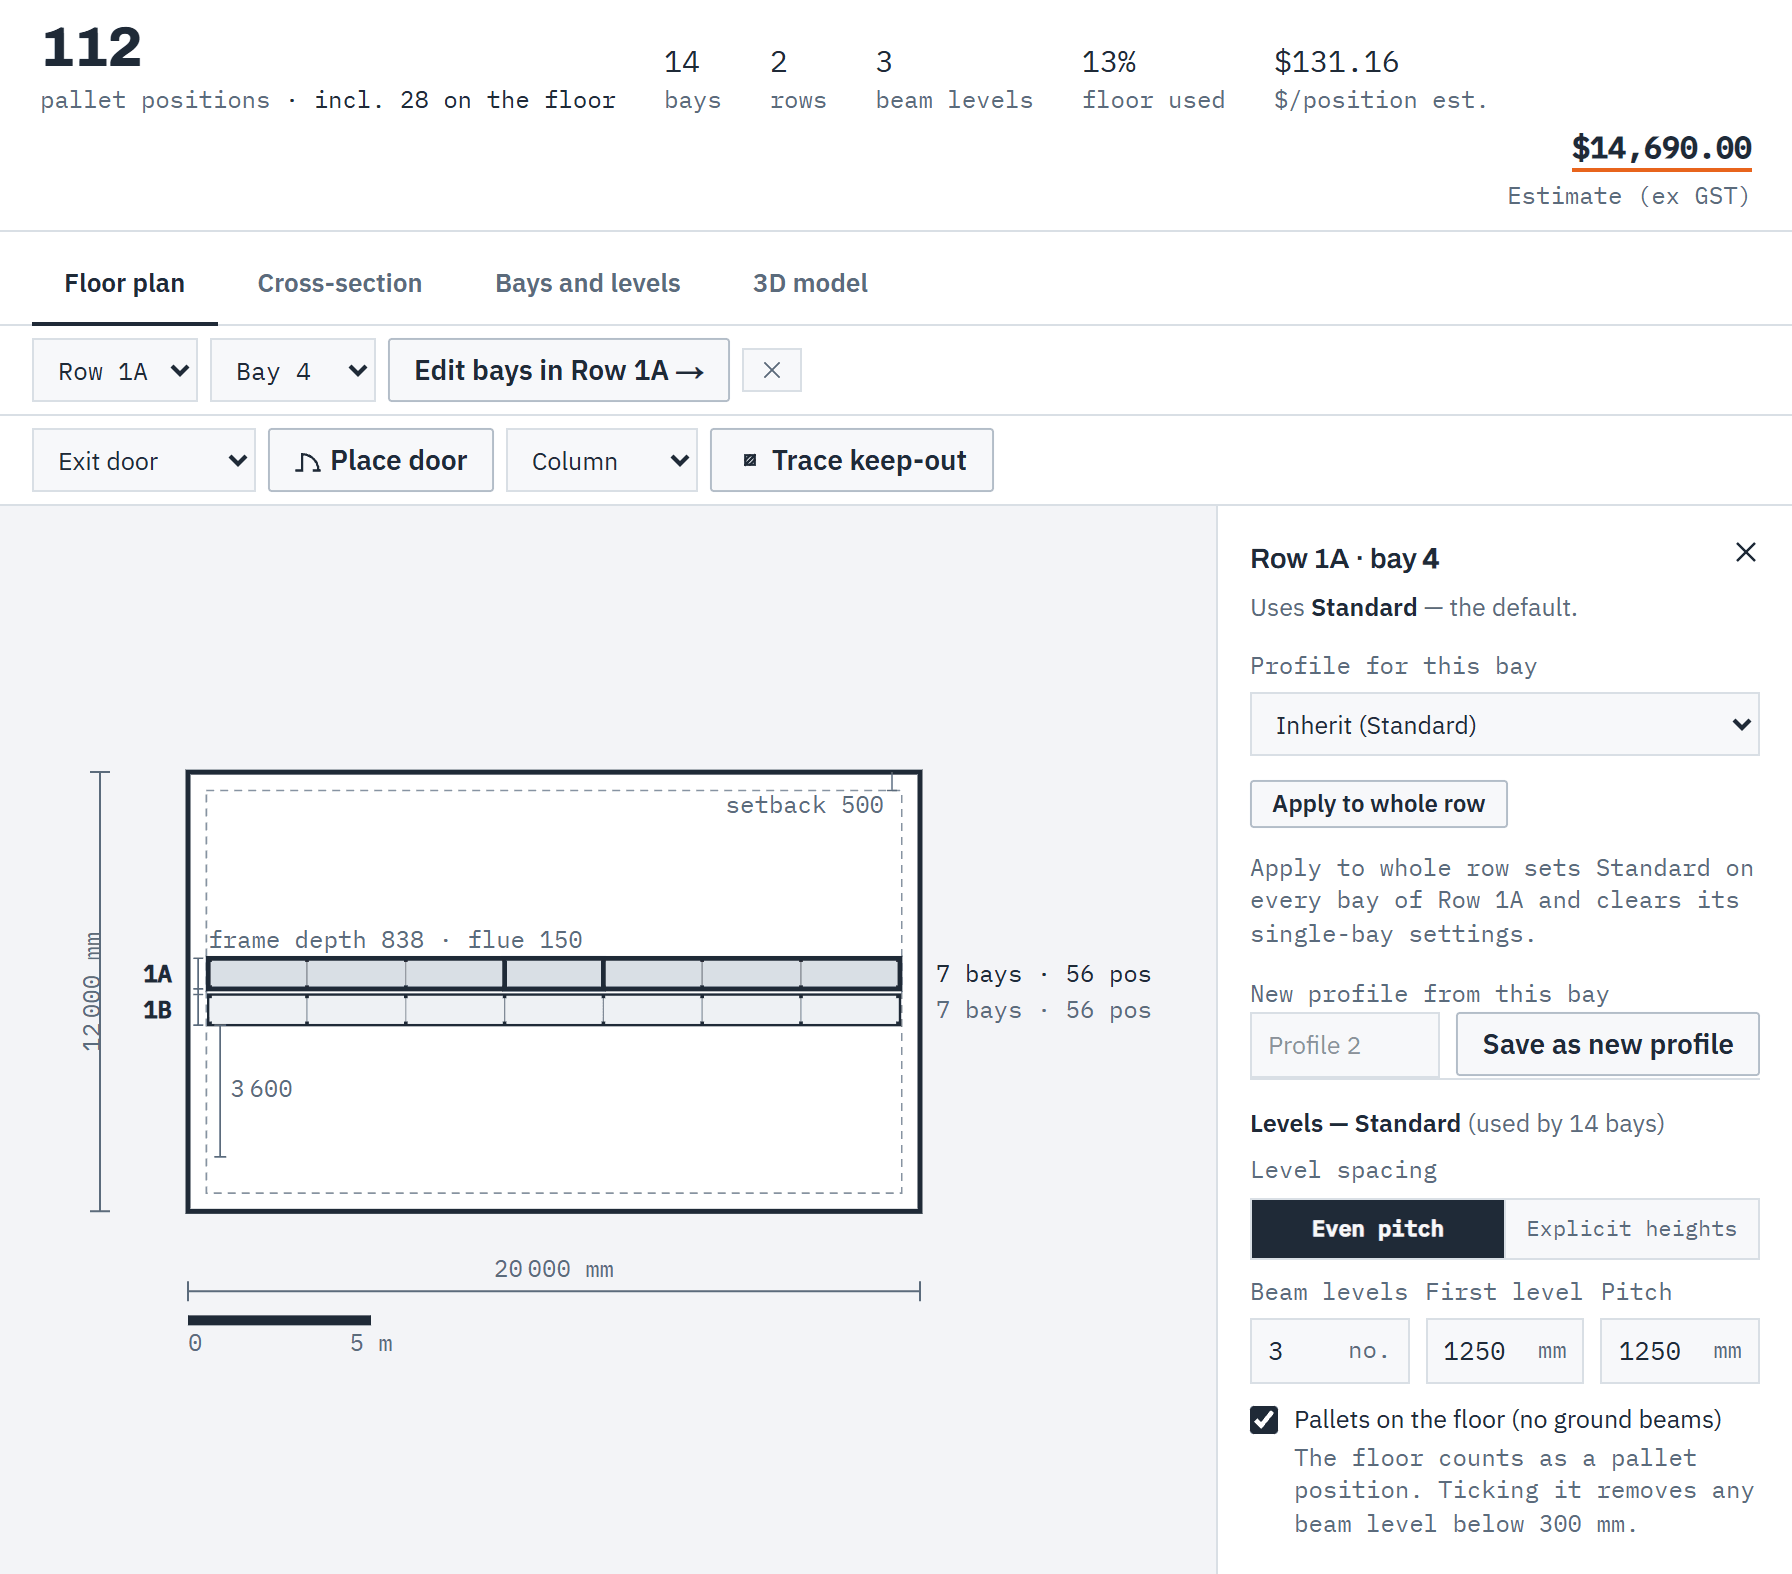
The Floor plan labels every row in the left margin (back-to-back rows read 1A and 1B) and shows each row's bays and pallet positions on the right, for example 7 bays · 56 pos. The aisles are dimensioned in the aisle, with the frame depth, flue gap and perimeter setback marked once. Click a row to select it, then Edit bays in Row 1A to open it in Bays and levels. From the keyboard, use the Row list there. On a desktop you can also click a bay on the plan: it's highlighted, selected in Bays and levels and its settings open beside it; Esc clears it, and the Bay list does the same from the keyboard.
 (opens full size in a new tab)
Click a row on the plan to select it, then Edit bays to open it in Bays and levels. Step 15: Change one bay or a whole row
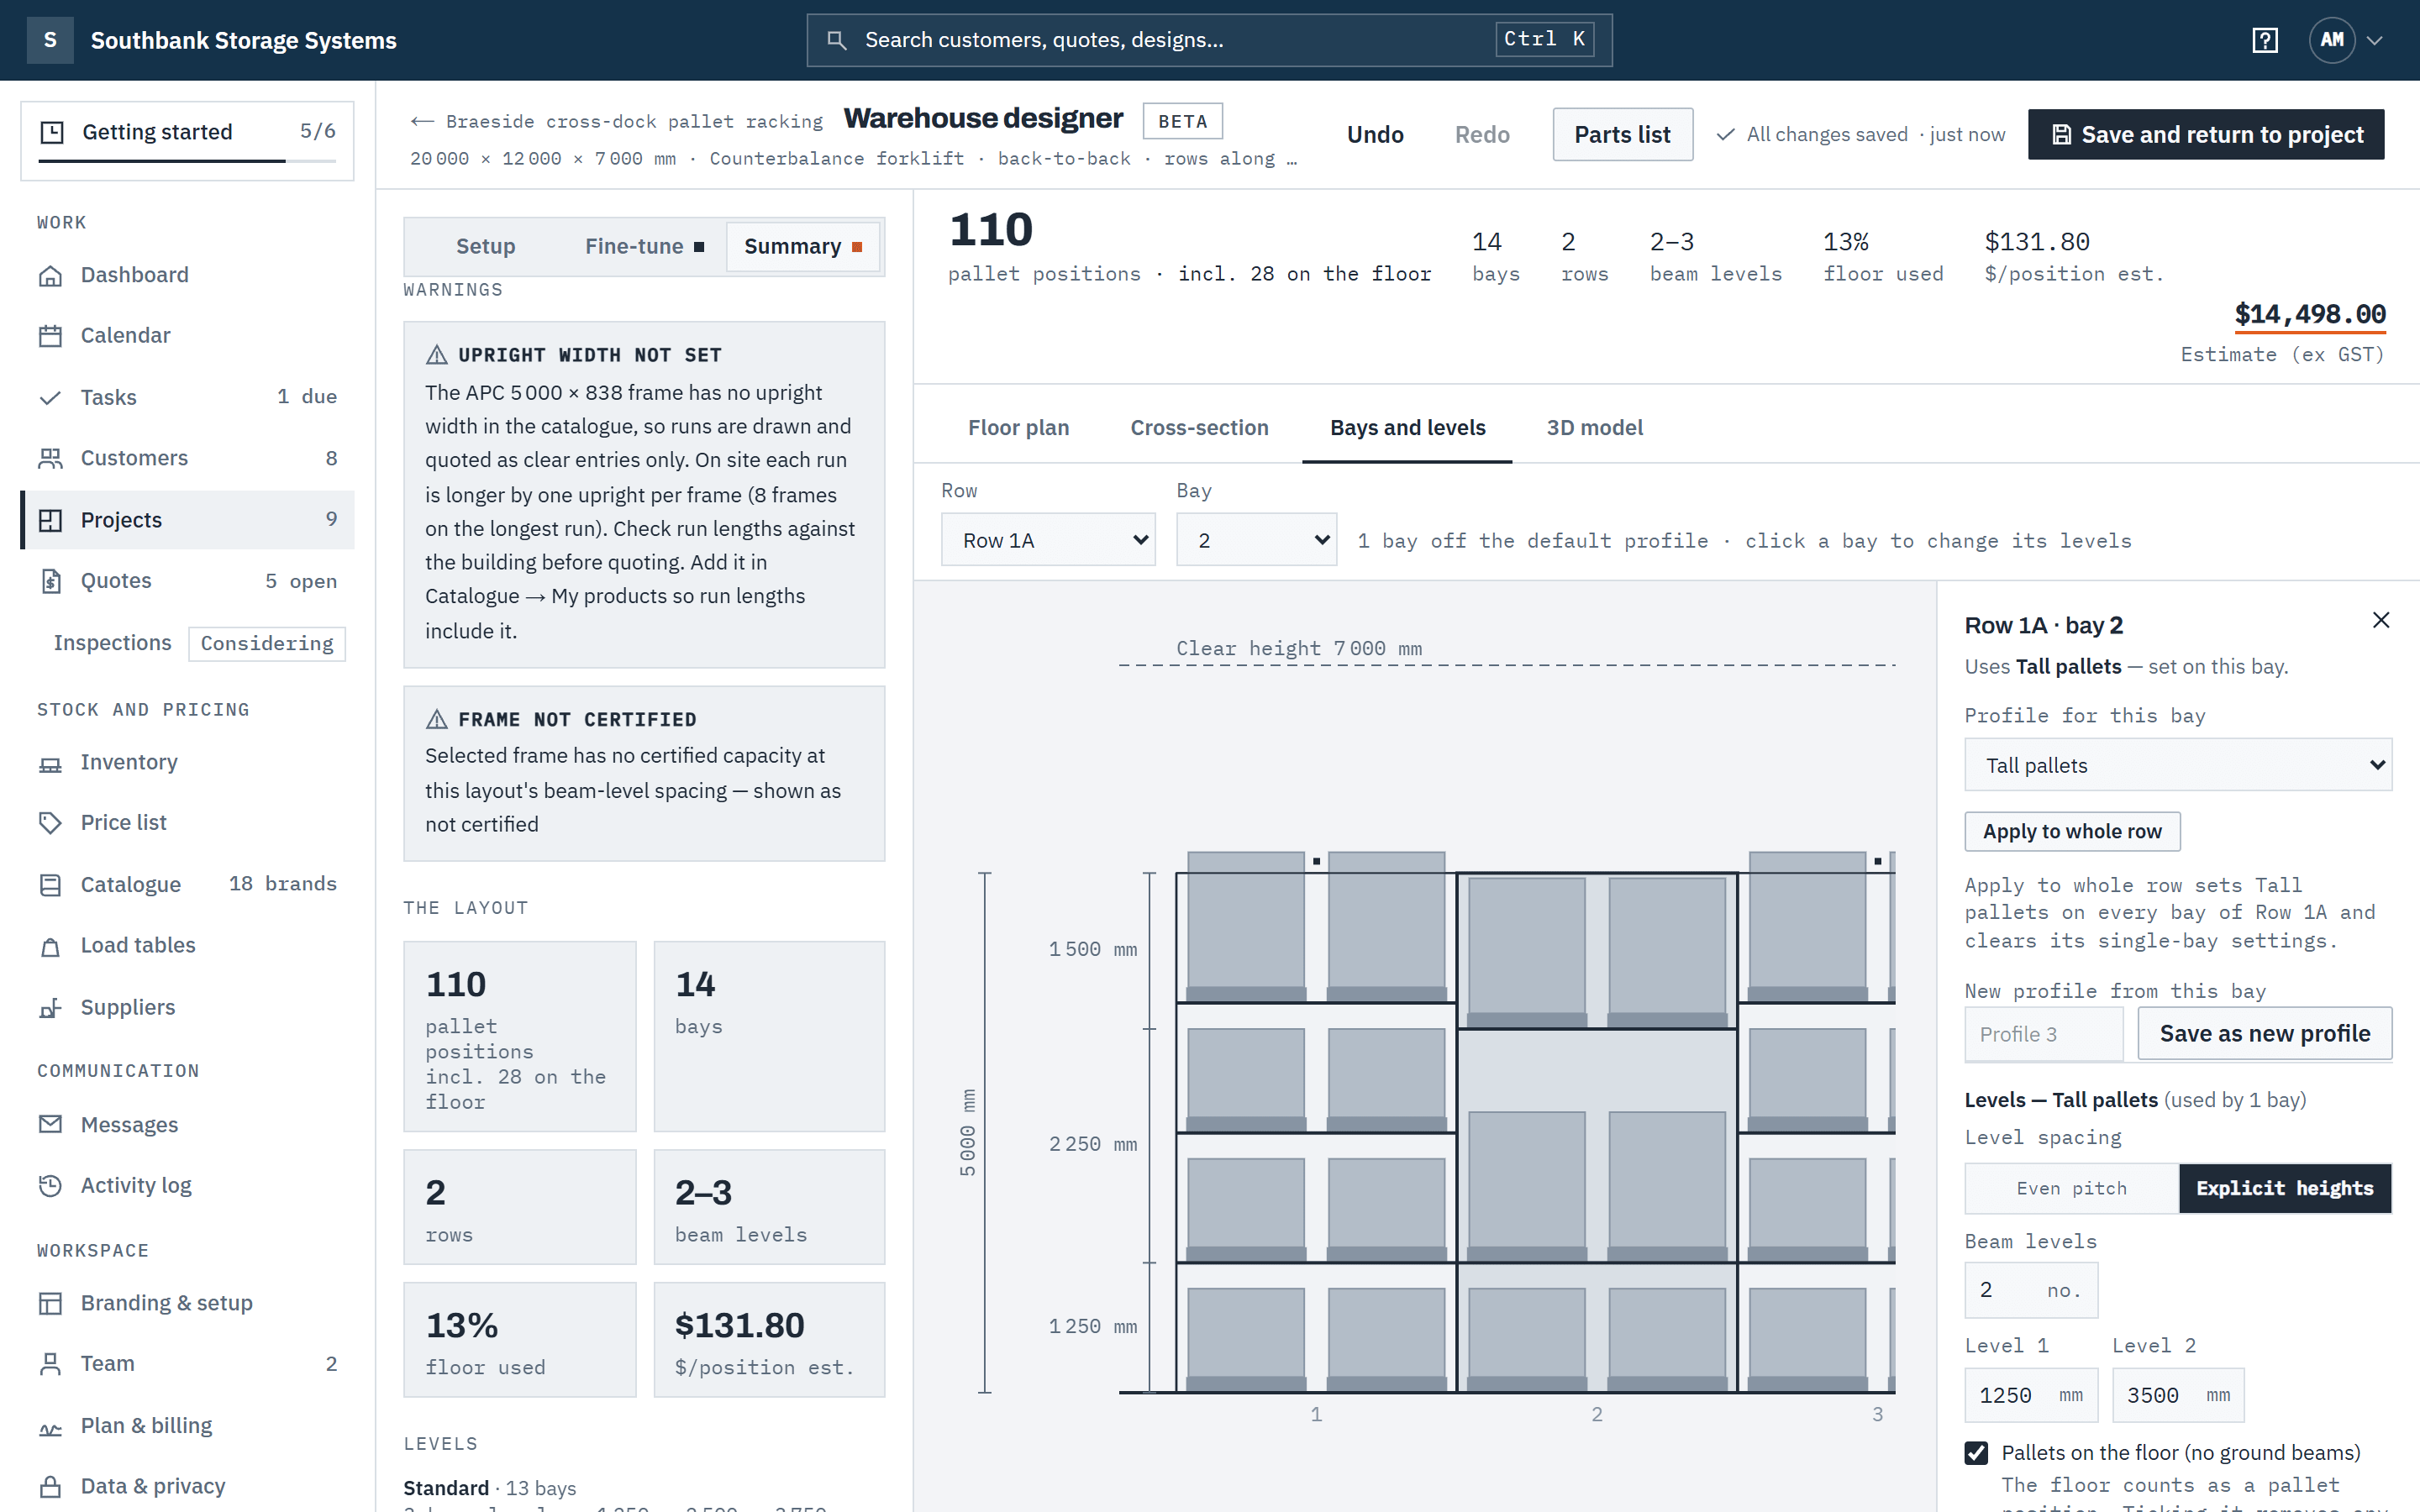
Bays and levels draws the row to scale, with the clear height dashed and the level heights dimensioned on the left. It loads the beams as the 3D model does: pallets on every level when Deck panels is off, deck panels and cartons when it's on. A long row scrolls sideways; press Tab to reach the drawing and use the arrow keys. Choose the Row (back-to-back rows read Row 1A and Row 1B), and click a bay, or pick its number under Bay. In the bay settings docked beside the drawing:
- Profile for this bay: inherit the row's levels, or pick a profile.
- Apply to whole row sets that profile on every bay in the row; Row back to default undoes it.
- New profile from this bay, then Save as new profile, gives the bay its own levels, which you edit right there.
Every profile is listed on Fine-tune under Bay profiles: rename it, choose Edit levels, or delete it (the default profile can't be deleted). The toolbar counts the bays that are off the default profile.
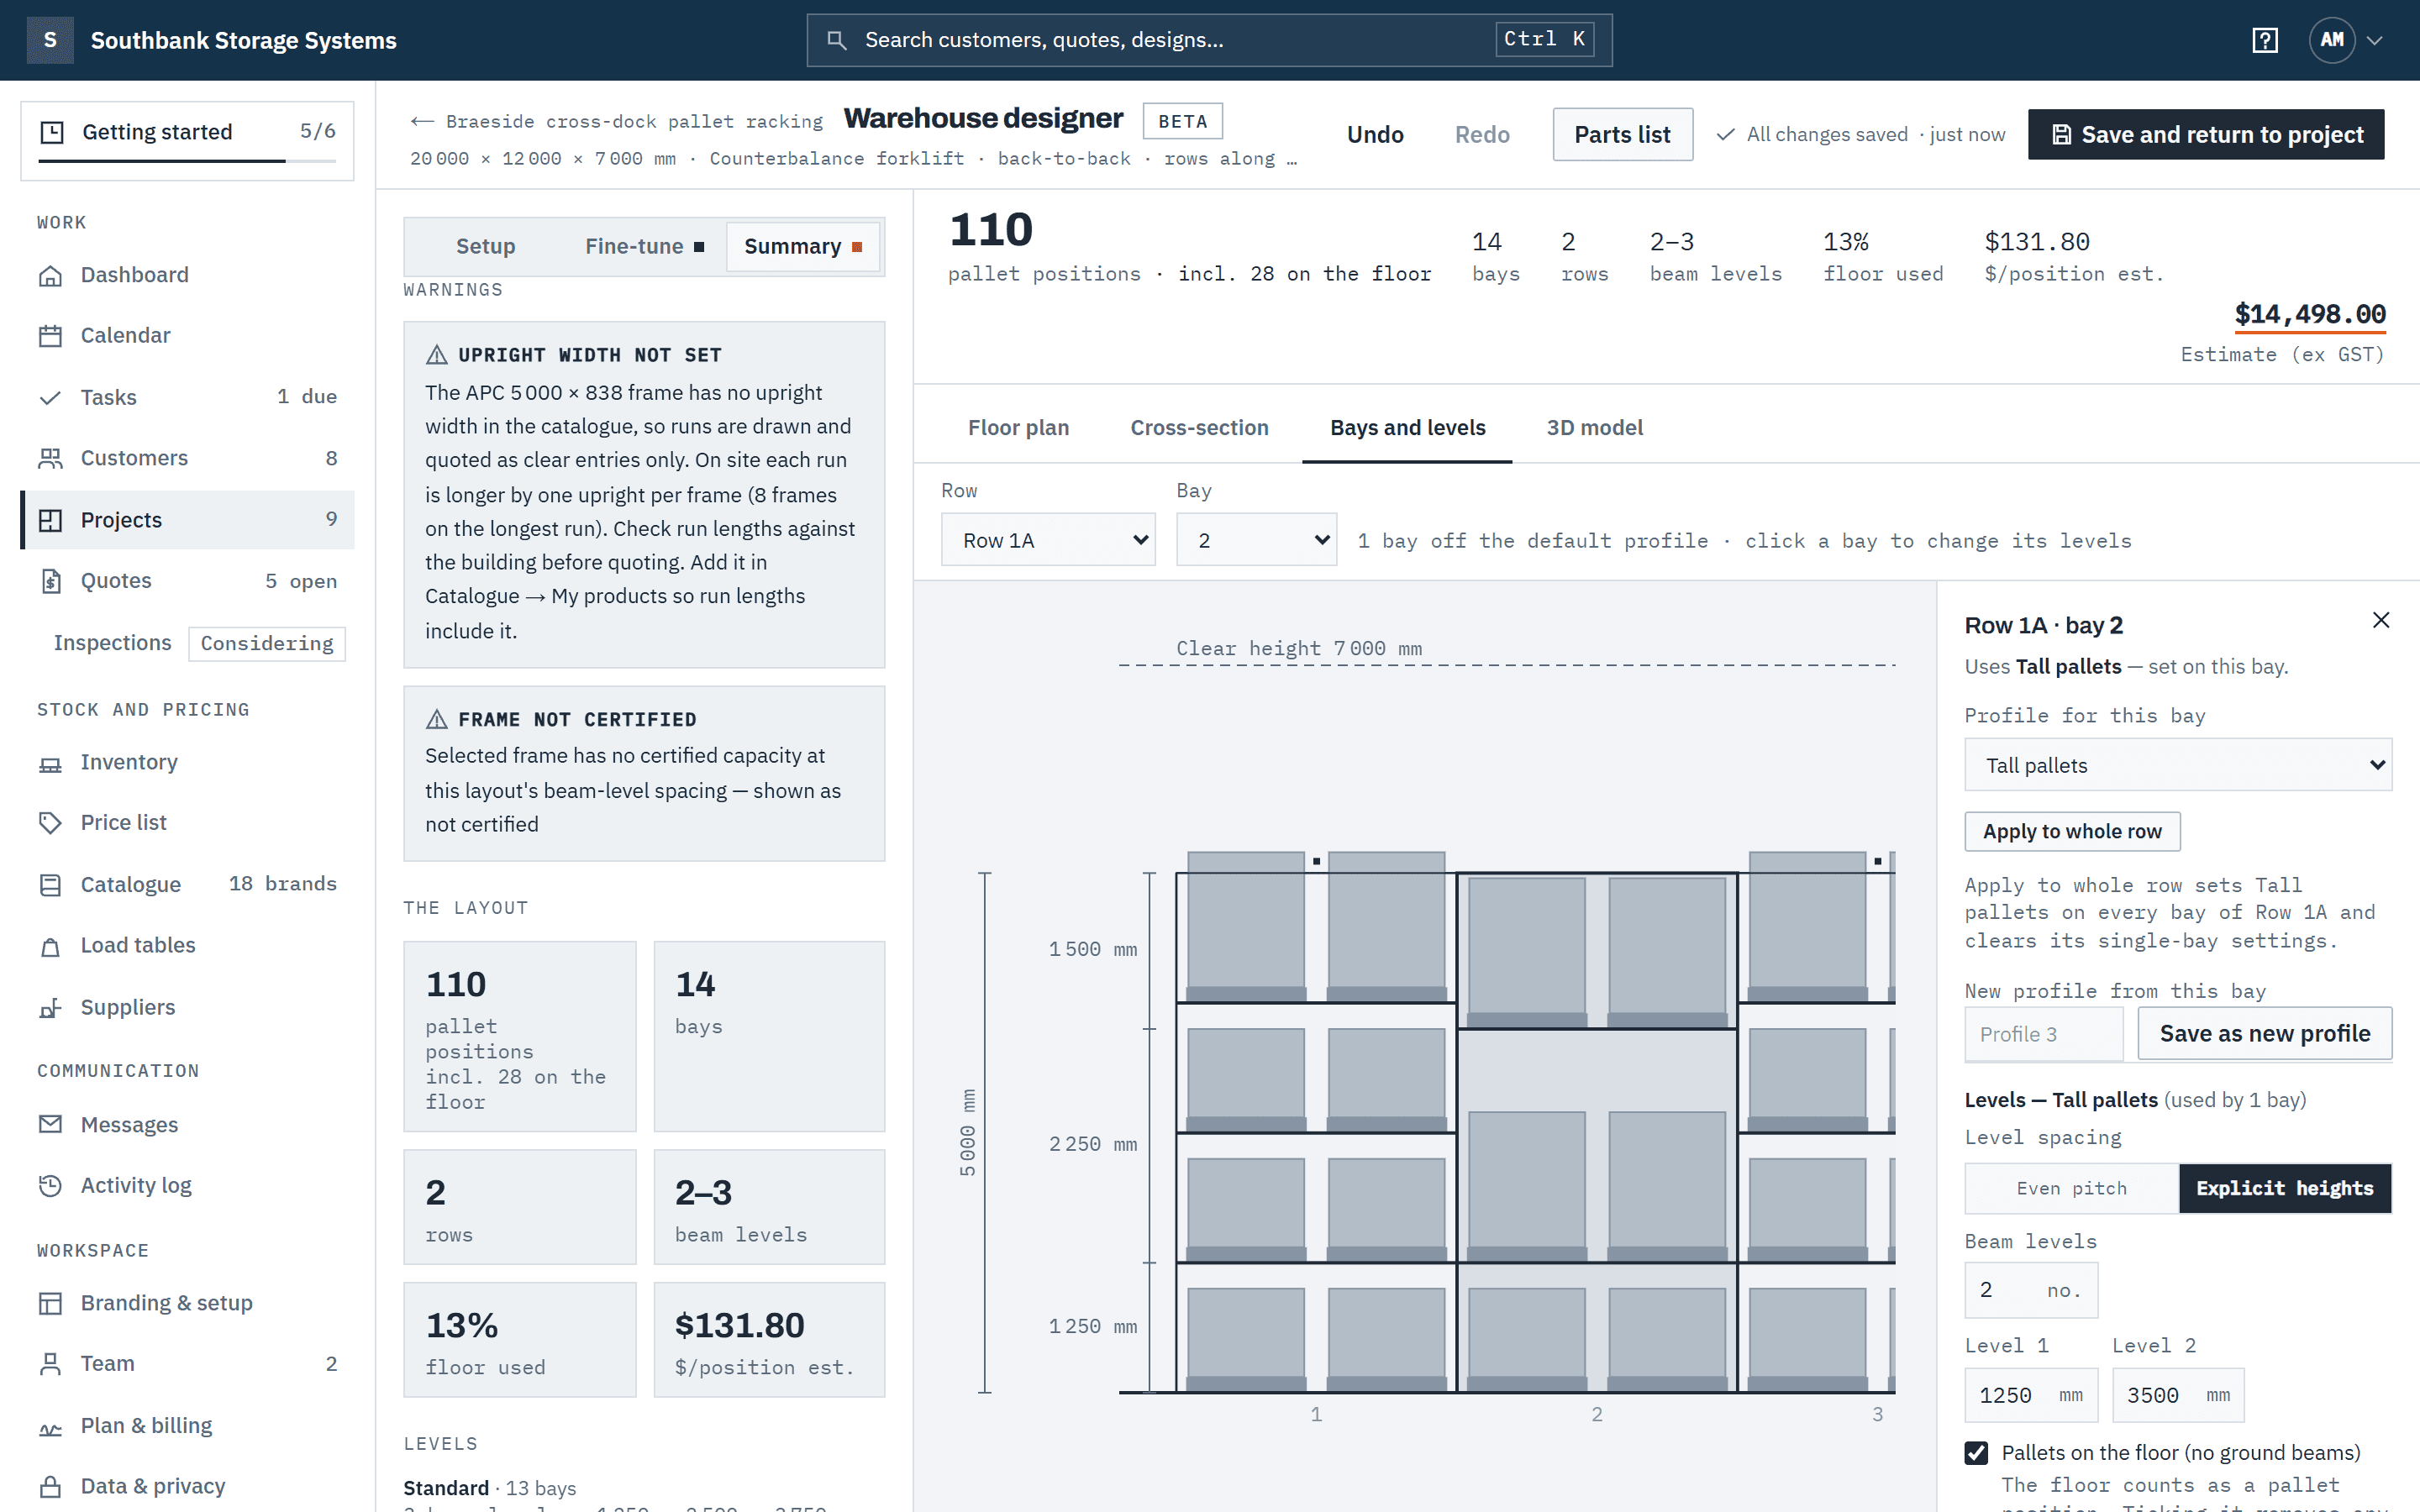 (opens full size in a new tab)
Click a bay on Bays and levels to give it, or its whole row, a different profile. Step 16: Check the warehouse in 3D
3D model has the same controls as the container designer, with Iso, Top, Front, Side and Fit. It draws what the quote prices: deck panels (with cartons) only when Deck panels is on, a floor pallet only in bays whose profile has pallets on the floor, and, with deck panels off, as many pallets per beam level as fit the beam, the same count as the Summary's pallet positions. Your customer sees the same model in the proposal and on their online quote.
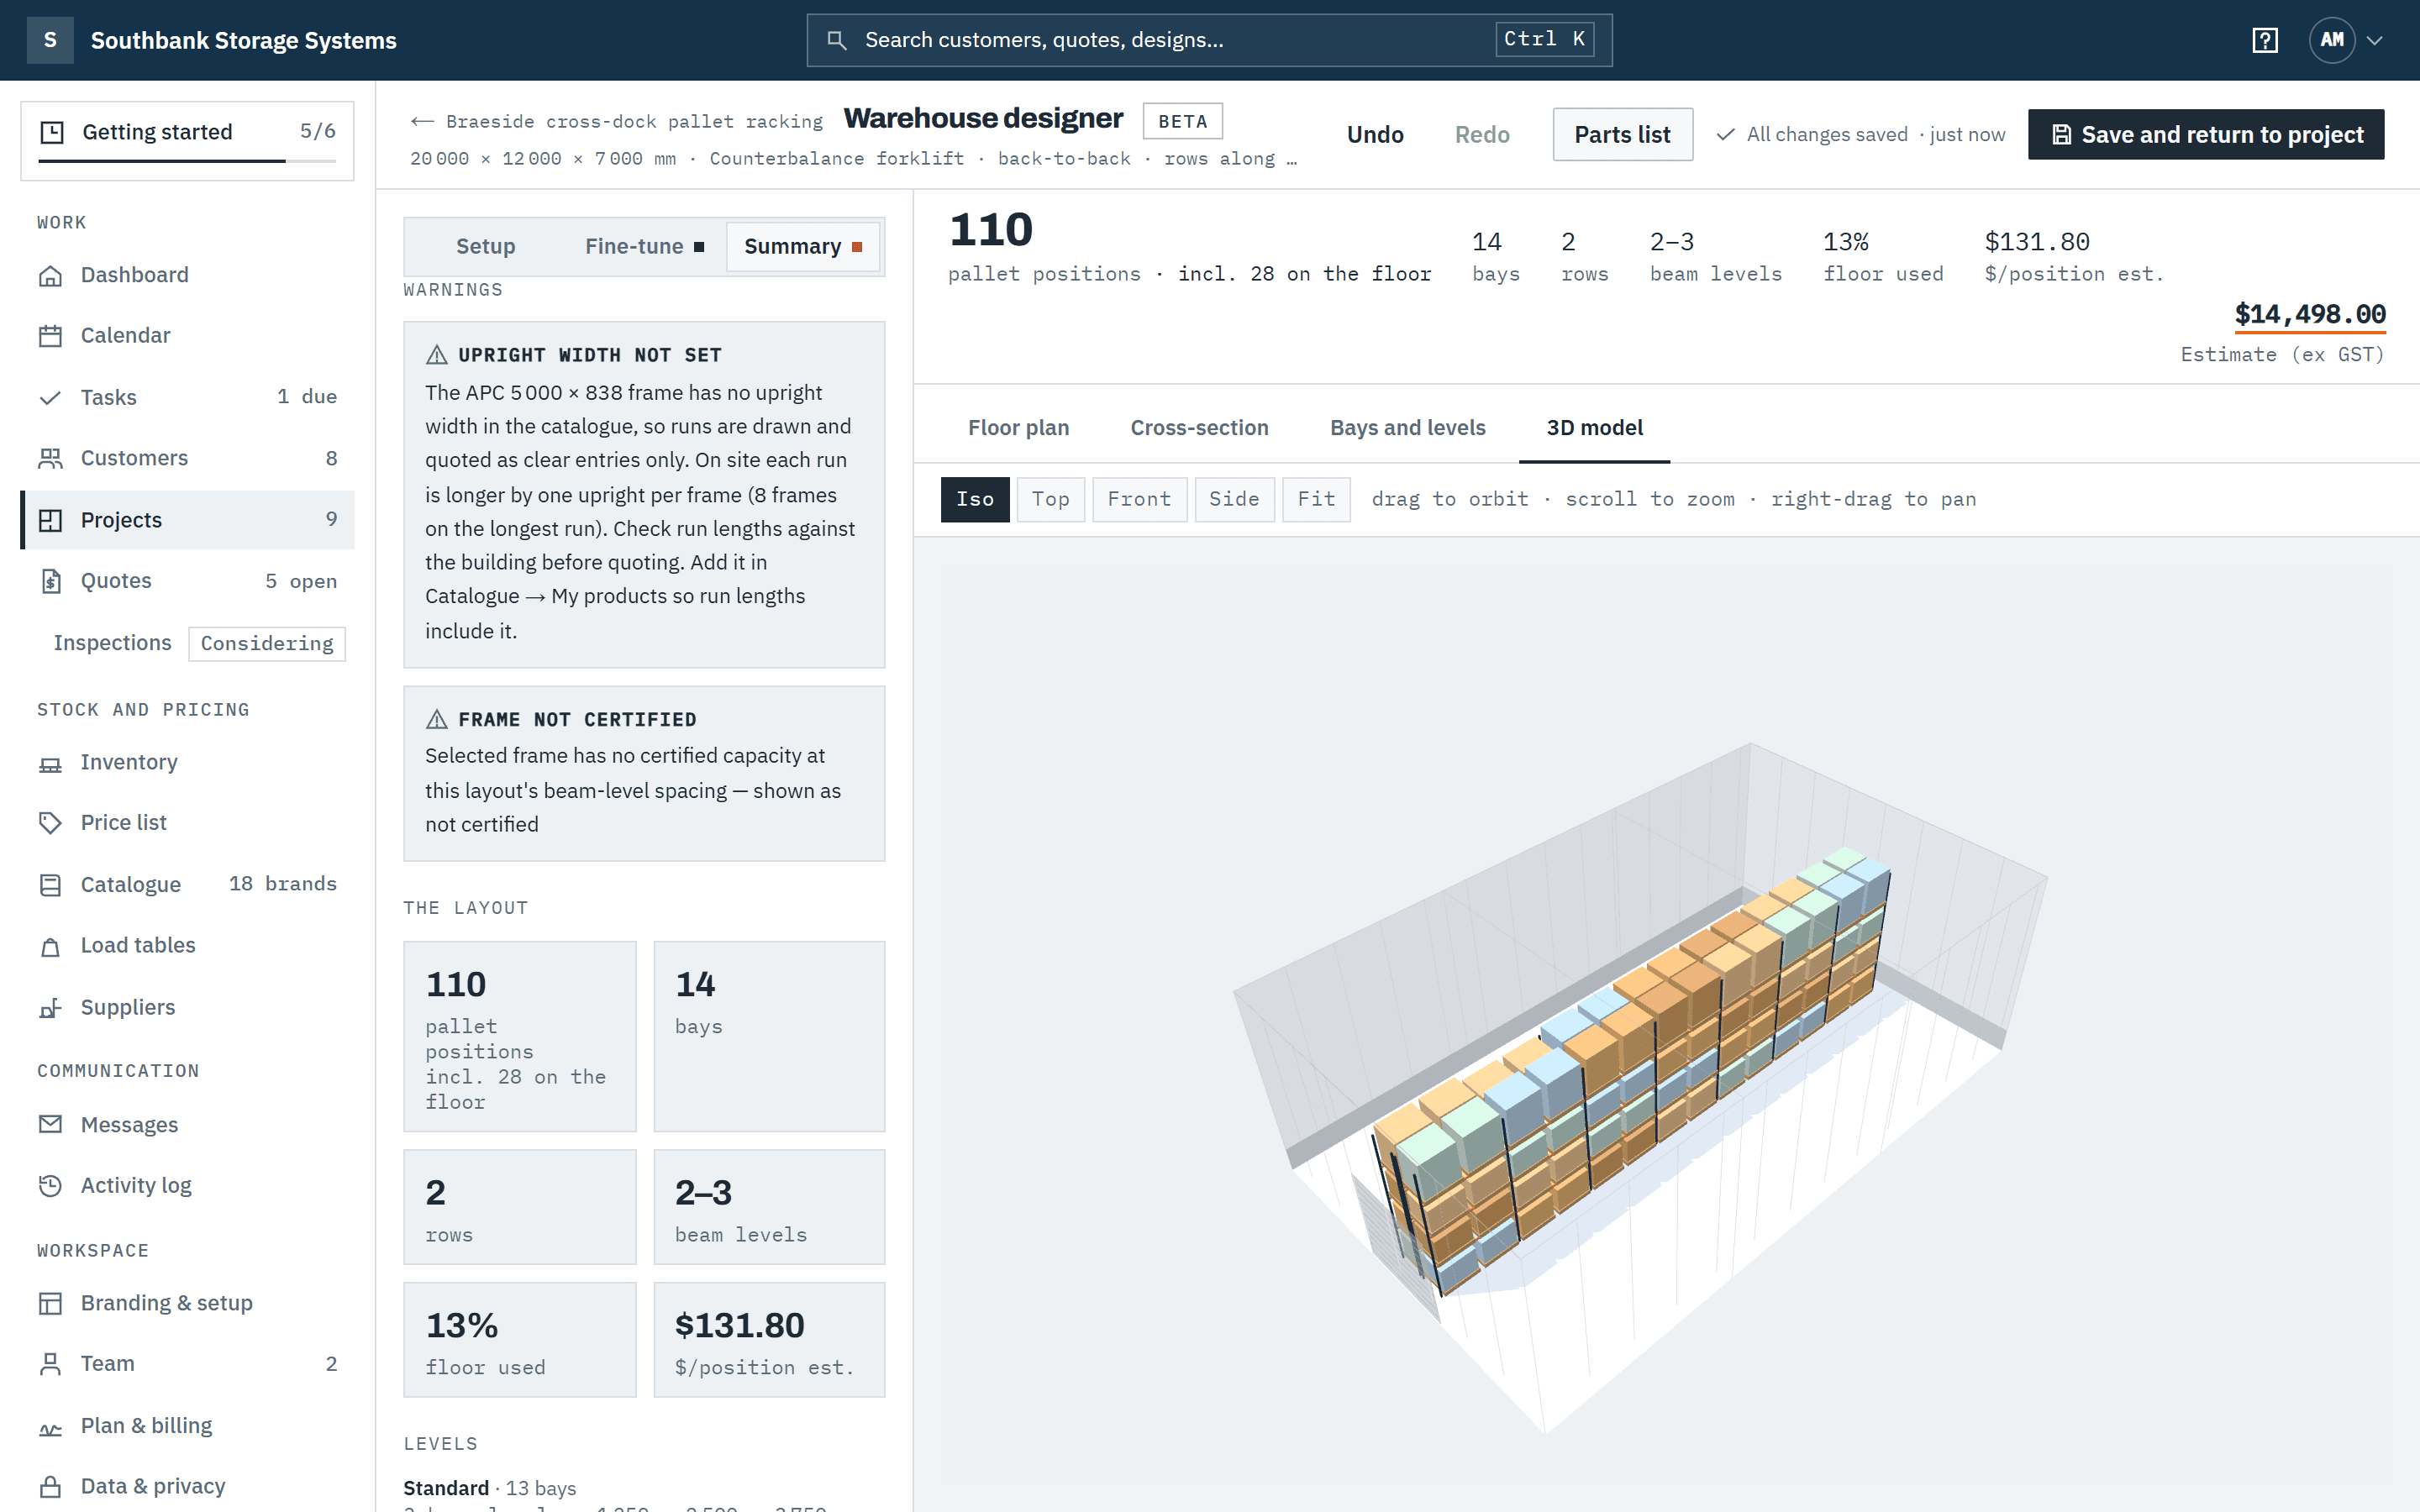 (opens full size in a new tab)
The warehouse 3D draws the pallet positions the Summary counts; Fit brings the whole layout back into view. Step 17: Fix a warning in one click
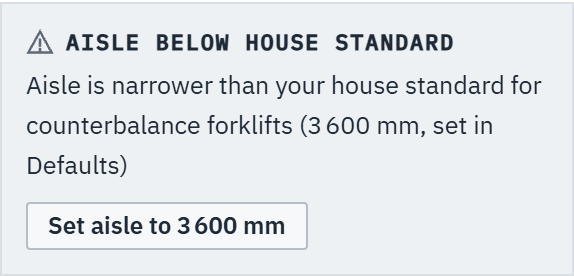
Summary lists each warning as a card, and most carry a fix button: Set aisle to 3 600 mm (your house standard), Set cross-aisles to 2, Choose a shorter frame, Lower levels above frame, Use automatic rows or Use automatic bays per row. A fix only changes the layout setting the warning names; it never changes a capacity or your defaults.
When rows or bays don't fit, the warning says by how much, for example Rows don't fit — 1 240 mm over the usable width. On Setup and Fine-tune the warning titles are listed at the top; choose one to jump to its card.
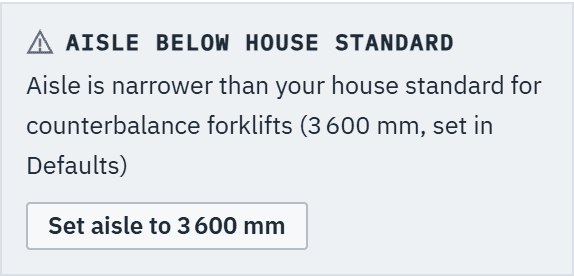 (opens full size in a new tab)
Most warnings carry a fix button: one click sets the value the warning asks for. Step 18: Clear or keep bay settings when rows move
If you change the rows (their number, direction or type) after setting bays, the settings may point at rows that moved. Baylogik never drops them silently: a Bay settings moved warning says how many, with Clear to remove them or Keep to leave them where they now land.
Step 19: Read levels and capacity on the Summary
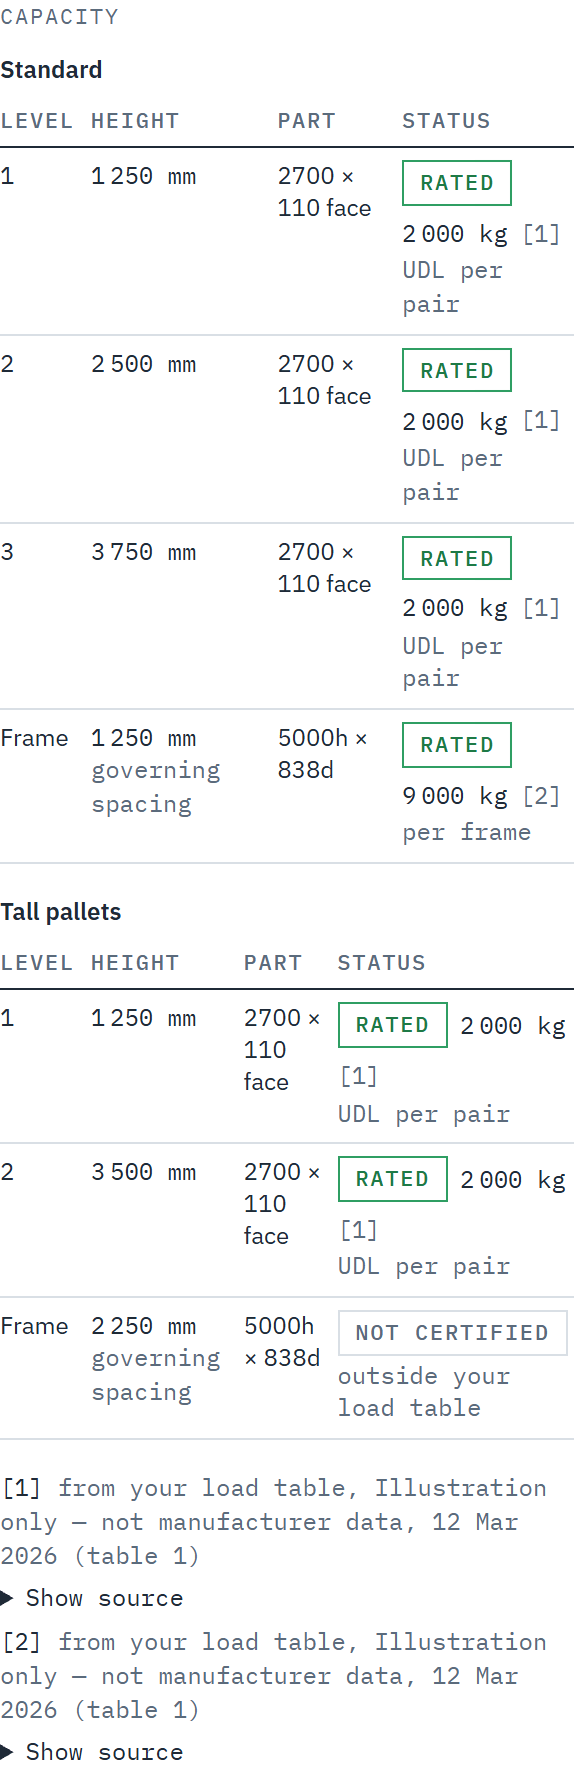
Summary counts the pallet positions on beam levels and on the floor, lists the levels of each profile in use, and under Capacity gives one table per profile: each beam level's height, beam pair and status, and a Frame row at the profile's governing level spacing (the largest gap, including floor to first beam). Each source is named once under the tables; Show source opens the full note.
Pallet positions count the pallets that fit side by side on each beam: your Pallet standard from Catalogue → Defaults, loaded on its shorter face, plus a side clearance at each end and between pallets. On a 2700 mm beam with the default 75 mm clearance an Australian 1165 × 1165 pallet fits 2 and a Euro 1200 × 800 (on its 800 mm face) fits 3. Set the clearance under Branding & setup → Defaults & clearances, or for one design in Fine-tune.
Each status reads Rated with the figure and its source, or Not certified with the reason, such as outside your load table. The warnings include Frame not certified and Bay spacing outside load table. See Your own load tables.
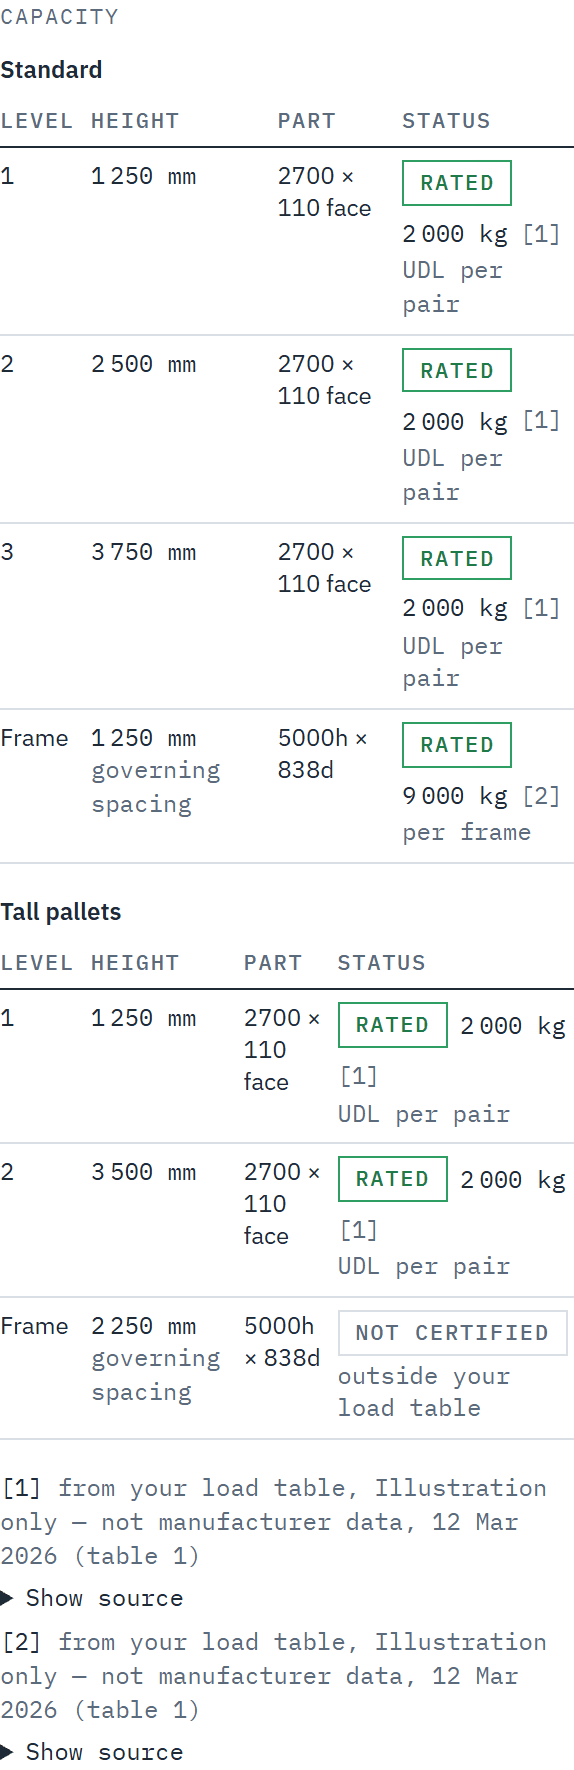 (opens full size in a new tab)
Summary → Capacity rates each level and the frame per profile, or says why it's not certified. Step 20: Print or download the parts list
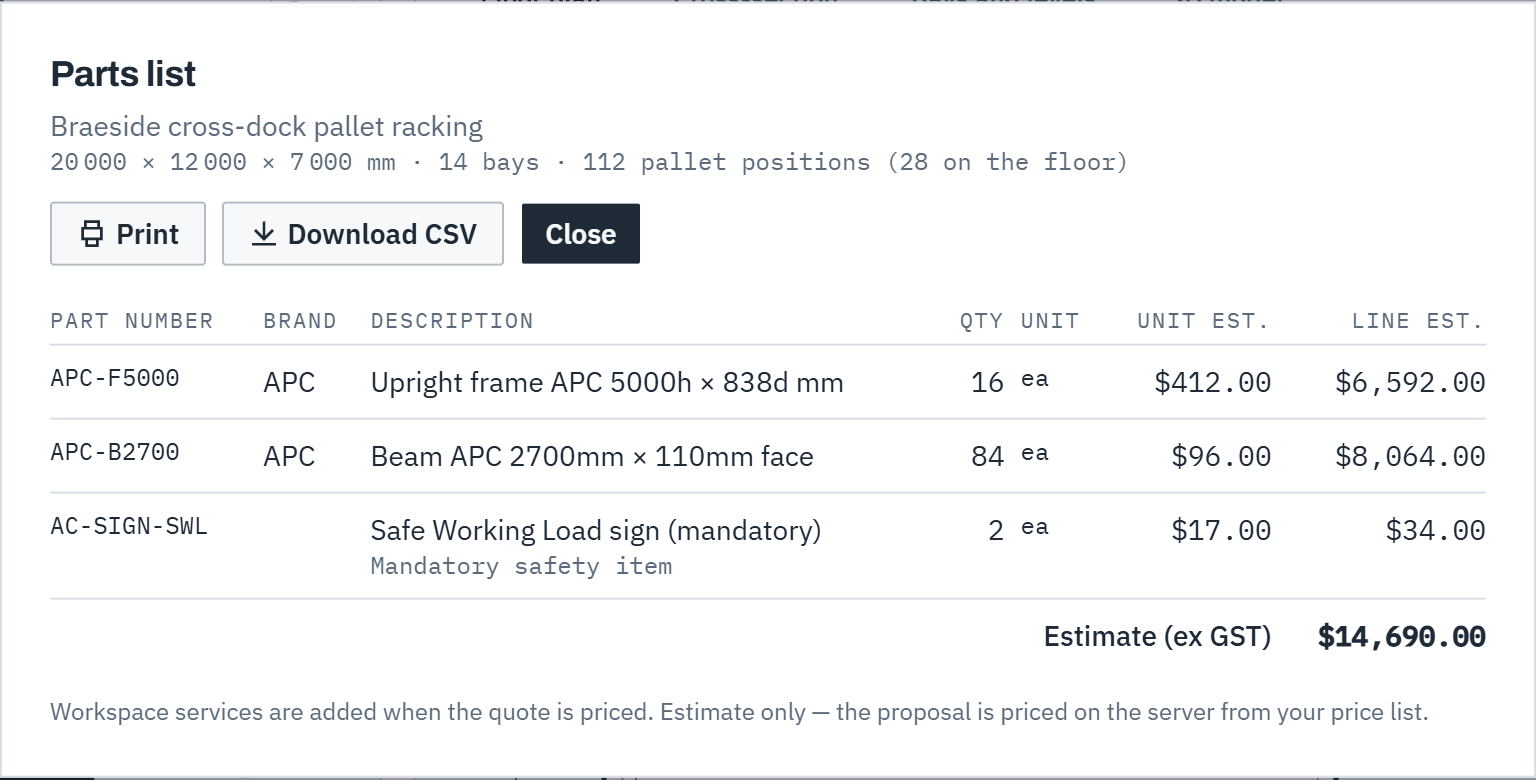
Parts list in the header lists the frames, beams, deck panels (when they're on — your default deck panel unless the design has its own), mandatory safety items and your own accessories marked Add to every quote, with their part number, brand, description, quantity and unit, and the estimate on screen. They are the same lines as the stat strip's estimate and the quote. Use Print, or Download CSV for a supplier: part numbers and quantities, no prices. Your services marked Add to every quote, such as labour and freight, are added when the quote is priced.
Safety items are counted per physical run: a row split by a cross-aisle or a keep-out is two runs, each with its own sign. Corner protectors go on every free-standing run end, one per face, so a back-to-back row needs two at each end. An end less than 600 mm from a wall isn't free-standing, and an office keep-out counts as a wall: the gap is measured to the office itself, so its clearance is part of the gap. Ends at cross-aisles and at column, dock or other keep-outs are free-standing, because traffic can reach them. A brand's own safety item, such as a beam clip, is only added when the frame or beam is that brand. A mandatory item you haven't priced reads Not priced, and the quote can't be sent until it has a price.
 (opens full size in a new tab)
Parts list shows the same lines as the estimate and the quote; print it or download the CSV for a supplier.

Keep-outs
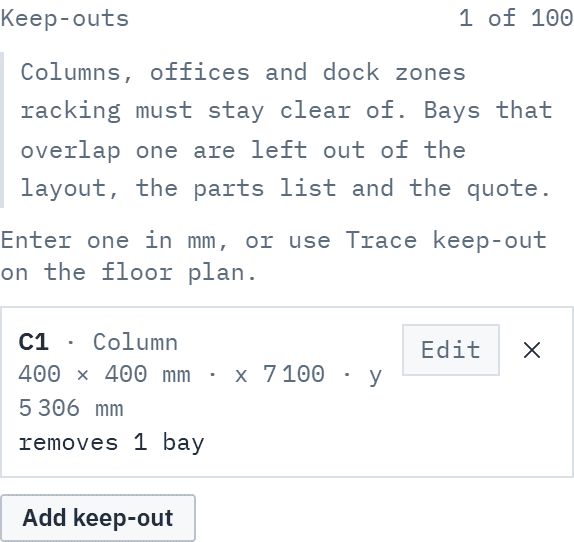
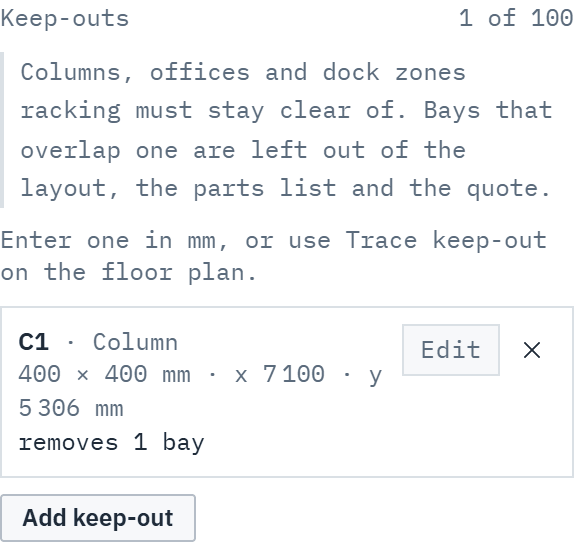
A keep-out is part of the warehouse floor that racking has to stay clear of: a building column, an office, a dock zone or anything else. Every bay that overlaps one is left out of the layout, so the stat strip, the parts list and the quote all count the racking that can actually be installed.
Step 21: Add a column, office or dock zone
On Setup, under Keep-outs (below the building envelope), choose Add keep-out. Pick the Type (Column, Office, Dock zone or Other) and, if you like, a short Label such as C1. Enter its position in millimetres from the building's left wall (X from left) and top wall (Y from top) as drawn on the floor plan, then its Width and Depth. A new keep-out starts as a 400 × 400 mm column.
Clearance is optional: extra room kept clear on every side, entered by you. It isn't an engineering clearance; enter what the site requires. A keep-out must sit inside the building, and its size must be more than 0. Until it does, Add keep-out shows what to fix and nothing is saved.
 (opens full size in a new tab)
Setup → Keep-outs: each entry says how many bays it removes. Step 22: See what a keep-out costs
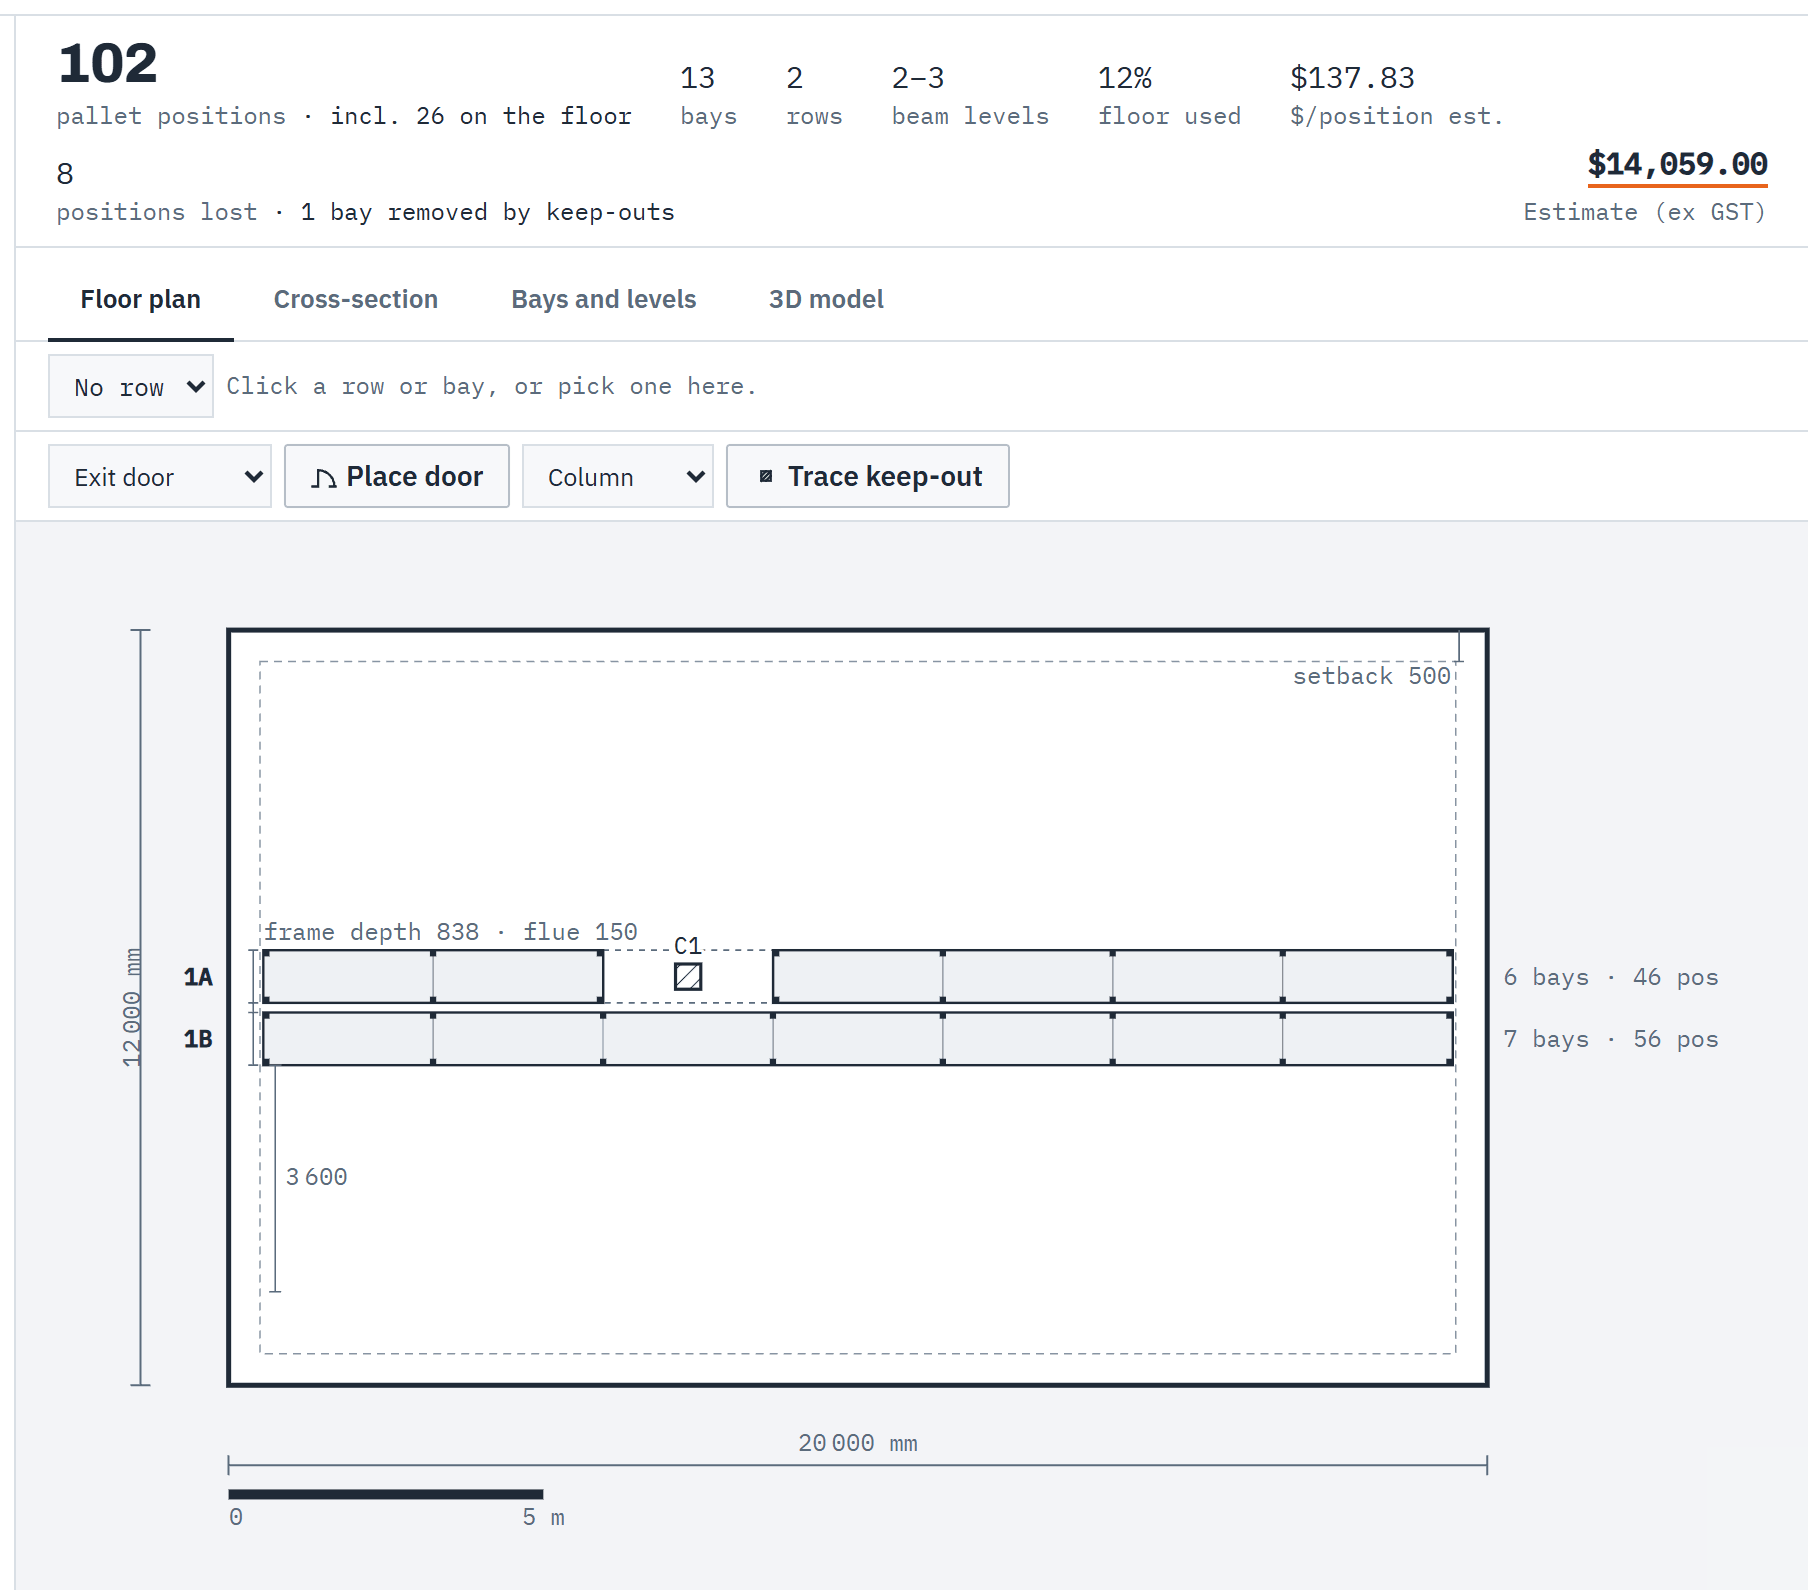
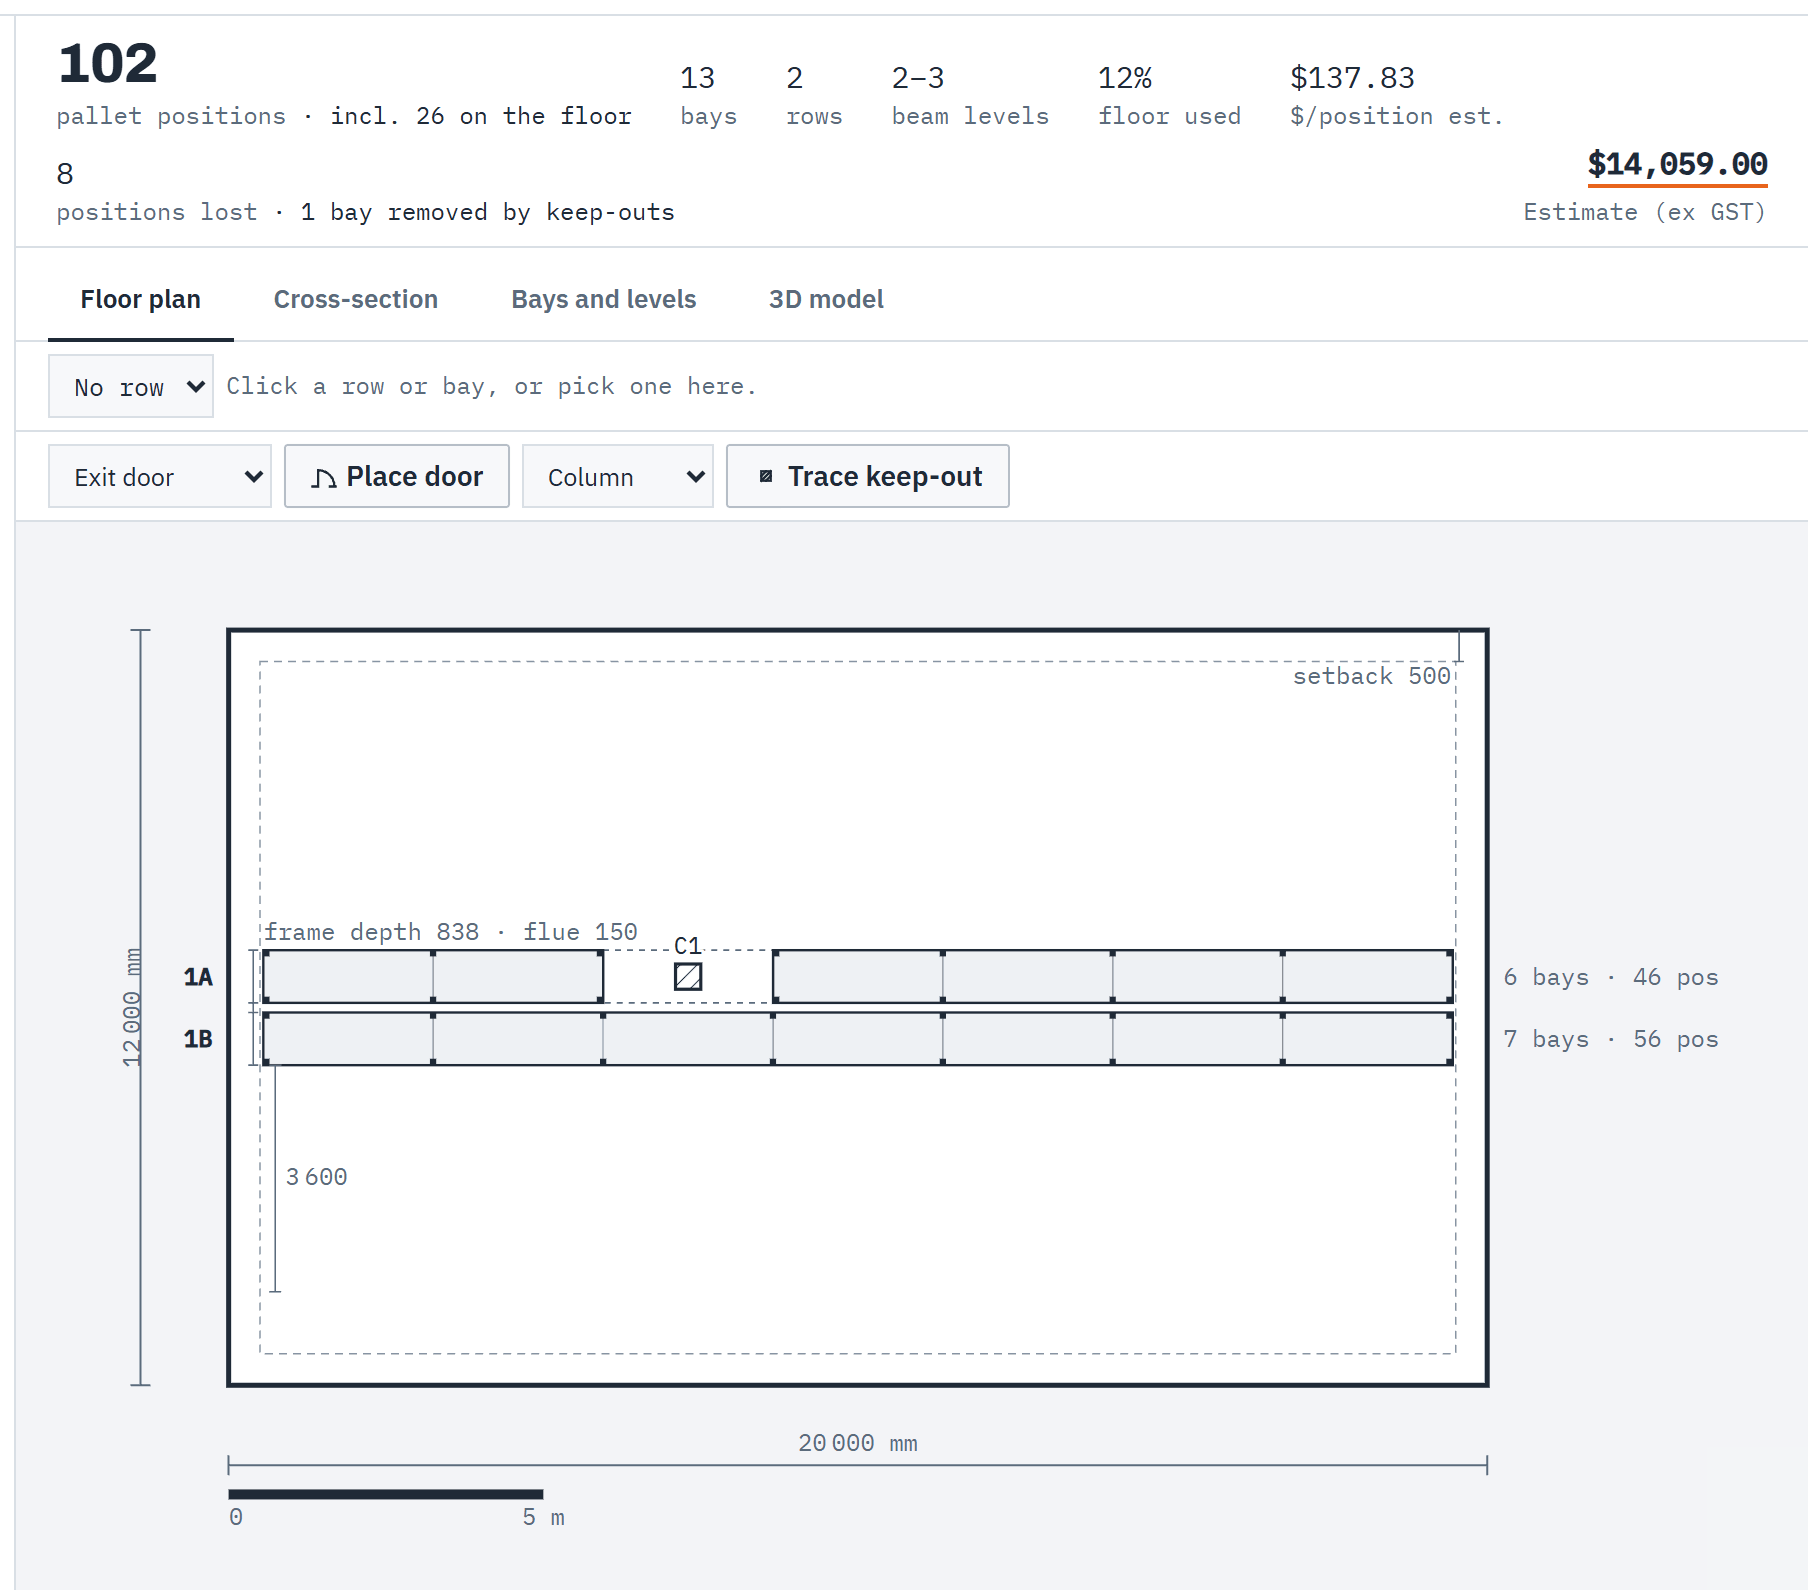
Each keep-out in the list says what it does, for example removes 2 bays. A bay goes when its footprint overlaps the keep-out or its clearance; touching an edge doesn't count. The rest of the row stays, split either side, and frames are counted for each run that's left. The stat strip adds positions lost, the pallet positions on the removed bays, with the number of bays removed. Summary lists every keep-out and the totals.
The floor plan, 3D model and your customer's proposal draw the keep-outs. Your labels stay in the designer: the proposal and online quote show the type only. Choose Edit to change a keep-out, or the delete button to remove it; Undo brings it back.
 (opens full size in a new tab)
The plan hatches each keep-out and outlines the bays it removes; the stat strip counts the positions lost. Step 23: Keep-out notes and warnings
A keep-out that removes no bays sits in an aisle, flue or setback, clear of every row. That's usually what you want for a building column, so it isn't a warning: Summary lists it under Notes (for example Column C1 sits clear of the racking) and it doesn't add to the warning count. Move it if the racking should stop there.
Keep-out outside the building is a warning: it appears when the building is made smaller after a keep-out was placed, and only the part inside still removes bays. Both offer Edit keep-outs, which opens Setup on the list.
Start from their drawing
In the warehouse designer you can lay the customer's floor plan under the layout, scale it to the floor, and trace columns, offices and dock zones straight off it. The drawing is a guide on your screen only: it never appears on the proposal or the online quote.
Step 24: Add the drawing to the project
Add it on the project page's Files card, or on Setup under Floor plan underlay (above Keep-outs) with Upload a file. Once the project has a drawing, the designer offers it above the plan: choose Use (with the file name) and Set scale opens. Or, on the Files card, choose Use as underlay next to the file. Nothing changes on the layout until you apply the scale. A drawing can be a PDF or an image (PNG, JPEG, WebP, or GIF, which is kept as a PNG) of up to 4 MB. For a PDF with several pages, choose the floor-plan page, for example Page 3 of 12.
A PDF over 4 MB can't be uploaded as it is: Baylogik offers to attach one page as an image instead, made on your computer. Or export just the floor-plan page from the drawing and upload that. Large photos are made smaller before they are sent.
Step 25: Set the scale and place the building
Choose Set scale. Zoom in with the buttons or the mouse wheel to place points precisely. First, click two points a known distance apart, such as the ends of a dimension line or two column centres, and type the Real distance in millimetres. The further apart the points, the more accurate the scale.
Then click the building's top-left inside corner, then its bottom-right. The dialog shows the size it measured, for example 64 200 × 38 400 mm. Leave Use as the floor size ticked to set the building's length and width from it. Apply places the drawing on the floor plan and locks it. It is measured from the drawing, so check key dimensions on site.
Step 26: Trace keep-outs off the drawing
Above the floor plan, pick the type beside Trace keep-out (Column, Office, Dock zone or Other), then choose Trace keep-out. Click one corner of the area, then the opposite corner; there's no dragging. The keep-out is added to the list on Setup in whole millimetres, says what it removes, and Undo takes it away again. Esc clears a first corner you've placed; press it again to stop tracing. Tracing works without a drawing too.
From the keyboard, the arrow keys move the crosshair (hold Shift for bigger steps) and Enter places a point. A traced keep-out is as accurate as the drawing and the screen allow: open it with Edit to type exact figures.
Step 27: Trace an L-shaped building
The warehouse floor is a rectangle. For an L-shaped building, set the building as the rectangle that encloses the whole L, then trace the missing corner as an Other keep-out. Racking stays out of it, and the layout counts only the floor you can use.
Step 28: Show, fade, lock or remove the drawing
Show underlay hides or shows the drawing; Opacity fades it so the racking stands out. While Lock underlay is on, the scale, the file and Remove underlay can't be changed, so a stray click can't move it. Unlock it to set the scale again. Every change can be undone.
If the file is deleted from the project, the designer says The underlay file is no longer in this project. Your layout and keep-outs are unaffected. Choose Remove underlay, which works even while it's locked. To use a different drawing instead, unlock the underlay to change its file.
If a save doesn't go through
Step 29: Read the save status
Couldn't save means the last change didn't reach Baylogik, and a bar under the header says why, for example Changes not saved: Couldn't reach the server. If the connection dropped, the designer tries again by itself and counts down, such as Couldn't save · retrying in 8s; choose Retry to try straight away. If the change itself was refused, fix it and your next change saves.
Step 30: Leave without losing work
If you choose Save and return or the back link while a save is failing, you stay put and a bar explains: Your latest changes aren't saved. Choose Retry, Leave without saving or Stay. Closing the browser tab with unsaved changes asks you first.
Step 31: Sort out a clash with a teammate
Unsaved changes means the layout was changed in another tab or by someone else since you opened it. Choose Reload to see their version, or Overwrite to replace it with yours.
Good to know
- Undo and Redo work with Ctrl Z and Ctrl Shift Z. Restoring a revision keeps the current layout as a revision named Before restore of ….
- If the browser closed mid-edit, the designer offers Restore unsaved changes the next time you open it in that tab.
- Capacity is never worked out from dimensions. A rating shows only where a manufacturer's figure has been loaded with its source, or comes from your own load table; otherwise the part says not certified and the proposal says the same. Engineering sign-off stays with the manufacturer or your engineer.
- The warehouse warnings on aisle width, run length and headroom compare the layout with your own settings under Defaults, for example Aisle is narrower than your house standard for counterbalance forklifts (3 600 mm, set in Defaults). They are your house standards, not a standard's minimums; egress is for the site's building certifier to confirm (in New Zealand, the building consent authority — the warnings name it when your workspace's tax country is New Zealand).
- Run lengths include the uprights: a run of 30 bays is 30 clear entries plus 31 upright widths. The width comes from the frame's catalogue entry, with its source and date, or from your own frame under My products; for a custom-size frame, enter it under Fine-tune. Baylogik never guesses it: a frame without one warns Upright width not set and the layout counts clear entries only. A design saved before upright widths existed updates when you next change it, with a notice such as Upright widths added — bays per row 24 → 23.
- With a Sprinkler deflector height on Setup → Building, the warehouse designer compares the top of the load (the highest beam level in use plus the Load height on the top level) with your Clearance below sprinkler deflectors under Defaults (500 mm to start) and warns Close to sprinklers. Without a load height it measures to the frame top, and says so. It's your house setting, not a sprinkler design: the warning asks you to verify with your fire engineer.
- A column or other keep-out standing in an aisle warns Walkway narrowed when the clear width beside it is less than your Walkway past columns and keep-outs setting under Defaults (1 000 mm to start), again a house setting for the site to confirm.
- In the warehouse designer, mark the building's exits, doors, docks and stairs under Doors and docks on Setup: racking stays out of each clear zone, and the designer checks routes to the exits against your house settings. See Doors, exits and docks.
- Mixing brands in one bay raises the AS 4084.2 Cl. 5.6.4 warning (non-OEM components).
- A frame and beam that share no compatibility group can't be picked together: choosing one clears the other with a notice naming both brands (The … beam was cleared — it isn't compatible with the … frame. Pick a beam again.). The server refuses a newly picked incompatible pair too; a pair saved before this check still saves, and shows the warning card.
- If a beam's length changes in your catalogue after the layout was drawn, the designer warns Beam length changed in your catalogue with a one-click fix, for example Use 2 700 mm.
- In the container designer, a Sides + back layout whose back-wall beams aren't the picked beam warns Back wall beams aren't the picked beam. The quote puts those beams on their own line, as a custom size, so it never bills them at the picked beam's length.
- With a catalogue beam picked, the right wall's and each island's Beam list offers the compatible catalogue beams and Custom length. Every beam length and frame size gets its own quote line and its own capacity row. A length with no catalogue beam is quoted as a custom size, never certified, at the Rate you enter; without a rate it reads Not priced and the quote can't be sent until it has one.
- A save that gets no answer within 30 seconds reads Save timed out · still waiting. The designer waits for that answer before trying again, so a slow save never shows as changed elsewhere.
- The estimate in the designer is a guide. The quote is priced on the server from your price list when you generate it. Changing the layout of a draft quote prompts you to regenerate it; a sent quote has to be revised. See Create and send a quote.
- Roles that can't change designs, and archived projects, open the designer read-only: the header says Read-only and the way out reads Back to ….
- Rooms over 20 000 × 12 000 mm are beyond container scale: use the warehouse designer, which has the same Setup, Fine-tune and Summary tabs. Its Summary lists any warnings in full, then the layout's rows, bays, pallet positions, shelf area and how much of the floor is used, and the estimate. On phones the designer is read-only, except the warehouse designer's Doors and docks list.
- The floor plan underlay is the warehouse designer's alone. Setting the scale and tracing need a desktop or laptop; on phones the drawing shows but can't be changed. Drawings turn in quarter turns only, so a skewed scan can't be straightened. Duplicating a project doesn't copy its files, so the copy starts without the underlay; its traced keep-outs stay.
- Further reading: the SafeWork NSW pallet racking fact sheet and forklift safety guidance, and WorkSafe Victoria's pallet racking operation and maintenance guidance. They're written for the businesses that run racking, and are worth passing on to your customers.
Related articles
- ProjectsFind a job, see its layout and quotes, and open it in the designer.
- Doors, exits and docksMark exits, docks and stairs in the warehouse designer, and read the route checks.
- Create and send a quoteGenerate, review and send a priced, branded proposal.
- Choose your catalogueEnable the brands you sell, and add your own frames, beams and services.
- Your own load tablesEnter manufacturers' load tables with their source and date, so your parts are rated from them (Team).